
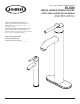
Installation Guide


5
CARE AND MAINTENANCE / CUIDADO Y MANTENIMIENTO
Clean periodically with a soft cloth. Avoid abrasive cleaners, steel wool, and harsh chemicals as these will dull the nish
and void your warranty.
Limpie periódicamente con un paño suave. Evite utilizar limpiadores abrasivos, lana de acero y químicos agresivos, ya
que pueden dañar el acabado y anular su garantía.
TROUBLESHOOTING / SOLUCIÓN DE PROBLEMAS
PROBLEM
PROBLEMA
POSSIBLE CAUSE
CAUSE POSIBLE
CORRECTIVE ACTION
ACCIÓN CORRECTIVA
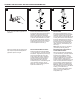
Leaks underneath handle. Bonnet has come loose or O-ring on cartridge is dirty or
twisted.
1. Move the handle to the OFF position. Loosen the handle
set-screw and remove the handle.
2. Tighten the bonnet by turning it clockwise. Move the
cartridge stem to the on position. The leak should stop
draining out from around the cartridge stem.
3. Shut off the water supply. Remove the bonnet by turning
it counter-clockwise. Lift out the cartridge valve. Inspect
the larger O-ring.
on the cartridge bonnet and the smaller O-ring on the
cartridge stem.Remove any debris from the O-rings. If
either O-ring is twisted, straighten it out. If either O-ring
is damaged, replace the cartridge by calling customer
service.
4. Position the cartridge back into the faucet body. Make
sure the ridges on the two sides of the cartridge bonnet
t into the grooves on the two sides of the faucet body.
Tightly screw the bonnet onto the faucet body.
5. Re-install the handle.
Hay goteras debajo de la
manija.
El bonete está ojo o la junta tórica del cartucho está
sucia o torcida.
1. Mueva la manija a la posición de apagado. Desator-
nille el tornillo de la manija y retire la manija.
2. Apriete el bonete girándolo en dirección de las
manecillas del reloj. Coloque el vástago del cartucho
en la posición de encendido. La fuga debe dejar de
drenar alrededor del vástago del
cartucho.
3. Si la fuga no se detiene, cierre el suministro de agua.
Retire el bonete girándolo en dirección contraria a las
manecillas del reloj. Levante la válvula del cartucho.
Inspeccione la junta tórica mayor del bonete del
cartucho y la junta tórica menor del vástago del
cartucho. Elimine todos los desechos de las juntas
tóricas. Si una de las juntas tóricas está torcida,
estírela. Si una de las juntas tóricas está dañada,
llame a Servicio al Cliente para reemplazar el
cartucho.
4. Vuelva a colocar el cartucho en el cuerpo del grifo.
Asegúrese de que los bordes de ambos lados del
bonete del cartucho encajen en las ranuras de ambos
lados del cuerpo del grifo. Atornille con rmeza el
bonete en el cuerpo del grifo.
5. Vuelva a instalar la manija.
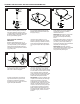
Water does not completely
shut off.
Rubber valve seat is dirty, stuck, or broken. 1. Shut off the water supply to the faucet that leaks.
2. Remove the handle on the problem side. Loosen the
bonnet by turning it counterclockwise. Lift out the
cartridge assembly.
3. Inspect the rubber valve seat in the faucet body. If there
is debris or brass scrap on the surface of the seat,
remove it. If the rubber seat is stuck tightly in the
water inlet hole, push it gently with a ngertip so that it
moves up and down smoothly. The spring (smaller end
up) must be replaced underneath the valve seat. If the
rubber valve seat is worn out or broken, replace the
cartridge by calling customer service.
4. Replace the cartridge in the faucet body. Make sure
that the ridges on the two sides of the cartridge
bonnet t into the grooves on the two sides of the
faucet body. Tightly screw the bonnet onto the faucet
body.
5. Re-install the handle.