SHOWER BASES INSTALLATION AND OPERATION INSTRUCTIONS Jacuzzi Luxury Bath 14525 Monte Vista Avenue Chino, CA 91710 1-800-288-4002 www.jacuzzi.
English Contents Contents........................................................................................................................................................................... 2 Product Information.......................................................................................................................................................... 2 Catalina™ Shower Base Specifications....................................................................................................
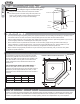
A A D D C English Catalina™ Shower Base Specifications C B B Center Drain (Threshold Side) Left And Right Hand Drain (Threshold Side) *Add 1/8” (3mm) for rough-in dimensions. Product Configuration Center Shower Base Part Number Marketing Product Code (MPC) Dimensions A B C D Weight MB96000 CAT4836 SCX XXX X 48” (1219mm) 36” (914mm) 17-3/16” (437mm) 24” (610mm) 50 lbs. (23kg) MB71000 CAT4848 SCX XXX X 48” (1219mm) 48” (1219mm) 23-3/16” (589mm) 24” (610mm) 55 lbs.
Cayman™ Tru-Level™ Shower Base Specifications English Threshold Side Threshold Side A* E A* F A B B G C C C D D H B D Rectangular Square Neo-Angle *Add 1/8" (3mm) for rough-in dimensions Product Configuration Square/ Center Drain Retangular/ Center Drain Neo-Angle/ Center Drain Shower Base Part Number MARKETING PRODUCT CODE (MPC) S344000 DIMENSIONS PRODUCT A B C D E F G H WEIGHT CAY3636SCXXXX 36" (914mm) 36" (914mm) 17.50" (445mm) 18.
1 Remove the shower base from the carton. Do not destroy the shipping carton until after satisfactory inspection of the product. Should initial inspection reveal any damage or defect in the shower finish, do not install the shower base. Jacuzzi® Luxury Bath’s responsibility for shipping damage ceases upon delivery of the product in good order to the carrier. Refer any claims of damage to the carrier. Any damage or defect claimed after installation is excluded from the warranty.
English Cayman™ Tru-Level™ Shower Base Installation Instructions The shower base does not include a shower drain, required to complete installation. Remove the shower base from the carton. Do not destroy the shipping carton until after satisfactory inspection of the product. Should initial inspection reveal any damage or defect in the shower finish, do not install the shower base.
CAUTION 5 Do not lift a corner to level the base. This will result in loss of contact with the mortar. Attach the shower base flange to the stud wall and blocking with the stainless-steel screws provided. Use a minimum of three screws per flange section, see Figure 8. If there is a gap between the base flange and the stud or blocking, a shim must be used to prevent distortion or cracking of the flange. CAUTION Use the stainless-steel screws provided.
Installation Procedures Continued (All Models) English CAUTION The weep holes are necessary to allow drainage Figure 12 from leakage through an unsealed tiled grout. Filling the area marked, Do Not Fill, will prevent moisture from draining back to the base through the weep holes, see Figure 12. Such moisture is due to leakage through the tile grout. Sealing the tile grout will prevent this leakage.
The Catalina™ Drain Cover is designed to fit snugly over the top of the recessed drain as illustrated (Figure 13). English Catalina™ Drain Cover Installation and Removal Instructions Figure 13 To Install Drain Cover Position the Drain Cover over the top of the recessed shower base drain area. Make sure the four Drain Cover Clip Legs line up with the four strainer slots as illustrated (Figure 14A) before pressing downward to snap it into place.
English Notes: Page 10 www.jacuzzi.
WARRANTY COVERAGE Jacuzzi Luxury Bath (the “Company”) offers the following express limited warranty to the original purchaser of any Jacuzzi Luxury Bath Shower System product (“unit”) who purchases the product for personal or single family use (“user”). The Company will repair or replace, at its option, the unit or its equipment in accordance with the following terms and conditions. Units in commercial use are excluded from any warranty coverage whatsoever.
RESPONSIBILITIES OF OTHERS Inspecting the unit prior to installation is the responsibility of the installer or building contractor who acts on behalf of the user. They are responsible for ensuring the unit is free of defect or damage. Notices are placed on and in the unit and on the shipping carton advising the installer of this responsibility. In the event of a problem, the unit must not be installed.
Espanõl BASE PARA DUCHA INSTRUCCIONES DE INSTALACION Jacuzzi Luxury Bath 14525 Monte Vista Avenue Chino, CA 91710 1-800-288-4002 www.jacuzzi.com Jacuzzi® Base para Ducha: Instalación y Operación www.jacuzzi.
Série Signature Contenido Contenido . . . . . . . . . . . . . . . . . . . . . . . . . . . . . . . . . . . . . . . . . . . . . . . . . . . . . . . 14 Conserve estas instrucciones para uso futuro . . . . . . . . . . . . . . . . . . . . . . . . . . . . . . . . . . . . 14 Especificaciones de la base para ducha Catalina™ . . . . . . . . . . . . . . . . . . . . . . . . . . . . . . . . .
Especificaciones de la base para ducha Catalina™ A A D D C Espanõl C B B Desagüe central (Lado del umbral) Desagüe izquierdo y derecho (Lado del umbral) *Agregue 1/8” (3mm) para las dimensiones preliminares. Configuración del producto Número de pieza de la base para ducha Código de venta del producto (MPC, por sus siglas en inglés) MB96000 Dimensiones A B C D Peso del Producto CAT4836 SCX XXX X 48” (1219mm) 36” (914mm) 17-3/16” (437mm) 24” (610mm) 50 lbs.
Especificaciones de la base para ducha Cayman™ Tru-Level™ Lado Umbral Lado Umbral A* E A* F A B B G C C Espanõl C D D H B D Rectangular Cuadrado Neo-Angular *Añada 1/8” (3mm) en las dimensiones del bosquejo para la instalación. *Añada 1/8” en las dimensiones del bosquejo para la instalación.
1 Retire la base para ducha de la caja. No destruya la caja de envío hasta que haya realizado una inspección satisfactoria del producto. En caso de que la inspección inicial revele algún daño o defecto en el acabado, no instale la base para ducha. La responsabilidad de Jacuzzi Luxury Bath por daños durante el transporte finaliza contra entrega del producto en buen estado al transportista. Presente sus reclamos por daños al transportista.
Espanõl Instrucciones de instalación de la base para ducha Cayman™ Tru-Level™ 1 La base para ducha no incluye el desagüe, que se requiere para completar la instalación. Quite la base de ducha del cartón. No destruya el cartón de empaque hasta que la inspección sea satisfactoria del producto. Si la inspección inicial muestra cualquier daño o defecto en el superficie, no lo installarle. La responsabilidad de Jacuzzi Luxury Bath termina con la entrega del producto en buena condición al portador.
Procedimientos de instalación - Continuación (Todos los modelos) PRECAUCIÓN Pegar un extremo de la base al pared de pie derecho y asegurala con con los tornillos proveídos. Utilizar un mínimo de tres tornillos por sección del frente, ver la Figura 8. Si hay espacio libre entre la brida y el pie derecho, usar una láminilla debe ser usado para prevenir la deformación o agrietamiento del frente. PRECAUCIÓN Utilizar los tornillos de acero inoxidable incluidos.
Procedimientos de instalación - Continuación (Todos los modelos) PRECAUCIÓN Figura 12 Los agujeros de desagüe son necesarios para dirigir cualquiera fuga de aqua posible. Azulejo Pared de cemento Llenando la área marcada, Do Not Fill (No Llenarse), va a prevenir el agua pasar por los agujeros de desagüe, ver Figura 12. Tal humedad es debido a la salida por la lechada de azulejo. Es necesario dirigir la humedad por los agujeros.
Instrucciones de instalación y extracción de la tapa del desagüe de la base Catalina™ El diseño de la tapa del desagüe de la base Catalina™ permite que se adapte perfectamente a la parte superior del desagüe empotrado, como muestra la Figura 13. Figura 13 Para instalar la tapa del desagüe Espanõl Coloque la tapa del desagüe por encima de la parte superior del área de la base para ducha empotrada.
Espanõl Notas: Page 22 www.jacuzzi.
Garantía Limitada de Tinas de Jacuzzi Luxury Bath Producto Base para Ducha COBERTURA DE LA GARANTÍA Jacuzzi Luxury Bath ( la "Compañía") ofrece la siguiente garantía limitada expresa a los compradores originales de cualquier producto de los sistemas de baños de ducha de Jacuzzi Luxury Bath Builder Group Bath Product ("unidad") que compren el producto para uso personal o de una sola familia ("usuario").
RESPONSABILIDAD DE TERCEROS Es responsabilidad del instalador o del contratista constructor que actúen en nombre del usuario realizar una inspección de la unidad antes de instalarla. Ellos son responsables de asegurarse de que la unidad no tiene defectos ni daños. Se ponen avisos en la unidad y en la caja que la contiene para advertir al instalador sobre esta responsabilidad. En caso de que haya algún problema, no debe instalarse la unidad.
Français BASES DE DOUCHE CONSIGNES D’INSTALLATION ET D’UTILISATION Jacuzzi Luxury Bath 14525 Monte Vista Avenue Chino, CA 91710 1-800-288-4002 www.jacuzzi.com Installation et utilisation de la base de douche www.jacuzzi.
Table des matières Table des matières......................................................................................................................................................... 26 Renseignements sur le produit ...................................................................................................................................... 26 Caractéristiques des bases de douche CatalinaMC.......................................................................................................
Caractéristiques des bases de douche CatalinaMC A A D D C C B B Évacuation à gauche/à droite (côté seuil) Français Évacuation centrée (côté seuil) *Ajoutez 0,125 po (3mm) pour connaître les dimensions de disposition des tuyaux. Configuration du produit Évacuation centrée Évacuation à gauche/à droite Numéro de pièce de la base de douche Code produit marketing (MPC) Dimensions A B C D Poids MB96000 CAT4836 SCX XXX X 48” (1219mm) 36” (914mm) 17-3/16” (437mm) 24” (610mm) 50 lbs.
Caractéristiques des bases de douche CaymanMC Tru-LevelMC Threshold Side Threshold Side A* E A* F A B B G C C C D D B D Rectangular Square H Neo-Angle Français *Ajoutez 0,125 po (3mm) pour connaître les dimensions de disposition des tuyaux.
1 Retirez la base de douche de son emballage. Ne détruisez pas le carton de livraison tant que vous n’avez pas vérifié le bon état du produit. Si l’inspection révèle des dommages ou des défauts dans le fini de la douche, n’installez pas la base de douche. La responsabilité de Jacuzzi Luxury Bath quant aux dommages causés par l’expédition prend fin au moment de la livraison au transporteur de produits en bon état. Communiquez avec le transporteur pour toute réclamation pour des dommages.
Français Consignes d'installation pour les bases de douche CaymanMC Tru-LevelMC 1 La base de douche ne dispose pas d'une évacuation de douche, un élément nécessaire pour que l'installation soit complète. Retirez la base de douche de son emballage. Ne détruisez pas le carton de livraison tant que vous n'avez pas vérifié le bon état du produit. Si l'inspection révèle des dommages ou des défauts dans le fini de la douche, n'installez pas la base de douche.
Consignes d'installation - Suite (tous les modèles) MISE EN GARDE Ne levez pas un coin pour niveler la base. Le mortier risquerait de ne plus être en contact. 5 Fixez la bride de la base de douche au poteau d'ossature murale et bloquez-la à l'aide des vis en acier inoxydable fournies. Utilisez au moins trois vis pour chaque partie de la bride (voir la Figure 8).
Procédures d'installation - Suite (tous les modèles) MISE EN GARDE Les trous d'évacuation sont nécessaires pour évacuer les fuites par l'intermédiaire d'un coulis à carreaux non scellé. Figure 12 Carreau Panneau de ciment 9 Le remplissage de la zone « NE PAS REMPLIR » empêchera l'humidité de refluer vers la base par l'intermédiaire des trous d'évacuation (voir la Figure 12). Cette humidité est due à l'eau fuyant à travers le coulis à carreaux.
Instructions d’installation et de retrait du couvercle d’évacuation CatalinaMC Le couvercle d’évacuation CatalinaMC est conçu pour pouvoir être posé de façon stable sur l’évacuation encastrée, comme illustré par la Figure 13. Figure 13 Installation du couvercle d’évacuation Placez le couvercle d’évacuation sur le haut de l’espace d’évacuation encastré de la base de douche.
Français Remarques: Page 34 www.jacuzzi.
Garantie limitée de Jacuzzi Luxury Bath Système de douche COUVERTURE DE LA GARANTIE Jacuzzi Luxury Bath (« l’Entreprise ») offre la garantie limitée expresse suivante à l’acheteur original d'un système de douche Jacuzzi Luxury Bath (« l'unité ») qui a acheté ce produit pour un usage personnel ou unifamilial (« l'utilisateur »). L’Entreprise réparera ou remplacera, à son entière discrétion, l'unité ou son équipement conformément aux conditions et modalités suivantes.
RESPONSABILITÉS DES AUTRES Il incombe à l’installateur ou à l’entrepreneur agissant au nom de l’utilisateur d'inspecter l’unité avant de l’installer. Celui-ci doit s’assurer que l’unité ne présente aucun défaut ou dommage. Des avis sont placés sur et dans l’unité ainsi que sur la boîte d’expédition avisant l’installateur de cette responsabilité. En cas de problème, l’unité ne doit pas être installée.