
Installation Guide


Detailed Installations Instructions
Important: Read complete instructions before beginning installation.
Each shower base is shipped with a shower drain and stainless steel strainer. An optional bright brass strainer
isavailable for installation on the drain assembly.
Remove the shower base from the carton. Do not destroy the shipping carton until after satisfactory inspection
of the product.
Immediately upon receipt, inspect the base before installing. Should inspection reveal any damage or defect in the
finish, do not install the base. Damage or defect to the finish claimed after the base is installed is excluded from the
warranty. Jacuzzi Whirlpool Bath’s responsibility for shipping damage ceases upon delivery of the products in good
order to the carrier. Refer any claims for damage to the carrier. For definitions of warranty coverage and limitations,
refer to the published warranty information packaged with the product. Jacuzzi Whirlpool Bath is not responsible for
any defect that could have been discovered, repaired, or avoided by following this inspection and testing procedure.
Plan the installation in relation to the finished wall surfaces. Take into account the dimensions of both the shower base
and the shower door enclosure to be used with it. Install the optional trim parts when all other installation has been
completed.
4
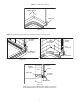
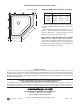
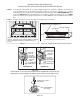
Provide an opening in the subfloor no less than 5" x 5" square. This opening should be located on the center lines
of the shower base drain hole (See Product Chart).
The opening is to accommodate a 2" waste pipe. The waste pipe should be 1/4" to 1/2" above the surface of the
subfloor.
PRELIMINARY ROUGH-IN
90°
C
L
SQUARE OR RECTANGULAR
5"x5" OPENING (MIN. AS POSSIBLE)
90°
C
L
C
L
2" WASTE PIPE
(SEE PRODUCT CHART FOR DRAIN LOCATION)
NE0-ANGLE
90°
2"x4" BLOCKING
7"
90°
90°
90°
7" FROM SUBFLOOR
TO TOP OF BLOCKING
7"
(SEE PRODUCT CHART FOR DRAIN LOCATION)
5"x5" OPENING (MIN. AS POSSIBLE)
2" WASTE PIPE
2"x4" BLOCKING
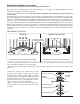
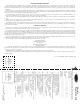
STRAINER
DRAIN
ASSEMBLY
SILICONE
SEALANT
SHOWER BASE
RUBBER WASHER
FIBER WASHER
NUT
APPLY LUBRICANT
Remove the stainless steel strainer from the drain
assembly. Disassemble the locknut and two gaskets
from the back of the drain assembly. Apply a 1/4" bead
of caulking (silicone) to the drain hole and insert the drain
assembly. Replace the rubber washer, fiber washer,
and lock nut in that order. Hand tighten the locknut.
Remove excess sealant from finished side.
Apply a lubricant (common household liquid soap
works well) to the inside of the rubber seal of the drain
assembly.