INSTALLATION INSTRUCTIONS Jacuzzi Luxury Bath 14525 Monte Vista Avenue Chino, CA 91710 1-800-288-4002 www.jacuzzi.
English Installation Table of Contents Product Information.......................................................................................................................................................... 2 Important Safety Instructions............................................................................................................................................ 3 Inspection and Testing.....................................................................................................
Installation Important Safety Instructions English This is a professional grade product. A working knowledge of construction techniques, plumbing and electrical installation according to codes are required for proper installation and user satisfaction. We recommend that a licensed contractor perform the installation of all Jacuzzi® products. Our warranty does not cover improper installation related problems. READ AND FOLLOW ALL INSTRUCTIONS. SAVE THESE INSTRUCTIONS.
English Installation Important Safety Instructions (cont.) WARNING! RISK OF SEVERE INJURY! To avoid injury, use care when entering and exiting the hydromassage bathtub CAUTION! Do not use drugs or alcohol before or during the use of a hydromassage bathtub equipped with a heater. People using medications or having an adverse medical history should consult a physician before using a hydromassage bathtub equipped with a heater. Possible drowning may occur.
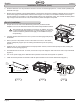
English Installation Framing and Support READ ALL INSTALLATION INSTRUCTIONS COMPLETELY. IMPROPER INSTALLATION WILL VOID THE WARRANTY. The floor structure beneath the bathtub must be able to support the total weight of the bathtub, water and bather. Consult a structural engineer. IMPORTANT! Make sure that walls and floors meet fire safety requirements of local building code and/or FHA/HUD Minimum Property Standards. Observe all governing codes and ordinances. 1.
English Installation Framing and Support (cont.) Subfloor Prepare the subfloor for the drain and ensure that the area is level. 1. The drain/overflow of the bathtub extends below the bottom of the bathtub. Identify the drawing in the Technical Specifications Manual that corresponds with your bathtub. 2. Make appropriate cuts to the subfloor to accommodate the drain. 3. The Jacuzzi Tru-Level® base is a standard feature on all bathtubs.
English Installation Chromatherapy Operation G • Press once to activate color lighting. • Press a second time to activate solid White color. • Press a third time to turn OFF. NOTE: The Up and Down buttons can be used to select colors or intensity. • Press button to activate the color blending feature. • Light sequence is as follows: Blue, Teal, Green, Yellow, Orange, Red, Pink, Purple. • To select a solid color press the Up button when the color is displayed.
English Installation Installation Procedures (cont.) 3. Sufficient clearance must be provided for access to service connections (pump/motor, controls, heater plumbing and electrical hook ups). 4. Bottom support materials: Casting plaster/plaster of paris (herein referred as foundation materials) are not necessary but its use is highly recommended for a firmer bottom support. In a bucket, mix foundation material.
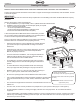
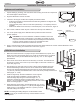
English Installation Installation Procedures (cont.) Undermount Installation 1. Inspect all fittings, plumbing, and control lines after inserting to ensure the components are not damaged or disconnected. A B C 2. Align the bathtub and connect the drain. 3. Cut deck to fit using the undermount template provided as follows: • Position the template so that the desired undermount guidelines are aligned with the rim edge as shown. • Using a grease pencil, mark the center lines (denoted by CL on template).
English Installation Installation Procedures (cont.) 6. Spot-fasten the two bottom corners and the two top corners of the vertical side nailing flange. 7. Nail/fasten at each stud through the topside flanges at each stud 16" (405 mm) on center, working from both ends toward back center. Complete the fastening through vertical side flange, approximately 8" (205 mm) on center. Finish Surface Concrete Board 8.
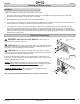
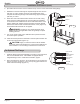
English Installation Installation Procedures (cont.) Bathtubs with Optional Skirt Finishing Materials 1. Screw skirt flanges into wall studs, Figure 14. Caulking Bead It may be necessary to shim the unit to close any gaps between wall studs and the flanges. Mounting Screws (as viewed from inside the enclosure) 2. Complete finish work over skirt flange. Skirt Panel 3. Caulk around the perimeter of the skirt to seal the space between the skirt and the finished deck. Fig.
English Installation Cleanup After Installation To avoid dulling and scratching the surface of the bathtub, never use abrasive cleaners. For most soiled surfaces, a mild liquid detergent and warm water is sufficient. The following is also recommended: • • • • Remove spilled plaster with a wood or plastic edge. Spots left by plaster or grout can be removed if lightly rubbed with detergent on a damp cloth or sponge.
Installation Authorized Service English If you need a referral for a service company near you, or need assistance with operation or maintenance-related questions, please call our Service Support Department at 1-800-288-4002. Visit our web site at http://www.jacuzzi.com/ for products, services, and an online copy of these Installation and Operation Instructions. When requesting service or technical assistance please have available both the model and serial number of your unit.
Installation English Warranty Limited Lifetime Warranty on Jacuzzi® Branded Baths for the Comfort, and Luxury Collections WARRANTY COVERAGE Jacuzzi Luxury Bath (the “Company”) offers the following expressed limited lifetime warranty to the original purchaser of any Jacuzzi Luxury Bath products provided in the Company’s Comfort and Luxury collections ("Bath") who purchases the Bath for personal or single family residential use (“User”): The Company will repair or replace, at its sole option, the Bath or its
Installation Warranty Limited Lifetime Warranty on Jacuzzi® Branded Baths for the Comfort, and Luxury Collections (cont.) English RETURN OF WARRANTY REGISTRATION To register your product, please go to our website Jacuzzi.com, click on Bath and Showers, then select ONLINE WARRANTY REGISTRATION from the top of the page. You will then be prompted to enter your product Serial Number followed by your warranty registration information.
14525 Monte Vista Avenue Chino, California 91710 Jacuzzi Luxury Bath
WARRANTY REGISTRATION CARD To complete your registration, visit our website at www.jacuzzi.com or fill out and mail this card to the address printed on the other side within thirty (30) days from date of purchase in order for this warranty to become effective.