
Installation Guide


Installation
English
www.jacuzzi.com Page 11
Installation Procedures (Continued)
Undermount Installation
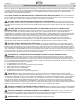
1. Inspect all ttings, plumbing, and control lines after inserting to ensure the
components are not damaged or disconnected.
2. Align the bathtub and connect the drain.
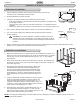
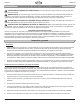
3. Cut deck to t using the undermount template provided as follows:
• Position the template so that the desired undermount guidelines are aligned with
the rim edge as shown.
• Using a grease pencil, mark the center lines (denoted by
L
C
on template). Remove
template.
• Measure the distance from the wall, or other xed point, to the center lines (Figure 12).
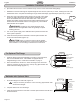
4. Afx counter to bathtub. Clean any dirt or debris from the top of the bathtub rim.
5. Turn on the power supply to the dedicated GFCI-protected circuits and check
system operation.
CAUTION! Do not use an adhesive or adhesive sealant to secure the
bathtub to the deck. If maintenance or remodeling is required, the deck
may have to be removed. Adhesive will permanently bond the bathtub to
the deck.
6. Apply a continuous bed of silicone sealant around the entire seam between the counter and the bathtub rim. Allow
sealant to cure according to manufacturer’s instructions (Figure 13).
3-Wall Alcove Installation
1. Make sure framed-in alcove is of proper size per Jacuzzi dimensions, square, and
plumb; check oor for levelness (Figure 14). Rough-in should be kept to a minimum
until the unit is on the job site. Measurements may vary +0 or -¼" from original
specications.
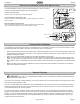
2. Place the tub in the alcove with the front skirt rmly on the oor. The bathtub must
be set level. To check, use a level on top of the ledges on both ends of tub and on
top of dam (Figure 15).
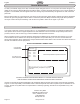
3. After leveling tub, mark each stud (concrete or block wall)
immediately above the back horizontal ange. Remove
tub from alcove. Measure the distance between the top of
the back horizontal ange and the bottom of the tub ledge
approximately 1½" (40 mm). Carefully mark this dimension
on the back studs (or wall), below the rst mark (Figure 15 -
inset).
4. Install a Ledger Strip: Jacuzzi mandates the use of supports
under the rear ledges of bathtubs to prevent shifting. Use
horizontal ledger strip along the entire rear ledge or “I”, “T”
supports in at least two places in vertical position. Nail a 1" x
3" (25 mm x 75 mm) ledger strip immediately below the lower
marks made on framing (Figure 15 - inset).
5. When fastening wood framing, pre-drill anges with a ⅛" (5
mm) carbide bit and fasten using #8 x 1-½" (38 mm) self-
tapping sheet metal screws; to concrete/block walls use 1" (25
mm) concrete nails with nailing tool or impact.
NOTE: Pre-drilling the nailing anges is recommended to avoid cracking of the acrylic unit. Silicone the top of each fas-
tener to insure water tightness.
Template
Counter
A
B
C
D
Fig. 12
Fig. 13
Template
Bathtub Rim
Seal with
silicone sealant
Level
Fig. 14
Top of
Ledger
Strip
Ledger
Board
1,50”
Fig. 15