SALON™ SPA BATH SERIES INSTALLATION AND OPERATION INSTRUCTIONS Jacuzzi® Luxury Bath 14525 Monte Vista Avenue Chino, CA 91710 1-800-288-4002 www.jacuzzi.
English Salon™ Spa Bath Page 2 www.jacuzzi.
Salon™ Spa Bath Contents........................................................................................................................................................................... 3 Product Information.......................................................................................................................................................... 3 Safety instructions.......................................................................................................................
Salon™ Spa Bath Safety instructions English INSTRUCTIONS PERTAINING TO A RISK OF FIRE, ELECTRIC SHOCK, OR INJURY TO PERSONS. This is a professional grade product. A knowledge of construction techniques, plumbing and electrical installation according to codes are required for proper installation and user satisfaction. We recommend that a licensed contractor perform the installation of all Jacuzzi® Luxury Bath products. Our warranty does not cover improper installation related problems.
Salon™ Spa Bath WARNING: WARNING: WARNING: RISK OF HYPERTHERMIA AND POSSIBLE DROWNING! Do not use a hydromassage bathtub equipped with a heater immediately following strenuous exercise. RISK OF ELECTRICAL SHOCK! Do not permit electrical appliances (such as a hair dryer, lamp, telephone, radio or television) within 60˝ (1524mm) of this hydromassage bathtub. Do not operate hydromassage system unless the bath is filled with water to at least 1-2˝ (25-51 mm) above the highest jet.
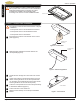
Salon™ Spa Bath English Inspection and Testing Visual Inspection 1 Remove the bathtub from the shipping carton. Be careful not to scratch the surface of the bathtub on exposed staples. Remove the staples or fold them into the carton. Retain the carton until satisfactory inspection of the product has been made. Do not lift the bathtub by the plumbing at any time; handle by the shell only. 2 Inspect the shell and bathtub components.
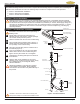
Salon™ Spa Bath Frame out the space where the bathtub is to be located. The following should be taken into consideration when preparing the area: • • • • • • • Common Access Locations Dimensions provided on rough-in diagrams are nominal. Measure your actual unit upon receipt and build according to the actual dimensions. The floor structure beneath the bathtub must be able to support the total weight of the bathtub, water and bather.
Salon™ Spa Bath Framing (con’t) English • To ensure the installer has space to maneuver and install the bathtub, allow adequate wall and ceiling clearance (Figure 3).
Salon™ Spa Bath The additional design features of the Fuzion™ require that the following steps be completed prior to installing the bathtub in the constructed surround.
Salon™ Spa Bath Fuzion™ Frame Installation English If you are installing a Fuzion™ bathtub with accessory frame, please refer to the Fuzion™ Frame Installation Guide (#GL44000) before proceeding any further. Complete the installation and assembly steps according to the Fuzion™ Frame Installation Guide.
Salon™ Spa Bath Electrical Connections English Risk of electric shock. Connect only to a circuit protected by a GFCI. When using electrical products, basic precautions should always be followed: • • Always follow local building and electrical codes. Grounding is required. The unit should be installed and grounded by a qualified electrician. Two separate GFCI protected circuits are required. A separate, 240VAC, 20 Amp GFCI circuit is required for the heater and pump/motor.
Salon™ Spa Bath Reference Illustrations English These illustrations are for reference only, as the unit comes fully assembled. Risk of electric shock. Before servicing these connections, disconnect all power supply cables to both 120VAC service and 240VAC service.
Salon™ Spa Bath Drop-in Installation • • • • Observe all local and building codes. Determine which tools will be used during the installation. Additional bathtub drain parts and plumbing are commercially available at plumbing and hardware stores. Drain/Overflow rough-in information is included with your bathtub in the installation instruction manual. Complete the bathtub surround installation (Figure 8). 1 Install drain/overflow according to the manufacturer’s instructions.
Salon™ Spa Bath Drop-in Installation (con’t) English 8 Install the unit, inserting the equipment- end first, lowering the bathtub into the opening as shown in the illustration (Figure 10). Scrap Lumber 2˝ (50mm) Max Thickness DO NOT use plumbing fixtures or lines to lower the unit. Allow the bathtub to rest on the supports.
Salon™ Spa Bath Undermount Installation Install drain/overflow according to the manufacturer’s instructions. Template English 1 Watertight installation of the drain is the installer’s responsibility. Drain leakage is excluded from the Jacuzzi Luxury Bath warranty of this product. 2 Turn off power supply to dedicated GFCI protected circuits. 3 Install the unit in desired location. DO NOT use plumbing fixtures or lines to carry or lower the unit.
Salon™ Spa Bath English General Operation Information All bathtubs manufactured by Jacuzzi Luxury Bath are designed for “fill and drain,” which means the bathtub should be drained after each use and filled with fresh water by the next bather. This is a health precaution, as these bathtubs are not designed to hold water continuously like pools or spas. Jet Two control panel types are available for the Luxury Salon Spa series.
Salon™ Spa Bath Increase Speed Press the (+) button to increase blower speed. • • • • English There are 8 blower intensities. Each push and release of the (+) button will increase blower intensity through 8 incremental steps. The indicator lights display intensity of blower power.
Salon™ Spa Bath English Pulse Mode With the blower ON, press the pulse button to cycle between off and a user defined maximum. The blower will cycle on (1.5 seconds) to the user defined maximum (1.5 seconds). All four indicator lights will blink. To turn off pulse mode, press the (pulse) button. Press the (+) or (-) button while in pulse mode to set the maximum intensity level from 50%-100%. There is a 5 second delay after adjusting the maximum intensity level before changes are observed.
Salon™ Spa Bath ON: Press the jet button once to turn the whirlpool jets ON. The whirlpool motor will be on high speed. The indicator lights at left will illuminate brightly. English Whirlpool Operation Jet OFF: Press the jet button a second time to turn the whirlpool jets OFF.
Salon™ Spa Bath English Wave Mode Press the wave button to cycle the air flow in the jets from maximum to no air flow. If the wave mode does not initiate, ensure that you are in whirlpool operation mode (lights immediately to the left of the jet button should be brightly lit). Both right and left air valves are cycled simultaneously from a closed position (no air) to open. The indicator lights will display the flow as it cycles from minimum to maximum. To turn off wave mode, press the (wave) button.
Salon™ Spa Bath Controlling the Waterfall Turning ON... Turning OFF... English The waterfall can only be activated when the whirlpool pump is in operation. The more the waterfall control knob is turned in a counterclockwise direction, the flow of water will increase.
Salon™ Spa Bath English Maintenance To clean your bathtub, simply use a mild, nonabrasive liquid detergent solution. You can protect and restore the gloss to a dulled acrylic surface by applying Meguiar’s #10 Mirror Glaze, a product specifically designed for use on acrylic finishes. If Meguiar’s is not available, use a fine grade automotive rubbing compound followed by an application of automotive paste wax. Never use abrasive household cleaners on any Jacuzzi Luxury Bath product.
Salon™ Spa Bath Troubleshooting Procedures PROBABLE CAUSES Pump/motor faulty Reset GFCI Insert plug securely into outlet Ensure control panel is connected to control box Contact Jacuzzi Luxury Bath @ 800-288-4002 Pump/motor operates but no fully adjustable jets are functioning Jets are closed Open jets by rotating counter-clockwise Suction cover/strainer may be clogged With the motor turned OFF, remove the suction cover/ strainer and remove any debris.
Salon™ Spa Bath English Authorized Service If you need a referral for a service company near you, or need assistance with operation or maintenance-related questions, please call our Service Support Department at 1-800-288-4002. Visit our web site at http://www.jacuzzi.com/ for products, services, and an online copy of these Installation and Operation Instructions. When requesting service or technical assistance please have available both the model and serial number of your unit.
Limited Lifetime Warranty Salon™ Spa Bath Warranty on Jacuzzi Luxury Branded Baths for the Comfort, Comfort Plus, Pure Air®, Luxury, Salon™ Spa, and Pure Air® II Collections Jacuzzi Luxury Bath (the “Company”) offers the following expressed limited lifetime warranty to the original purchaser of any Jacuzzi® Luxury Bath products provided in the Company’s Comfort, Comfort Plus, Pure Air®, Pure Air® II, and Luxury™ collections ("Bath") who purchases the Bath for personal or single family residential use (“Us
RETURN OF WARRANTY REGISTRATION Salon™ Spa Bath To register your product, please go to our web-site Jacuzzi.com, click on Bath and Showers, then select ONLINE WARRANTY REGISTRATION from the top of the page. You will then be prompted to enter your product Serial Number followed by your warranty registration information. Or you may also register by completing the registration below and mailing it to jacuzzi at the address provided below.
English Salon™ Spa Bath SALÓN™ DE BAÑERA DE HIDROMASAJE SERIE INSTRUCCIONES PARA LA INSTALACIÓN Y EL FUNCIONAMIENTO Jacuzzi® Luxury Bath 14525 Monte Vista Avenue Chino, CA 91710 1-800-288-4002 www.jacuzzi.com HD91000 and Operation Installation www.jacuzzi.
English Salon™ Spa Bath Page 28 www.jacuzzi.
Salón™ Salon™ de SpaBañera Bath de Hidromasaje Contenido....................................................................................................................................................................... 29 Información del producto................................................................................................................................................ 29 Instrucciones de seguridad.......................................................................................
Salón™ de BañeraSalon™ de Hidromasaje Spa Bath Instrucciones de seguridad Español English INSTRUCCIONES RELATIVAS A RIESGOS DE INCENDIO, DESCARGAS ELÉCTRICAS O LESIONES A PERSONAS. Éste es un producto de calidad profesional. Se requieren conocimientos de técnicas de construcción, fontanería e instalación eléctrica conforme a los códigos para la instalación apropiada y la satisfacción del usuario.
Salón™ Salon™ de SpaBañera Bath de Hidromasaje ADVERTENCIA: RIESGO DE HIPERTERMIA Y POSIBLE AHOGAMIENTO! No utilice una bañera de hidromasaje con calentador inmediatamente después de realizar ejercicios físicos extenuantes. ADVERTENCIA: RIESGO DE DESCARGA ELÉCTRICA No utilice electrodomésticos como secadores de pelo, lámparas, teléfonos, radios o televisores dentro de un radio de 60 pulgadas (1524 mm) de esta bañera de hidromasaje.
Salón™ de Bañera de Hidromasaje Salon™ Spa Bath Español English Inspección y prueba Inspección visual 1 Retire la bañera de la caja de envío. Tenga cuidado de no rayar la superficie de la bañera con las grapas expuestas. Retire las grapas o pliéguelas hacia el interior de la caja. Conserve la caja hasta que la inspección del producto haya sido satisfactoria. Nunca levante la bañera sujetándola por la fontanería; solo hágalo por el armazón. 2 Inspeccione el armazón y los componentes de la bañera.
Salón™ Spa de Bañera Salon™ Bath de Hidromasaje Enmarque el espacio donde colocará la bañera. Al preparar el área deberá tener en cuenta lo siguiente: • • • • • • • Ubicaciones comunes de acceso Las dimensiones proporcionadas en los diagramas de instalación son nominales. Tome las medidas de su unidad al recibirla y construya conforme a las dimensiones reales. La estructura del piso debajo de la bañera debe poder soportar el peso total de la bañera, el agua y el ocupante.
Salón™ de Bañera de Hidromasaje Salon™ Spa Bath Español English Estructura (continuación) • Para asegurarse de que el instalador tenga espacio suficiente para maniobrar e instalar la bañera, deje un espacio libre respecto a la pared y el cielorraso (Figura 3).
Salón™ Spa de Bañera Salon™ Bath de Hidromasaje Las características de diseño adicionales de Fuzion™ requieren que se completen los siguientes pasos antes de instalar la bañera en el recubrimiento construido.
Salón™ de Bañera de Hidromasaje Salon™ Spa Bath Instalación del marco Fuzion™ Español English Si está instalando una bañera Fuzion™ con un marco accesorio, consulte la Guía de instalación del marco Fuzion™ (#GL44000) antes de continuar. Complete los pasos de armado e instalación conforme a la Guía de instalación del marco Fuzion™.
Salón™ Spa de Bañera Salon™ Bath de Hidromasaje Conexiones eléctricas Al utilizar productos eléctricos, siempre debe tomar las siguientes precauciones básicas: Siempre siga los códigos eléctricos y de construcción locales. Es necesario una conexión a tierra. La unidad debe ser instalada y conectada a tierra por un electricista especializado. • • Se necesitan dos circuitos independientes protegidos por un GFCI.
Salón™ de Bañera de Hidromasaje Salon™ Spa Bath Ilustraciones de referencia Español English Estas ilustraciones son sólo de referencia, dado que la unidad viene completamente armada. Riesgo de descarga eléctrica. Antes de reparar estas conexiones, desconecte todos los cables de suministro de energía de los circuitos de 120 VAC y 240 VAC.
Salón™ Spa de Bañera Salon™ Bath de Hidromasaje Instalación empotrada • • • • Respete todos los códigos locales y de construcción. Defina las herramientas que va a utilizar durante la instalación. Las piezas adicionales de drenaje de la bañera y la fontanería se pueden conseguir en ferreterías y tiendas de instalaciones sanitarias. La información para la instalación del drenaje/desborde está incluida con su bañera en el Manual de instrucciones de instalación.
Salón™ de Bañera de Hidromasaje Salon™ Spa Bath Instalación empotrada (continuación) Español English 8 Instale la unidad, introduciendo primero el extremo del equipo y bajando la bañera dentro de la apertura como se muestra en la ilustración (Figura 10). Madera para desecho Espesor máximo de 2” (50 mm) Azulejo o superficie terminada Sustrato NO utilice tuberías ni accesorios de fontanería para bajar la unidad. Permita que la bañera descanse sobre los soportes.
Salón™ Spa de Bañera Salon™ Bath de Hidromasaje Instalación de montaje bajo cubierta Instale el drenaje/desborde conforme a las instrucciones del fabricante. Plantilla La instalación impermeable del drenaje es responsabilidad del instalador. La pérdida del drenaje no está incluida en la garantía Jacuzzi Luxury Bath de este producto. 2 Desconecte el suministro de energía hacia los circuitos especializados protegidos con GFCI. 3 Instale la unidad en la ubicación deseada.
Salón™ de Bañera de Hidromasaje Salon™ Spa Bath Español English Información general sobre el funcionamiento All bathtubs manufactured by Jacuzzi Luxury Bath are Todas las bañeras fabricadas por Jacuzzi Luxury Bath están diseñadas para “llenar y drenar”, lo que significa que se debe vaciar la bañera después de cada uso y llenarla con agua limpia para el próximo baño.
Salón™ Spa de Bañera Salon™ Bath de Hidromasaje Aumento de la velocidad English Español Oprima el botón (+) para aumentar la velocidad del generador de burbujas de aire El generador de burbujas de aire tiene 8 intensidades. Cada vez que pulse y suelte el botón (+), aumentará la intensidad del generador de burbujas de aire a través de 8 pasos graduales. Las luces indicadoras muestran la intensidad de la potencia del generador de burbujas de airer.
Salón™ de Bañera de Hidromasaje Salon™ Spa Bath Español English Modo de pulsaciones Mientras el generador de burbujas de aire esté ENCENDIDO, oprima el botón de pulsaciones para pasar de apagado a un máximo definido por el usuario. El generador de burbujas de aire pasará desde el punto de arranque (1,5 segundos) hasta el máximo definido por el usuario (1,5 segundos). Las cuatro luces indicadoras parpadearán. Para desactivar el modo de pulsaciones, oprima el botón (pulsaciones).
Salón™ Spa de Bañera Salon™ Bath de Hidromasaje ENCENDIDO: Oprima el botón de los chorros una vez para ACTIVAR los chorros Whirlpool. El motor Whirlpool funcionará a alta velocidad. Las luces indicadoras de la izquierda se iluminarán intensamente. English Español Funcionamiento Whirlpool CHORRO APAGADO: Oprima el botón de la boquilla una segunda vez para DESACTIVAR los chorros Whirlpool.
Salón™ de Bañera de Hidromasaje Salon™ Spa Bath Español English Funcionamiento de la cromoterapia o terapia de iluminación (luz) Oprima el botón de la luz una primera vez: Se ENCIENDE la iluminación de color; utilice los botones ascendente y descendente para comenzar la visualización secuencial de colores o seleccionar otro color. Oprima el botón de la luz una segunda vez: Se ENCIENDE la iluminación blanca; utilice los botones ascendente y descendente para seleccionar la intensidad de la luz blanca.
Salón™ Spa de Bañera Salon™ Bath de Hidromasaje El calentador se ENCIENDE automáticamente cada vez que se activa el funcionamiento Whirlpool. El funcionamiento del calentador no se muestra en el panel de control. Hay una luz indicadora visible en el calentador que señala que el calentador está funcionando. El calentador ayudará a mantener la temperatura del agua en la bañera.
Salón™ de Bañera de Hidromasaje Salon™ Spa Bath Español English Mantenimiento de los chorros giratorios Si cabellos u otros tipos de residuos quedan atrapados en los cojinetes de estos chorros, los chorros podrían dejar de girar. Es posible que resulte necesario desarmar y eliminar los residuos. Para ello, simplemente tome la boquilla y retírela del alojamiento del chorro. La carcasa del cojinete estará unidada a la boquilla.
Salón™ Spa de Bañera Salon™ Bath de Hidromasaje Procedimientos para la resolución de problemas El motor/la bomba no enciende CAUSAS PROBABLES El motor/la bomba no tiene suministro de energía El motor/la bomba no está enchufado/a Motor/bomba defectuoso/a SOLUCIÓN Reinicie el GFCI Asegure el enchufe en la toma de corriente Asegúrese de que el panel de control esté conectado a la caja de control Comuníquese con Jacuzzi Luxury Bath al 800-288-4002.
Salón™ de Bañera de Hidromasaje Salon™ Spa Bath Español English Servicio técnico autorizado Si necesita obtener los datos de una empresa de servicio técnico cercana a su domicilio o necesita ayuda con dudas relacionadas con el funcionamiento o mantenimiento, llame a nuestro Departamento de Asistencia de Servicio Técnico al 1-800-288-4002. Visite nuestro sitio web en http://www.jacuzzi.
Garantía limitada de por vida para las bañeras de marca Jacuzzi Luxury de las Warranty Comfort, Comfort Plus, Pure Air®, Luxury, Salon™ Spa y Pure Air® II COBERTURA DE LA GARANTÍA Jacuzzi Luxury Bath (la “Empresa”) ofrece la siguiente garantía expresa limitada de por vida al comprador original de cualquiera de los productos Jacuzzi® Luxury Bath incluidos en las colecciones Comfort, Comfort Plus, Pure Air®, Pure Air® II y Luxury™ (“Bañera”) de la Empresa que adquiera la Bañera para uso personal o residencial
DEVOLUCIÓN DE LA TARJETA DE REGISTRO DE LA GARANTÍA Español English Spa Bath Para registrar su producto, ingrese en nuestro sitio web Jacuzzi.com, haga clic en Bath and Showers (Bañeras y duchas) y luego seleccione ONLINESalon™ WARRANTY REGISTRATION (REGISTRO DE LA GARANTÍA EN LÍNEA) en la parte superior de página. Se le pedirá que ingrese el número de serie de su producto y, a continuación, la información de registro de la garantía.
English Salon™ Spa Bath SÉRIE DE BAIGNOIRES SALON™ SPA DIRECTIVES D’INSTALLATION ET D’UTILISATION Jacuzzi® Luxury Bath 14525 Monte Vista Avenue Chino, CA 91710 1-800-288-4002 www.jacuzzi.com HD93000 and Operation Installation www.jacuzzi.
Baignoires Salon™ Spa Salon™ Spa Bath English Français Contenu Contenu ......................................................................................................................................................................... 54 Product Information........................................................................................................................................................ 54 Directives de sécurité....................................................................
Baignoires Salon™ Salon™ Spa Bath Spa DIRECTIVES RELATIVES AUX RISQUES D’INCENDIE, D’ÉLECTROCUTION OU DE BLESSURES. Il s’agit d’un produit de qualité professionnelle. Des connaissances relatives aux techniques de construction, de plomberie et d’installation électrique conformes aux codes sont requises pour effectuer une installation adéquate à la satisfaction de l’utilisateur.
Baignoires Salon™ Spa Salon™ Spa Bath Français English Instrucciones de seguridad operacional AVERTISSEMENT : RISQUE D’HYPOTHERMIE ET DE NOYADE ! N’utilisez pas une baignoire d’hydromassage munie d’un appareil de chauffage immédiatement après avoir fait des exercices vigoureux.
Inspection et essai Inspection visuelle 1 Retirez la baignoire de la boîte d’expédition. Faites attention de ne pas égratigner la surface de la baignoire sur les agrafes exposées. Retirez les agrafes ou pliez-les sur la boîte. Conservez la boîte jusqu’à ce que vous ayez effectué une inspection satisfaisante du produit. Ne soulevez jamais la baignoire par la plomberie; manipulez-la par la coquille seulement. 2 Examinez la coquille et les composants de la baignoire.
Baignoires Salon™ Spa Salon™ Spa Bath English Français Cadrage Un manuel de spécifications techniques est offert avec votre baignoire. Le manuel de spécifications techniques comprend des renseignements utiles concernant votre produit Jacuzzi Luxury Bath. Localisez le manuel de spécifications techniques. Encadrez l’espace où sera installée la baignoire.
Baignoires Salon™ Salon™ Spa Bath Spa • Pour s’assurer que l’installateur a de l’espace pour se déplacer et installer la baignoire, allouez suffisamment d’espace au mur et au plafond (figure 3).
Baignoires Salon™ Spa Salon™ Spa Bath English Français Matériau spécifique à Fuzion™ Les caractéristiques supplémentaires de conception de Fuzion™ exigent que les étapes suivantes soient terminées avant l’installation de la baignoire dans la périphérie construite.
Baignoires Salon™ Salon™ Spa Bath Spa Si vous installez une baignoire Fuzion™ avec un cadre accessoire, veuillez vous reporter au guide d’installation du cadre Fuzion™ (n° GL44000) avant de continuer. Terminez l’installation et les étapes d’assemblage conformément au guide d’installation du cadre Fuzion™.
Baignoires Salon™ Spa Salon™ Spa Bath Français English Connexions électriques Risque de décharge électrique. Reliez seulement à un circuit protégé par un disjoncteur de fuite de terre. Des précautions de base doivent toujours être prises lorsque vous utilisez des appareils électriques : respectez toujours les codes locaux d’électricité et de construction; la mise à la terre est requise. L’unité doit être installée et mise à la terre par un électricien qualifié.
Baignoires Salon™ Salon™ Spa Bath Spa Ces illustrations ne sont offertes qu’à titre de référence puisque l’unité est vendue entièrement assemblée. Risque de décharge électrique. Avant de réparer ces connexions, débranchez tous les câbles d’alimentation électrique du service à 120 volts CA et du service à 240 volts CA.
English Français Baignoires Salon™ Spa Salon™ Spa Bath Installation par le dessus Avant de commencer l’installation, veuillez lire ce qui suit : • • • • Respectez tous les codes locaux et de construction. Déterminez les outils qui seront utilisés pendant l’installation. D’autres pièces de plomberie et d’évacuation de la baignoire sont offertes sur le marché dans des quincailleries et des magasins de fourniture de plomberie.
Baignoires Salon™ Salon™ Spa Bath Spa 8 Installez l’unité en insérant l’extrémité de l’équipement en premier, en abaissant la baignoire dans l’ouverture, comme dans l’illustration (figure 10) Morceau de retailles de bois 5 cm (2 po) Épaisseur maximale Carreaux ou surface finie Substrat N’UTILISEZ PAS les accessoires de plomberie ou les conduites pour abaisser l’unité. Laissez la baignoire s’appuyer sur les supports.
Baignoires Salon™ Spa Salon™ Spa Bath English Français Installation en dessous Installez l’évacuation/le trop-plein conformément aux directives du fabricant. 1 Gabarit L’installateur est responsable de l’étanchéité de l’installation de l’évacuation. Toute fuite de l’évacuation est exclue de la garantie Jacuzzi Luxury Bath de ce produit. 2 Coupez l’alimentation des circuits spécialisés protégés par un disjoncteur de fuite de terre. 3 Installez l’unité à l’endroit désiré.
Baignoires Salon™ Salon™ Spa Bath Spa Toutes les baignoires fabriquées par Jacuzzi Luxury Bath sont conçues pour « remplissage et évacuation », ce qui signifie que la baignoire doit être vidée après chaque utilisation et remplie d’eau fraîche par le baigneur suivant. Il s’agit d’une précaution de santé puisque ces baignoires ne sont pas conçues pour conserver de l’eau continuellement comme les piscines ou les spas. Deux types de panneau de commande sont offerts pour la série de baignoires Luxury Salon Spa.
Baignoires Salon™ Spa Salon™ Spa Bath English Français Augmenter la vitesse Appuyez sur le bouton (+) pour augmenter la vitesse du ventilateur Il y a huit intensités pour le ventilateur. Chaque appui et relâche du bouton (+) augmenter l’intensité du ventilateur selon huit niveaux distincts. Les voyants lumineux affichent l’intensité du ventilateur.
Baignoires Salon™ Salon™ Spa Bath Spa English Français Mode à pulsation Avec le ventilateur EN MARCHE, appuyez sur le bouton à pulsation pour basculer entre éteint et un maximum définit par l’utilisateur. Le ventilateur passera (1,5 seconde) au maximum défini par l’utilisateur (1,5 seconde). Les quatre voyants lumineux clignoteront. Pour éteindre le mode à pulsation, appuyez sur le bouton à pulsation.
Salon™ Spa Bath English Fonctionnement du bain tourbillon EN MARCHE : appuyez sur le bouton du jet une fois pour mettre les jets du bain tourbillon en marche. Le moteur du bain tourbillon tournera à une vitesse élevée. Les voyants lumineux à la gauche s’allumeront. Jet ÉTEINT : appuyez sur le bouton du jet une seconde fois pour ÉTEINDRE les jets du bain tourbillon.
Fonctionnement de la chromothérapie ou de l’illuminathérapie (éclairage) Appuyez sur le bouton d’éclairage une fois : met l’éclairage en couleur EN MARCHE; utilisez les boutons vers le haut et vers le bas pour faire défiler les couleurs ou sélectionner une autre couleur English Français Salon™ Spa Bath Appuyez sur le bouton d’éclairage une seconde fois : met l’éclairage blanc EN MARCHE; utilisez les boutons vers le haut et vers le bas pour sélectionner l’intensité de l’éclairage blanc.
English RapidHeat™ L’appareil de chauffage se met en marche automatiquement dès que le fonctionnement du bain tourbillon est actif. Le fonctionnement de l’appareil de chauffage n’est pas affiché sur le panneau de commande. Il y a un voyant lumineux visible sur l’appareil de chauffage lui-même qui indique que l’appareil de chauffage fonctionne. L’appareil de chauffage aidera à maintenir la température de l’eau dans la baignoire.
Salon™ Spa Bath Pour nettoyer votre baignoire, utilisez simplement une solution de détergent liquide doux non abrasif. Vous pouvez protéger et restaurer le lustre d’une surface acrylique dépolie en appliquant Meguiar’s #10 Mirror Glaze, un produit spécifiquement conçu pour être utilisé sur les finis en acrylique. Si le produit Meguiar n’est pas disponible, utilisez une pâte à polir automobile de haute qualité suivie de l’application d’une cire automobile en pâte.
Baignoires Salon™ Spa Procédures de dépannage English PROBLÈME Le bloc pompe/moteur ne se met pas en marche CAUSES PROBABLES Il n’y a pas d’alimentation vers le bloc pompe/moteur Le bloc pompe/moteur n’est pas branché Le bloc pompe/moteur est défectueux REMÈDE Réinitialisez le disjoncteur de fuite de terre Insérez la fiche fermement dans la prise Assurez-vous que le panneau de commande est relié à la boîte de commande Communiquez avec Jacuzzi Luxury Bath au 800-288-4002 Le bloc pompe/moteur fonctionne,
Baignoires Salon™ Spa Salon™ Spa Bath Si vous avez besoin d’une référence pour une entreprise de service près de chez vous ou si vous avez des questions concernant le fonctionnement ou l’entretien, veuillez communiquer avec notre service à la clientèle au 1-800-288-4002. Visitez notre site Web à http://www.jacuzzi.com pour les produits, les services et une copie en ligne de ces directives d’installation et d’utilisation.
COUVERTURE DE LA GARANTIE Jacuzzi Luxury Bath (« l’Entreprise ») offre la garantie limitée à vie expresse suivante à l’acheteur original des produits Jacuzzi® Luxury Bath offerts au sein des collections Comfort, Comfort Plus, Pure Air®, Pure Air® II et Luxury™ (« Baignoire ») qui a acheté la Baignoire pour un usage personnel ou unifamilial résidentiel (« Utilisateur »).
Salon™ Spa Bath RETOUR DE L’ENREGISTREMENT DE LA GARANTIE English Français Pour enregistrer votre produit, veuillez visiter notre site Web, Jacuzzi.com, cliquez sur « Bath and Showers » (baignoires et douches), puis sélectionnez ONLINE WARRANTY REGISTRATION (enregistrement de la garantie en ligne) dans la partie supérieure de la page. On vous demandera d’entrer le numéro de série de votre produit, suivi des renseignements d’enregistrement de votre garantie.