
Installation Guide


ENGLISH
16
Jacuzzi Whirlpool Bath EL21000B 10/06
Drain Information
A drain/overfl ow assembly (sold separately) must be installed
on the bath, water tested, and connected to the sanitary system
of the house. After opening the carton, inspect for damage and
verify that the kit is of the proper fi nish. In the Jacuzzi Whirlpool
Bath drain/overfl ow kit (supplied with some models), note that
the waste fl ange, strainer, overfl ow cover and cover screws
are packaged in a separate package within the kit to protect
the trim fi nish. Follow the installation instructions provided
with the drain/overfl ow kit. After the drain is fully installed,
test for proper drainage. If the unit does not drain properly,
rectify this condition before proceeding with the installation.
Jacuzzi Whirlpool Bath is not responsible for removal and or
reinstallation costs.
NOTE: Watertight installation of the drain is the installer’s
responsibility. Drain leakage is excluded from the Jacuzzi
Whirlpool Bath warranty of this product.
NOTE: FUZION™ TUBS ONLY - The supplied overfl ow
fi tting of the drain/overfl ow assembly MUST be installed
before the wood frame or (for undermount tubs) the
counter is installed.
Plumbing and Water Supply
Plumbing
Pump, jets, and suction fi ttings for the whirlpool system are
factory plumbed in schedule 40 PVC piping.
All Jacuzzi Whirlpool Salon™ Spa Bath products are factory
tested for proper operation and watertight connections prior to
shipping. If leaks are detected, notify your Jacuzzi Whirlpool
Bath Dealer. Do not install the unit.
Water Supply
Consult local authorities for plumbing code requirements
in your area.
IMPORTANT: Proper installation of the fi ll spout plumbing
and compliance with local codes are the responsibility
of the installer. Jacuzzi Whirlpool Bath does not war-
rant connections of water supply fi ttings and piping, fi ll
systems, or drain/overfl ow systems. Nor is it responsible
for damage to the bath which occurs during installation.
CAUTION: A nonfl ammable protective barrier must be
placed between soldering work and bath unit to prevent
damage to the bath.
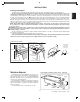
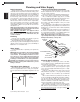
*ANTI-SIPHON VALVE
BATH RIM
6"
* NOT
PROVIDED
Anti-Siphon Valve (Optional)
Optional Anti-Siphon valve installation. The Anti-Siphon
valve is not supplied with the tub. Consult your local plumb-
ing code requirements for the minimum height above the tub
rim.
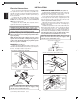
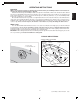
Fuzion™ Overfl ow Fitting Installation
The supplied overfl ow fi tting of the drain/overfl ow assembly
MUST be installed before the wood frame or (for undermount
tubs) the counter is installed.
Remove and open the overfl ow fi tting from the drain kit (sup-
plied). Remove washers and nuts from the overfl ow fi tting.
Place a small bead of plumbers putty, silicone, or similar
approved sealant around the underside of the top fl ange. Place
the overfl ow fi tting into the overfl ow hole of the tub.
From the underside of the unit, place the rubber washer
then locknut on the fi tting and tighten securely. Be careful
not to over tighten.
The 1-1/2" (38 mm) overfl ow fi tting connects with standard
drain plumbing fi ttings widely available at local hardware and
plumbing stores. Assemble in accordance with local plumbing
or building codes.
After the drain is fully installed, test for proper drainage. If
the unit does not drain properly, rectify this condition before
proceeding with the installation. Jacuzzi Whirlpool Bath is not
responsible for removal and or reinstallation costs.
NOTE: Watertight installation of the drain is the installer’s
responsibility. Drain leakage is excluded from the Jacuzzi
Whirlpool Bath warranty of this product.
Clean-Up After Installation
To avoid dulling and scratching the surface of the bath,
never use abrasive cleaners. A mild liquid detergent and warm
water will clean soiled surfaces.
Remove spilled plaster with a wood or plastic edge. Metal
tools will scratch the surface. Spots left by plaster or grout
can be removed if lightly rubbed with detergent on a damp
cloth or sponge.
Paint, tar, or other diffi cult surface stains can be removed
with paint thinner, turpentine, or isopropyl alcohol (rubbing
alcohol). NOTE: Use these chemicals only on SURFACE
stains.
Minor scratches which do not penetrate the color fi nish can
be removed by lightly sanding with 600-grit wet/dry sandpaper.
You can restore the glossy fi nish to the acrylic surface of the
bath with a special compound, Meguiar's #10 Mirror Glaze.
If that is not available, use automotive rubbing compound fol-
lowed by an application of automotive paste wax.
Major scratches and gouges which penetrate the acrylic
surface will require refi nishing. Ask your Jacuzzi Whirlpool
Bath dealer for special instructions or visit our web site at
http://www.jacuzzi.com/ to fi nd a service agent listing for Sur-
face or Shell-Related Problems.
O
VERFL
O
W
FITTING
APPLY
PUTTY/SEALANT
(NOT PROVIDED)
FLAT RUBBER WASHER
LOCKNUT
TIGHT
WASTE ELBOW
(NOT PROVIDED)