
j1s6036blxxrs installation sheet


Installation
English
Page 12 www.jacuzzi.com
Installation Procedures (Continued)
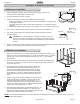
6. Spot-fasten the two bottom corners and the two top corners of the vertical side nailing ange.
7. Nail/fasten at each stud through the topside anges at each stud 16" (405 mm) on center, working from both ends
toward back center. Complete the fastening through vertical side ange, approximately 8" (205 mm) on center.
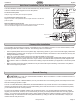
8. When other than cementitious backer board is to be used, furring strips
as thick as nailing anges are recommended for installation on studs
above the installed unit to assure walls will be ush. 100% silicone
sealant with mildew resistant properties should be applied between the
backer board and horizontal surface of unit (Figure 16). Then nished
wall materials can be applied.
WARNING! Finishing of other trades should be done
in conformance with applicable codes and generally accepted
building practices.
9. Turn on the power supply to the dedicated GFCI protected circuits and
check system operation.
10. Caulk around the perimeter of bathtub to seal the space between the
rim and the nished deck (Figure 16).
CAUTION! Apply a continuous bead of silicone sealant
around the entire seam between the counter and the bathtub rim.
Allow sealant to cure according to manufacturer’s instructions.
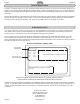
For Optional Tile Flange
1. Install the ange (purchased separately) according to the instructions
that are included with the kit. If the bathtub is equipped with an
integrated ange, refer to 3-wall alcove installtion on page 11.
2. Place the bathtub into the alcove. Screw the ange to the wood stud.
It may be necessary to shim the unit to close up any gaps between the
wood stud and the ange (Figure 17).
Bathtubs with Optional Skirt
1. Screw skirt anges into wall studs, Figure 18.
It may be necessary to shim the unit to close any gaps between wall
studs and the anges.
2. Complete nish work over skirt ange.
3. Caulk around the perimeter of the skirt to seal the space between the skirt and
the nished deck.
Surface Finish
Concrete Board
Silicone
Skirt
Fig. 16
Screw
Tile Flange
Silicon/Sealant
Bath Rim
Plastic Filler
Cement Board
Mortar
Stud Wall
1" x 4"
(not for support)
Finishing Material
Fig. 17
Fig. 18
Finishing
Materials
Caulking Bead
Skirt Panel
Mounting
Screws (as
viewed from
inside the
enclosure)