ProTechTM LCD Series Owner’s Manual
.
Table of Contents 1.0 Important Spa Owner Information ..........................................1 2.0 FCC Notice......................................................................................1 3.0 3.1 3.2 3.3 3.4 Important Safety Instructions ...................................................2 Important CSA Safety Instructions ........................................................3 Hyperthermia ....................................................................................................
10.0 10.1 10.2 10.3 10.4 10.5 Automatic Filtration Cycles .....................................................26 Standard Filtration Mode ..........................................................................26 Economy Filtration Mode..........................................................................26 Selecting The Filtration Mode.................................................................26 Preset Filter Cycles..............................................................................
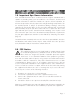
1.0 Important Spa Owner Information Your Jacuzzi® Premium spa is constructed to the highest standards and is capable of providing many years of trouble-free use. However, because heat retentive materials are utilized to insulate the spa for efficient operation, an uncovered spa surface directly exposed to sunlight and high temperatures for an extended period is subject to permanent damage. Damage caused by exposing the spa to this abuse is not covered by warranty.
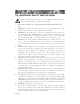
3.0 IMPORTANT SAFETY INSTRUCTIONS When installing and using this electrical equipment, basic safety precautions should always be followed, including: 1. READ AND FOLLOW ALL INSTRUCTIONS BEFORE OPERATING THE SPA! 2. WARNING: To reduce the risk of injury, do not permit children to use this product unless they are closely supervised at all times. 3. WARNING: A grounding wire connector is provided on this unit to connect a minimum No. 8 AWG (8.
B. Since excessive water temperatures have a high potential for causing fetal damage during the early months of pregnancy, pregnant or possibly pregnant women should limit spa water temperatures to 100 °F (38 °C). If pregnant, please consult your physician before using a spa. C. Before entering the spa, the user should measure the water temperature with an accurate thermometer since the tolerance of water temperatureregulating devices may vary as much as ±5 °F (±2 °C). D.
C. WARNING: People with infectious diseases should not use a spa. D. WARNING: To avoid injury, exercise care when entering or exiting the spa. E. WARNING: Do not use drugs or alcohol before or during the use of a spa to avoid unconsciousness and possible drowning. F. WARNING: Pregnant or possibly pregnant women should consult a physician before using a spa. G. WARNING: Water temperature in excess of 38 °C (104 °F) may be injurious to your health. H.
2. The Consumer Products Safety Commission has stated that the water temperature in a spa should not exceed 104 °F (40 °C). Immersion in water in excess of 104 °F (40 °C) can be hazardous to your health. 3. Observe a reasonable time limit when using the spa. Long exposures at higher temperatures can cause high body temperature. Symptoms may include dizziness, nausea, fainting, drowsiness, and reduced awareness. These effects could possibly result in drowning. 4.
4.0 Choosing A Location IMPORTANT: Because of the combined weight of the spa, water and users, it is extremely important that the base upon which the spa rests be smooth, flat, level and capable of uniformly supporting this weight, without shifting or settling, for the entire time the spa is in place. If the spa is placed on a surface which does not meet these requirements, damage to the skirt and/or the spa shell may result. Damage caused by improper support is not covered under warranty.
5.0 Power Requirements Jacuzzi Premium spas are designed to provide optimum performance and flexibility of use when connected to the maximum electrical service as listed in the tables below. If you prefer, your Jacuzzi Premium dealer can perform a minor circuit board modification to allow the spa to accept different electrical service. The operational considerations of these modifications are listed in the footnotes below.
Export J-350/J-360/J-370 Models (50Hz) Voltage: Number of Wires Frequency: Current Draw: Circuit Breaker: 230V/40A* 230 VAC 3 50Hz 29A 40A 230V/30A** 230 VAC 3 50Hz 23A 30A 230V/20A*** 230 VAC 3 50Hz 15A 20A Important Information: * In 40A configuration, the heater will operate while both jets pumps are running in high speed. This is the factory setting. ** In 30A configuration, the heater will not operate when both jets pumps are running in high speed. Note jets pump 2 runs only in high speed.
6.0 Electrical Wiring Instructions IMPORTANT NOTICE: The electrical wiring of this spa must meet the requirements of the National Electrical Code (NEC) and any applicable state or local codes. The electrical circuit must be installed by a qualified electrician and approved by a local building/electrical inspection authority. 1. 2. 3. • • • • 4. 5. 6. 7. 8. 9. This spa must be permanently connected (hard-wired) to the power supply.
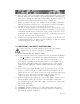
Figure-A Equipment Area Note: Pump Locations Vary by Model 9 4 10 1 Flow 7 5 6 2 1. 2. 3. 4. 5. 6. 3 Control Box Power Supply Entrance(s) 2-Speed Pump #1 Heater Spa Drain Valve Pump Drain Plug(s) 6 8 2 Circulation Pump Behind Load Box 7. 1-Speed Pump #2 8. Circulation Pump 9. Optional CD Ozonator (Purchased Separately) 10. Optional Mazzei Injector (Required for CD Ozonator Use - Purchased Separately) Figure-B - Control Box 2 TB1 1 1. Terminal Block 2. Bonding Lug 3.
7.0 Start-Up Instructions Congratulations! You are now all set to get your new spa ready to use. Simply follow this step-by-step procedure and, before long, you will be enjoying your first glorious experience in your Jacuzzi Premium spa. For best results, read each step in its entirety before proceeding with that step. 7.1 Filling the Spa Clear all debris from the spa.
7.5 Add Start-Up Chemicals Add the spa water chemicals as recommended by your Jacuzzi Premium Dealer. Refer to section 13.0 (Page 36) for general guidance. 7.6 Place Cover On Spa Keeping the insulating cover in place anytime the spa is not in use will reduce the time required for heating, thereby minimizing operating costs. The time required for initial heat-up will vary depending on the starting water temperature and the capacity of your spa.
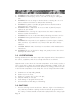
8.2 LCD Display A B C D E I F G H A. Lock Symbol indicates panel, set temperature, or filter cycle programming is locked. B. Heat Symbol: indicates heater is on (Sec. 9.1, Page 15). C. Ozone Symbol indicates the optional CD Ozonator is on Sec. 13.3, Page 37). D. General Indicators: show which filter cycle is in progress or display selected filter cycle programming features (Sec. 11.2, Page 28). E. Set Indicators: these characters identify what is being shown on the main 4-digit display. F.
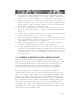
8.3 Spa Features And Controls J-370 model illustrated - Location of Features Varies by Model 1. 2. 3. 4. 5. 6. Control Panel Air Controls Filter/Skimmer Cover Diverter Valve #2 Maxx PowerPro Jets PowerPro Jets/MiniPowerPro Jets 7. Diverter Valve #1 8. Remote Control Panel 9. Therapy Seat 10. Spa Light Page 14 11. Vertical Jets (Foot Jets) 12. Footwell Suction Fittings and Filters. Filters protect pump 2 (and J-380 pump 3) plumbing network from debris buildup. 13. Waterfall Feature 14.
9.0 Operating Instructions Your Jacuzzi Premium spa has a touch-sensitive control panel, diverter valves, and air control knobs located on the top rim of the spa (Page 14). These controls let you operate many of the special functions of your Jacuzzi Premium spa. By familiarizing yourself with the following information, you will be able to gain the full benefit afforded by the various functions of your spa. 9.1 Set Spa To Heat To warm spa water, follow these steps: 1.
then repeatedly press the sensor pad to turn the light off or to select one of 6 constant colors illustrated below. RANDOM OFF RED OFF GREEN OFF BLUE OFF ORANGE OFF TEAL OFF VIOLET OFF Spa Light Sequence You must press the LIGHT sensor pad within 5 seconds between each “off” or “color” step in the light sequence to prevent it from resetting. Pressing the sensor pad after 5 seconds restarts the sequence at “Random” mode. This mode automatically changes the light color every 8 to 20 seconds.
customize the massage and performance by diverting water between various jet systems. Simply turn diverter to position B C A (Combo), B, or C to divert water pressure to various jet groups. Note: The diverter valve(s) is designed to operate in A positions A (Combo), B, and C for optimum performance.
the latch tabs together at the top of each speaker enclosure to unlatch it’s “pop-up” mechanism. To retract each speaker before covering spa, gently press downward on each enclosure until you feel a slight “click”, then release. CAUTION: Never step or sit on a speaker enclosure! This type of misuse will damage the speaker enclosure latching and track mechanism. Always retract speakers prior to covering spa.
SEL/ SEL/ D. Adjust Treble Press blue SEL button two times to select treble mode. Then press blue VOL or VOL button to adjust treble range from -7 to +7. E. Adjust Bass Press blue SEL button three times to select bass mode. Then press blue VOL or VOL button to adjust bass range from -7 to +7. F. Adjust Balance Press blue SEL button four times to select balance mode. Then press blue VOL or VOL button to adjust speaker balance as desired. VOL VOL SEL/ SEL/ SEL/ VOL VOL SEL/ SEL/ SEL/ SEL/ VOL VOL G.
H. Bass Boost Press grey LOUD button to increase the bass output. LOUD appears on the display. LOUD I. Set Clock DISP Press and hold grey DISP button for 3-seconds until time display flashes. Within 3 seconds, press blue + or - button to set displayed hours and minutes. Unit stores clock settings and returns to normal operation 3-seconds after last key press. Optional Stereo Receiver Weather Band and Radio Operation A.
B. Select a Radio Station 1. Slow Scan: Press blue + button or - button for less than one second to advance radio frequency up or down one step. BAND 2. Quick Scan: Press blue + button or - button for more than one second to quickly scan radio frequencies. Frequencies continue to change until button is released. C. Program a Station Preset Six numbered green PRESET buttons (1-6) store and recall stations for each radio band. W1 1 W2 W3 3 RPT 4 SHF 5 SCN 2 6 BAND Save a Station Preset: 1.
D. Recall a Station Preset 1. Press grey BAND button to select desired radio band, if necessary. 2. Press green PRESET button to recall station preset. BAND ST E. Automatically Store Stations Function selects 6 strongest stations and stores them in current band. 1. Press grey BAND button to select desired radio band, if necessary. 2. Press grey AS/PS button for more than 3-seconds (receiver beeps and flashes AST on display). The new stations replace station presets previously stored in that band. F.
Optional Stereo Receiver - CD Player Operation X XXX XX X XXX XX A. Insert and Eject CD 1. Press orange OPEN button on front flip-over OPEN panel. Gently push a CD X into slot and flip panel up XX to close. The CD will begin to play. 2. Press orange OPEN button on front flip-over panel, then flip-open EJECT CD panel. Press black EJECT button on inner side of flip-open panel to stop CD play and eject CD. Receiver switches to radio operation. Flip panel up to close.
E. Shuffle Play All Tracks Press green SHF button to play all tracks on CD in random order one time. Press again to stop shuffle play. F. Scan (Preview) All Tracks Press green SCN button to play first ten seconds of each track on current CD. SCAN appears on display. Press green SCN button again to stop SCAN and listen to track. G. Pause CD Play Press grey PLAY/PAUSE button to pause CD play. PAUS appears on display. Press grey PLAY/PAUSE button again to resume play. WARNING! A.
Stereo Receiver Specifications Optional Stereo Receiver Specifications CD Player Signal/noise ratio . . . . . . . . . . . . . . . . . . . . . . . . . . . . . . . . . . .>86 dB Frequency response . . . . . . . . . . . . . . . . . . . . . . . . . . .20 Hz - 20 kHz Channel separation . . . . . . . . . . . . . . . . . . . . . . . . . . . . . . . . . .>65 dB D/A converter . . . . . . . . . . . . . . . . . . . . . . . . . . . . . . . . . . . .1 Bit/CH Weather Radio Tuning Range . . . . . . . . . . . . . . . . .
10.0 Automatic Filtration Cycles Your Jacuzzi Premium controls have been designed to provide maximum convenience, as well as economy of operation. By selecting the appropriate filtration mode, you can ensure that your spa will be ready to use anytime with the lowest possible energy consumption. Your spa’s control system activates automatic filter cycles, during which pump #1 turns on in low speed to move water through the filter.
Summer Logic: In warm weather, the water temperature in the spa may exceed the set temperature. This condition may occur due to heat transference from the main pump and 24-hour circulation pump. If the water temperature is higher than 95°F (35°C) and rises two degrees above the set temperature, a “Summer Logic” condition occurs that deactivates the circulation pump and ozonator (if equipped).
11.0 Programming Instructions 11.1 Adjusting Time of Day The control system remembers the time of day even in the event of a prolonged power outage. However, it may occasionally be necessary to reset the time of day. For example: if you are not in the Pacific Time Zone you will want to reset the time for your own time zone. (The system will automatically adjust to and from daylight savings time.) To accomplish this, press DISPLAY, MODE and DISPLAY within five seconds each.
large four-digit display. Press WARMER ( + ) or COOLER ( - ) to adjust duration in increments of 15 minutes. 4. Press DISPLAY to make the filter cycle programming characters disappear from the screen and the main display return to showing the water temperature. If no sensor is pressed within 30 seconds, the screen automatically returns to the standard water temperature display.
11.4 Locking Filter Cycles You may keep the filter cycle programs from being inadvertently altered by electronically “locking” them. To accomplish this, simply press CYCLE then, within 30 seconds, press DISPLAY, MODE and WARMER ( + ), within five seconds each. LOCKED A padlock symbol will appear on the screen. In this state, the status of the cycle programming may be checked, but may not be altered.
the information, supplies, and accessory products you will need to accomplish this. 12.1 Cleaning The Filters Your Jacuzzi Premium spa is equipped with high-performance filter cartridges located inside the filter skimmer. Fine debris is filtered by the circulation pump drawing water through the circulation pump cartridge. Larger debris is also filtered by the 2-speed pump drawing water through the main pump cartridge during normal operation and at each filter cycle.
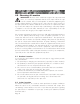
E F G top top Cartridge 1 Cartridge 2 (Inside Spa View) Rinse debris from filter pleats on each cartridge using a garden hose and high-pressure nozzle. Start at top and work downward to handle. Repeat until all pleats are clean. Place each cartridge back into skimmer well , then rotate each cartridge handle clockwise to thread back into wall fitting. DO NOT OVERTIGHTEN! * Note: to maximize filter life, switch filter cartridge positions at each cleaning.
CAUTION: There are certain precautions to keep in mind when draining your spa. If it is extremely cold, and the spa is outdoors, freezing could occur in the lines or the equipment (see “WINTERIZING”, page 34). On the other hand, if it is hot outdoors, do not leave the spa’s surface exposed to direct sunlight. To drain your spa, perform the following steps: 1. Turn off power to spa at breaker. 2. Locate drain valve on front/lower plastic pan.
CAUTION: Never attempt to remove the pillows by pulling on them! The pillows utilize a bolt-on design that prohibits removal without tools. To remove pillows: 1. Grasp center pillow insert (A) with finger tips and gently pry outward from pillow base (C). 2. Use a standard screwdriver to loosen and remove mounting bolts (B) from pillow base. 3. Assemble in reverse order after cleaning. DO NOT overtighten pillow mounting bolts! 12.
the spa has not been interrupted. In extreme, bitter cold weather less than -20 °F (-29 °C), reset the filter cycles for 24-hour operation to protect the spa (i.e. four 6-hour cycles). If you do not intend to use your spa, or if there is a prolonged power outage during periods of severe freezing temperatures, it is important that all water be removed from the spa and equipment to protect against damage from freezing. For expert winterization of your spa, contact your authorized Jacuzzi Premium dealer.
13.0 Water Quality Maintenance Maintaining the quality of the water within specified limits will serve to enhance your enjoyment and prolong the life of the spa's equipment. It is a fairly simple task, but it requires regular attention because the water chemistry involved is a balance of several factors. There is no simple formula, and there is no avoiding it.
13.3 Optional CD Ozone Water Maintenance System If you have elected to have your spa equipped with the optional Jacuzzi Premium CD Ozone water purification system you will find that your water stays fresh and clear with significantly less chemical sanitizer usage. You will also probably be able to go longer between complete spa drainings. The CD ozone unit operates in conjunction with the circulation pump. 13.
If the spa water is more than 20 °F (-7 °C) cooler than the temperature setpoint, the low speed pump #1 and heater will automatically activate to provide freeze protection. The spa will stay in this mode until the water temperature reaches 15 °F (-9 °C) below the set temperature. No corrective action is necessary. * FLOW SWITCH (Heater is deactivated. Pump may also be deactivated). Proper flow of water is inhibited or a flow switch has malfunctioned.
Communication between the control panel and/or remote control panel and circuit board is faulty. Contact your dealer or service center. "WATCHDOG" (spa is deactivated) A problem has been detected which could cause damage to the spa or its components. Contact your dealer or service center. OPEN SENSOR (heater disabled) OR SHORTED SENSOR (spa is deactivated) The high-limit temperature sensor is non-functional. This must be repaired only by a dealer or authorized service center.
2. If nothing appears on the screen: a. Check the household circuit breaker. b. Contact you dealer or authorized service center. PUMP DOES NOT OPERATE BUT LIGHT DOES Depress "JETS" sensor. 1. If no sound is detected or if a "buzzing" sound is detected, turn off power to the spa and contact your dealer or authorized service center. 2. If motor operates but no water flows to jets: a. Pump may not be properly primed. See instructions below. b. Contact dealer or authorized service center.
footwell suction covers (Page 14). WATER IS TOO HOT. 1. Reduce thermostat setting. 2. Reduce filtration cycle length. Even with heater off, water temperature can increase from prolonged pump operation (Page 28). NO HEAT 1. Check thermostat setting. 2. Keep the cover in place while heating. 3. Verify which filtration mode is selected, standard or economy (Page 26). 4.
Page 42 HEATER 5.5 kW PUMP 1 WHT K1 K13 Spa Light BLK HI LO K2 TB3 TB5 RED TB3 K3 Options J8 1 3 HI Z1 BLK K7 1 STEREO (Optional) To Heater Relays 1 2 TB6 K8 2 TB4 Select Mode Display y Main Panel 2. 1. WHT BLK BLK CIRCULATION PUMP WHT CD Ozone (Optional) This device may not cause harmful interference. This device must accept any interference received including interference that may cause undesired operation. This device complies with Part 15 of the FCC rules.
Wht PUMP 1 HEATER 5.5 kW HI LO Red Blk From TB1 SPA LIGHT K1 TB5 Wht T92 Relay K2 HI F2 From TB1 20A, 250V MDA20 Blk K4 TB1 1 PUMP 2 K3 JP9 1 3 5 7 9 11 13 1 3 5 7 9 JP20 JP19 1 J8 OPTIONS 3 INTERLOCK JUMPER 5 K5 J6 6 SENSORS Blk J7 TB3 Wht TB1 Red J2 J1 F1 Blk K7 J3 1 2 1 2 Cycle Display y STEREO (Optional) Wht Blk UV or CD Ozonator (Optional) Wht Blk Circulation Pump 1. This device may not cause harmful interference. 2.
HEATER 2.7 kW Page 44 BLU HI LO From TB1 Spa Light BRN N BLK L TB7 N L OPTIONS J8 TB1 GRN TB1 1 2 3 SENSORS J6 N N L L HI N L PUMP 2 1 2 TR2 STEREO (Optional) To Heater Relays Circulation Pump N 1 2 TR4 1 TB5 2 1 2 TB6 Select Display CD Ozone (Optional) Mode y Main Panel This equipment was tested and found to be fully compliant with EN55014-1 (1997), EN55014-2 (1997), EN61000-3-2 (1995), EN61000-3-3 (1995), EN55022 Class B, and EN50082-1 (1992) Standards.
HEATER 2.7kW, 230 VAC SPA LIGHT From TB1 N TB7 L L Black TB3 Red N J8 OPTIONS N HI LO TB1 G PUMP 1 L L 1 2 3 J6 N N SENSORS F1 L L J3 J7 L TB1 N PUMP 2 HI L Display N L y Circulation Pump UV or CD N Ozonator (Optional) L STEREO (Optional) 1 2 N L TB4 11 2 1 Cycle Mode Main Panel Power Input: 230-240 VAC, 40A / 35A 1-Phase, 50Hz; USE MIN.
20.0 Typical Spa Wiring Diagrams A-B US/Canada 60Hz Models Only A 2-Pole Circuit Breaker with 2-Wire Grounded Load Connection (3 Wires to Hot Tub, 2-Hot (L1-L2), 1-Ground) 240 VAC White (N) Black (L1) Red (L2) Bonding Lug 2-Pole GFCI Breaker TB1 Red (L2) Black (L1) Main Service Panel with GFCI Green Ground Lug No Load Neutral Wire Note: service disconnect not shown in this diagram. The control box TB1 terminal position varies between models.
.
.
.
Jacuzzi® Premium 14525 Monte Vista Ave. • Chino, CA 91710 Website: http://www.jacuzzipremium.com 6530-224, Rev. C © 2002 Jacuzzi Premium Printed in U.S.A.