BUILDER BATH SERIES INSTALLATION/OPERATING INSTRUCTIONS Installer: Leave this manual for homeowner. Homeowner: Read this manual and keep for future reference.
IMPORTANT SAFETY INSTRUCTIONS READ AND FOLLOW ALL INSTRUCTIONS SAVE THESE INSTRUCTIONS WARNING: RISK OF ACCIDENTAL INJURY OR DROWNING; CHILDREN SHOULD NOT USE HYDROMASSAGE BATHTUB WITHOUT ADULT SUPERVISION. WARNING : TO AVOID INJURY, EXERCISE CAUTION WHEN ENTERING OR EXITING THE HYDROMASSAGE BATHTUB WARNING: RISK OF ACCIDENTAL INJURY OR DROWNING; DO NOT USE HYDROMASSAGE BATHTUB UNLESS ALL SUCTION GUARDS ARE INSTALLED TO PREVENT BODY AND HAIR ENTRAPMENT.
PRECAUTIONS Do not operate the whirlpool system unless the bath is filled with water to at least 2" above the highest jet. Never drop or insert any object into any opening. Do not use oil-based bath additives in your whirlpool bath. When cleaning your bath, do not use abrasive substances which will damage the bath's surface. To prevent discoloration of the acrylic finish, do not fill the bath with water in excess of 140°F (60°C). The whirlpool system should be purged at least twice a month.
CONTENTS Specifications _________________________________________________________________________ 1-5 Roughing-in Reference _________________________________________________________________ 6-10 Framing and Support ___________________________________________________________________ 11 Skirts ________________________________________________________________________________ 12 Service Access _______________________________________________________________________ 13 Electrical Connections ____________________
Important: Read complete instructions before beginning installation. Each whirlpool bath arrives ready for installation, completely equipped with motor/pump assembly and plumbing and fittings necessary for whirlpool operation. An optional drain/overflow kit is available for installation on the bath. Remove the bath from the carton. Retain the shipping carton until satisfactory inspection of the product has been made. Do not lift the bath by the plumbing at any time; handle by the shell only.
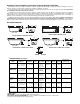
SPECIFICATIONS (Rectangular) MODEL DIMENSIONS DRAIN/OVERFLOW DIMENSIONS CETRA™ 536 WITH INTEGRAL SKIRT 60" (1524 mm) L* 18-1/2" ( 470 mm) A ( 229 mm) B 36" ( 914 mm) W 9" 21-1/4" ( 553 mm) H CIVA™ 60" (1524 mm) L* 36" ( 914 mm) W 21-1/4" ( 540 mm) H TOTAL WEIGHT/ OPERATING PRODUCT CUTOUT FLOOR LOADING GALLONAGE WEIGHT NA 742 lb (337 kg)/ 50 lb/sq. ft. 244 kg/sq. m 48 U.S. gal (181 liters) 16-3/4" (426 mm) A 9-3/8" (238 mm) B 58" x 34" 709 lb (322 kg)/ 47 lb/sq. ft. (229 kg/sq. m) 44 U.S.
SPECIFICATIONS (Rectangular) MODEL DIMENSIONS DRAIN/OVERFLOW DIMENSIONS TOTAL WEIGHT/ OPERATING PRODUCT CUTOUT FLOOR LOADING GALLONAGE WEIGHT SKIRT & MOUNTING AVAILABILITY OF "RAPIDHEAT" IN LINE HEATER NOVA™ 5 WITH INTEGRAL 3-SIDED TILE FLANGE 60" (1524 mm) L* 42" (1067 mm) W 18-1/2" ( 470 mm) H 14-3/4" (375 mm) A 8-1/2" (216 mm) B NA 722 lb (328 kg)/ 41 lb/sq. ft. (200 kg/sq. m) 45 U.S.
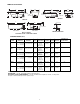
RIMLESS OVAL BATHS W L L 2'' (25.4 mm) 7-1/2" 191 mm 2" 25.4 mm H 3-1/2" 89 mm 8" 203 mm END VIEW MILANO FRESCO L H SIDE VIEW END VIEW SIDE VIEW W W 2'' 25.
CORNER BATHS L A 2" 51 mm H B DRAIN/OVERFLOW END VIEW FRONT VIEW 2" H 51 mm FRONT VIEW END VIEW Q-II 1" H 25 mm FRONT VIEW SIDE VIEW CAPELLA 55, CAPELLA 60 & TARA WITH INTEGRAL SKIRT 1" H 25 mm FRONT VIEW SIDE VIEW CAPELLA SPACESAVER WITH INTEGRAL SKIRT SPECIFICATIONS (Corner) DIMENSIONS MODEL DRAIN/OVERFLOW DIMENSIONS CUTOUT TOTAL WEIGHT/ OPERATING PRODUCT FLOOR LOADING GALLONAGE WEIGHT SKIRT & MOUNTING AVAILABILITY OF "RAPIDHEAT" IN LINE HEATER CAPELLA™ 55 55" (1397 mm) L 55" (1397
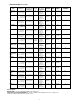
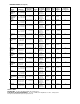
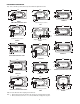
ROUGHING-IN REFERENCE Note: Unless otherwise specified, units are produced with left or right-hand versions. *72'' *60" *60" 8-1/4" 18'' 18" 16'' x 4'' 36" 12" x 4" 16" 15" x 5" 36'' 32" 2-1/2" 2'' 2" 8-1/2'' (Left-hand only as shown.) 14'' AMIGA AMIGA WITH INTEGRAL SKIRT LUXURA 5 CIVA * 72" *60" 8-1/4" *72" 24" 13-1/2" x 4" 16" 48" 15" x 5" 31-5/8" 10" x 5" 42" 32" 2-1/2" 5-1/2" 4-7/8" 8-1/2" 13-3/4" (Left-hand only as shown.
ROUGHING-IN REFERENCE Note: Unless otherwise specified, units are produced with left or right-hand versions.
ROUGHING-IN REFERENCE Note: Unless otherwise specified, units are produced with left or right-hand versions. 60" 42" *66" 13-1/2" 16" 13" x 5" 21" 12" x 4" 15" x 5" 12" 4-1/4" 30" 5" (Left- and right-hand determined by pump location.) SIGNA 5 WITH 4-SIDED FLANGE 9-3/8'' TORINO *72" VANTAGE *60" 16" 18-1/2" x 5" 24" 5" x 12" 12-1/2" 24" x 4" 48" 32" 2" 11-1/4" 36" (Left- and right-hand determined by pump location.
ROUGHING-IN REFERENCE Note: Unless otherwise specified, units are produced with left or right-hand versions. 62" 12" x 4" 43" 71-1/2" 11" 2" 2" 21-1/2" 20" 2" 40" 36" 11-3/4" 9-1/2" 71-1/2" (Left- and right-hand determined by pump location.) 2" (Left-hand only as shown.
ROUGHING-IN REFERENCE Note: Unless otherwise specified, units are produced with left or right-hand versions. 34" 33-1/2" 60" 60" 60" 60" 19" X 4" 7-1/2" 14" X 4" 6" 46-5/8" - Junction Box 24" 24" 34" 27" 34-15/16" 27" 50-1/4" 47-3/4" 43-1/8" 13" (Right-hand only as shown.
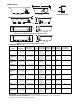
CORNER BATHS CUTOUT 53" (1346 mm) 53" 59" (1346 mm) 1499 mm 58" (1473 mm) 25-3/4" (654 mm) 25-3/4" (654 mm) 2-3/4" (70 mm) 58" (1473 mm) 25-1/2" (648 mm) 25-1/2" (648 mm) R = 70" 45-9/16" (1157 mm) CAPELLA 55 CAPELLA 60 3" RADIUS CORNERS (5 PLACES) 58" (1473 mm) 58" (1473 mm) 58" (1473 mm) 58" (1473 mm) 90° 23-1/2" (597 mm) (5 2275 5/ m 8" m ) 48" (1224 mm) 50" (1270 mm) CAPELLA SPACESAVER GALLERY CORNER 58" (1473 mm) 57-7/8" 57-7/8" (5 2275 5/ m 8" m ) 90° 23-1/2" (597 mm) 90°
Framing and Support The drain/overflow of the bath extends below the bottom of the bath. Note that this requires a cutout in the floor. The floor structure beneath the bath must be able to support a total weight of bath, water, and bather. Refer to the table under total weight for your model. The unit must be supported from the bottom of the bath and not from the bath rim or tile flange. If the subfloor is level, no other preparation is necessary. You can proceed to install the bath.
INTEGRAL SKIRT MOUNTING DETAIL Corner Baths with Skirt If an optional skirt is used on a corner bath, additional support is necessary in the front of the unit. Measure the height from the floor to the underside of the bath rim. Cut two 2" x 4" studs, apply adhesive to both ends and install (see roughing in reference).
Service Access Reinstalling Panel For partially or fully sunken installations, allow for access to service connections. It is the installer's responsibility to provide sufficient service access. The recommended minimum dimensions allowable for service to the bath are shown in the "Service Access" illustration. Provide adequate area around unit for air circulation for cooling the motor and to supply sufficient air to the jets. Do not insulate this area or around motor.
ELECTRICAL CONNECTION (FOR CORNER BATHS) Electrical Connections A separate circuit, which must be protected by a Ground Fault Circuit Interrupter (GFCI), is required. Install a duplex outlet to the studwall underneath the bathtub, at least 4 inches above the floor. The duplex outlet is not provided. Because these units are manufactured with a safe, convenient Magic Touch whirlpool ON/OFF switch on the bath itself, no remote switch or timer is necessary.
Electrical Connections (Canada only) The electrical installation is subject to inspection and approval by the local inspection authority. Employ a licensed electrician to connect the equipment to the supply in accordance with the local electrical code. Check that the power supply available corresponds to that required by the motor. The whirlpool bath must be connected to a separate 120VAC, 15AMP, single-phase circuit or a separate 120VAC, 20AMP, single-phase circuit (refer to the table for your model).
Drain Information A drain/overflow assembly (sold separately) must be installed on the bath, water tested, and connected to the sanitary system of the house. After opening the carton, inspect for damage and verify that the kit is of the proper finish. In the Jacuzzi Whirlpool Bath drain/overflow kit, note that the waste flange, strainer, overflow cover and cover screws are packaged in a separate package within the kit to protect the trim finish.
OPERATION Magic Touch® Whirlpool Switch Note: These instructions pertain to all bath products manufactured by Jacuzzi Whirlpool Bath. Not all features discussed in this instruction pamphlet apply to all baths. All baths manufactured by Jacuzzi Whirlpool Bath are designed for "fill and drain," which means the bath should be drained after each use and filled with fresh water by the next bather. This is a health precaution, as these baths are not designed to hold water continuously like pools or spas.
Controlling Whirlpool Action JETS The whirlpool action in your bath is influenced by three factors – direction of flow, force of water, and force of air. All baths manufactured by Jacuzzi Whirlpool Bath are equipped with fully adjustable PowerPro® jets, which are adjustable for all three factors. Some baths have additional directionally adjustable jets which can be adjusted for direction and flow of air only.
Cleaning the Bath Suction Cover/Strainer Maintenance To clean your bath, simply use a mild, nonabrasive liquid detergent solution. You can protect and restore the gloss to a dulled acrylic surface by applying Meguiar's #10 Mirror Glaze, a product specifically designed for use on acrylic finishes. If Meguiar's is not available, an acrylic polish of equal quality or automotive paste wax is acceptable. Never use abrasive household cleaners on any Jacuzzi Whirlpool Bath product.
General Whirlpool Bath Trouble Shooting Guide PROBLEM Pump/Motor does not start. Pump/Motor operates but no fully adjustable jets are functioning. PROBABLE CAUSES REMEDY No power to pump/motor. Reset GFCI. Pump/motor not plugged in. Insert plug fully into outlet. Magic Touch switch - air tube not connected to switch or to air switch on pump/motor. Reconnect tube to Magic Touch switch or to air switch pump/motor. Pump/motor faulty. Replace pump/motor assembly. Jets are closed.
PRODUCT SPECIFICATIONS ARE SUBJECT TO CHANGE WITHOUT NOTICE. USE INSTALLATION INSTRUCTIONS SUPPLIED WITH PRODUCT. Jacuzzi Whirlpool Bath has obtained applicable code (standards) listings generally available on a national basis for products of this type. It is the responsibility of the installer/owner to determine specific local code compliance prior to installation of the product. Jacuzzi Whirlpool Bath makes no representation or warranty regarding, and will not be responsible for any code compliance.
Jacuzzi Whirlpool Bath Limited Warranty Builder Group Bath Product WARRANTY COVERAGE Jacuzzi Whirlpool Bath (the “Company”) offers the following express limited warranty to the original purchaser of any Jacuzzi Whirlpool Bath Builder Group Bath Product (“unit”) who purchases the product for personal or single family use (“user”). The Company will repair or replace, at its option, the unit or its equipment in accordance with the following terms and conditions.
RESPONSIBILITIES OF OTHERS Inspecting the unit prior to installation is the responsibility of the installer or building contractor who acts on behalf of the user. They are responsible for ensuring the unit is free of defect or damage. Notices are placed on and in the unit and on the shipping carton advising the installer of this responsibility. In the event of a problem, the unit must not be installed.