
Installation Guide

English
Page 4 www.jacuzzi.com Installation Instructions
Freestanding Baths
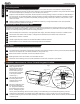
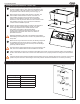
1
Install the metal drain/waste
tting (supplied with the
tub) into the drain hole as
illustrated (Fig 1). Ensure
that the drain opening on
the waste tting is situated
in the integral overow
channel (Fig. 1).
2
Use clear silicone to adhere
the bottom gasket to the
underside of the integral
overow channel.
3
Secure the waste tting with
the supplied waste tting
nut. Apply thread sealant to
the threads prior to inserting
the nut. Overtightening the
nut may cause shell damage. Ensure the drain opening on the waste tting is not exposed after tightening of the nut.
4
Install a PVC thread adaptor (not supplied) to the metal waste tting. This is to provide a PVC to PVC drain adapter
connection protruding from the oor. Water test tting for leaks before installation. NOTE: Use PVC Cement per ASTM D2564
on all PVC joints.
Inspection and Testing
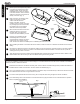
Visual Inspection
1
Remove the bathtub from the shipping carton. Be careful not to scratch the surface of the bathtub on exposed staples.
Remove the staples or fold them into the carton. Retain the carton until satisfactory inspection of the product has been made.
Do not lift the bathtub by the plumbing at any time; handle by the shell only.
2
Inspect the shell and bathtub components. Should inspection reveal any damage or defect in the nish or visible damage to
any components, do not install the bathtub. Damage or defect to the nish claimed after the bathtub is installed is excluded
from the warranty. Jacuzzi Luxury Bath’s responsibility for shipping damage ceases upon delivery of the products in good
order to the carrier.
3
Refer any claims for damage to the carrier. For denitions of warranty coverage and limitations, refer to the published
warranty information packed with the product.
All bathtub units are factory tested for proper operation and watertight connections prior to shipping. However, the unit must be
retested by the installer prior to installation. Jacuzzi Luxury Bath is not responsible for any defect that could have been discovered,
repaired, or avoided by following this inspection and testing procedure:
1
Place the bathtub on a level surface, near appropriate water supply, and water drainage. A driveway is a suitable choice.
2
Seal the drain and overow hole with tape or a stopper and ll the bathtub to the bottom of the overow hole.
3
Allow bathtub to stand for 5 minutes.
4
Visually inspect all joints for leaks. Do not install the bathtub if leaks are detected.
5
Return bathtub to box or otherwise protect from damage until time of installation.
Bathtub Water and Operational Test
Prepare the sub oor for the drain and ensure that the area is level.
1
The drain/overow of the bathtub extends below the bottom of the bathtub. Identify the drawing in the Technical Specications
section that corresponds with your bathtub (available on www.jacuzzi.com).
2
Determine the location of the basin. The oor must be at and level.
3
Make appropriate cuts to the Sub oor to accommodate the drain.
Please refer to the drawing(s) in the Technical Specications section that correspond to your bathtub.
Sub Floor
Installation Instructions for 1-Piece Tub with Integrated Overow
TOE-TAP DRAIN COVER
(SUPPLIED)
INTEGRAL OVERFLOW
CHANNEL
DRAIN OPENING
WASTE FITTING
TOP GASKET (SUPPLIED)
WASTE FITTING NUT
(SUPPLIED)
WASTE FITTING
(SUPPLIED)
WASTE FITTING
BOTTOM GASKET
(SUPPLIED)
SILICONE ALL AROUND
1-1/2” FPT TO SLIP
ADAPTER (NOT
SUPPLIED)
INTEGRAL OVERFLOW
CHANNEL
DRAIN
DETAIL
SEE DRAIN DETAIL
Fig 1.