
Installation Guide
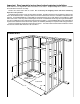


Framing and Support
The unit must be supported from the bottom and not
from the nailing flange. If the subfloor is level, no other
preparation is necessary. You can proceed to install the
bath. If the subfloor is not level, you MUST level the
entire surface prior to installing the bath. The use of
materials that shim or provide a level installation are
allowed provided the method used will insure a level unit
that is supported from the bottom. Materials that may be
used are a floor leveling compound, mortar, plaster or
minimal expansion structural foam having a density of a
minimum of 5 lbs./cubic ft; however the unit must remain
level in order for it to drain properly and the foam feet
must make full contact with the leveling material. Both
sides of a joint or splice of subfloor should be level to
each other. When attaching baths with flanges to
stud wall, use shims to fill any gaps between the
bath flange and studs.
The shower base should be installed after construc-
tion of the studwall and after rough plumbing is in place.
It is important that the framed pocket be plumb and
square and that the framing members be located as
detailed in the framing illustration. If the shower base
unit is to be installed in an existing shower room studwall,
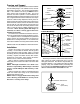
FLANGE MOUNTING
STUD
TILE
ADHESIVE
TILE
CEMENT
BOARD
1/8" GAP
STUD
CAULKING
SHIM IF
NECESSARY
TO FILL GAPS
BETWEEN STUD
AND FLANGE
ATTACH WITH
SCREWS
PROVIDED
FLANGE
1" X 4"
(NOT FOR
SUPPORT)
additional studs must be added to the dimensions shown.
Installation
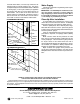
Remove the stainless steel strainer from the drain
assembly. Disassemble the locknut and two gaskets
from the back of the drain assembly. Apply a 1/4" bead
of caulking (silicone) to the drain hole and insert the drain
assembly. Replace the rubber washer, fiber washer,
and lock nut in that order. Hand tighten the locknut.
Remove excess sealant from finished side.
Apply a lubricant (common household liquid soap
works well) to the inside of the rubber seal of the drain
assembly.
NOTE: Watertight installation of the drain is the
installer's responsibility. Drain leakage is excluded
from the Jacuzzi Whirlpool Bath warranty of this
product.
Slide the shower base into the framed opening and
attach the shower base flange to the stud wall and
blocking with drywall screws.
NOTE: If there is any gap between base flange and
stud or blocking, shims MUST be used to prevent
distortion or cracking of the flange.
STRAINER
DRAIN
ASSEMBLY
SILICONE
SEALANT
SHOWER
BASE
RUBBER WASHER
FIBER WASHER
NUT
APPLY
LUBRICANT
DRAIN ASSEMBLY
TIGHTEN SEALING NUT
TOOL
(INCLUDED)
With a large screwdriver and the tool included with the
drain, tighten the inside compression nut to seal the
drain pipe connection. After drain is fully installed, test
for proper drainage. If the shower base does not drain
properly, rectify this condition before proceeding with
the installation. Jacuzzi Whirlpool Bath is not respon-
sible for removal and/or reinstallation costs.