
Installation Guide

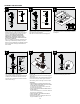
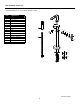

Align the faucet assembly (1) onto the rough-in body (3).
Secure the faucet assembly (1) to the rough-in body (3)
using bolts (2, contained in SKU# PT61000). Place the
flange (4) over the standpipe and then push it to
the base.
Note: Do not reverse the hot and cold water supply.
6B
Turn the supply lines on, and turn handle (1) to the
full on mix position. Hold hose (2) inside tub and press
the pin (3) to the bottom position. Flush faucet for
1 minute. If hose has gasket installed, use caution not
to lose during flushing process. After flushing turn off
water at the bath valve handle.
Make sure washer (1) is in hose end (2). Thread hose
onto outlet (3) and tighten securely. Do not overtighten.
ASSEMBLY INSTRUCTIONS
4
7
8
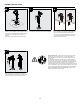
Make sure washer (1) is installed in hose end (2).
Hand tighten hose onto hand shower (3). Place hand
shower into holder (4). Inspect for leaks at arrows.
9
2
1
3
4
1
3
2
1
3
2
4
1
1
3
2
Diverter Instructions : To divert water from the faucet spout to the
hand shower, push in the diverter pin (3) to the inward position.To
divert water back to faucet spout, turn the water completely off, and
then on again.
The diverter pin (3) will auto-reset back into the outward position. If
the diverter pin (3) does not auto-reset back into the outward position,
then gently rotate the diverter pin (3) button left or right while the water
is shut off, and it should easily reset back to the outward position.
CAUTION: While water is running through the hand shower, the diverter
will not pull outward to reset to the faucet spout unless the water is shut
off and turned on again. DO NOT FORCIBLY PULL THE DIVERTER
PIN (3) OUTWARD WHILE WATER IS RUNNING. This can cause
damage to the diverter pin (3) assembly.
3