INSTALLATION MANUAL EXPOSED ROLLER SHOWER DOOR Left hand door installation shown Questions, problems, missing parts? Before returning to your retailer, call our customer service department at 1-800-2884002, 9 a.m. - 8 p.m.
Important: Jacuzzi Luxury Bath reserves the right to alter, modify or redesign products at any time without prior notice. Visit Jacuzzi.com for the latest version of installation manuals and warranty information. Please inspect the product immediately upon receipt for freight damage, missing packs/parts, or manufacturing defect. Damage reported post delivery will not be responsibility of Jacuzzi Luxury Bath. Read complete instructions before beginning installation. Remove the unit carefully from the carton.
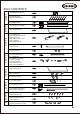
Aftercare instructions Tools required (not supplied) LEVEL DRILL MEASURING TAPE 6MM & 3.2MM DRILL BITS *Masonry drill bit may be required for tile and ceramic installations . PENCIL PAINTER’S TAPE KNIFE MILDEW RESISTANT RECOMMENDED M4 & M5 SCREWDRIVER HAMMER It is recommended to verify that the correct door size will be installed by measuring the opening where the door will be installed and comparing it with the size labeled in the packaging.
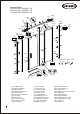
Jacuzzi items SX60826-BN / SX60827-CH SX59826-BN / SX59827-CH SX48826-BN / SX48827-CH [27] [16] [28] [7] [26b] [31] [6] [30] [3] [8] [26a] [25] [15] [4] [19] [18] [21] [1] [5] [22] [2] [17] [13] [23] [24] [14] [32] [33] [12] [29] [9] [20] [10] [11] [1] 13xWall plugs [2] 8xScrews M4x35 [3] 2xWall jambs [4] 1xMagnet expander [5] 1xFixed panel [6] 4xFlat screws M5x35 [7] 1xTop rail [8] 2xFasteners [9] 1xAluminum seal [10] 1xBottom guide [11] 1xEnd cap 3 [12] 1xU gasket [13] 1xScrew cap
STEP 1 BOX CONTENTS: 1xInstallation manual [1] 8xWall plugs [2] 8xScrews M4x35 STEP 3 STEP 2 [3] 2xWall jambs [4] 1xMagnet expander [5] 1xFixed panel [1] 4xWall plugs [6] 4xFlat screws M5x35 [25] 2xCushions [26] 2xWall connectors [27] 1xStopper [28] 2xWall fixings [26a] [26b] [7] 1xTop rail [8] 2xFasteners STEP 5 STEP 4 [9] 1xAluminum seal [1] 1xWall plug [10] 2xBottom guides [11] 2xEnd caps [12] 2xU gaskets [13] 2xScrew caps [29] 1xScrews M4x35 [14] 1xDoor panel [15] 2xTop rollers [33] 1xWrench [
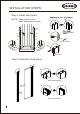
INSTALLATION STEPS: Step 1:Install wall jambs has NOTE: Temporarily hold in place with painter’s tape A [3] A A B B C C B shower 6mm drill bit C [2] 5mm 39mm Screw M4x35 Step 2:Assemble fixed panel A B A View from inside [5] B [4] View from inside 5
Step 3:Assemble top rail A BCDE Align [7] A B D E [8] [28] A B [6] 6mm drill bit [25] [26b] [27] C D E [26a] Step 4:Attach top rail and bottom trim B A A [8] B [12] C [13] Screw M4x25 [29] 6mm drill bit C D [10] [9] [11] If the shower enclosure is installed with a tray, make holes in the tray with φ3.2mm drill and wall plugs are not required; see drawing C. If not, make holes in the floor with φ6mm drill, wall plugs are required.
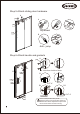
Step 5:Attach sliding door hardware A [15] [16] A B Top wheel [17] B Anti - jump Step 6:Attach handle and gaskets [31] D1 B A D2 Screw M5x30 View from inside of door [19] B C A [18] [17] D1 CUT 4" Fixed Panel C 7 [20] D2 Door Panel CUT 4" Ensure wall profiles are plumb. Adjust enclosure to be square and level. Wheels should be adjusted to square the doors and ensure smooth running.
Step 7:Leveling adjustments View from inside of door Align door to wall jamb Step 8:Final securing of door Warning: Do not drill through the safety glass drill on "V" Line 1, closer to the wall. Fixed panel Fixed panel drill on "V" Line 2, closer to the profile.
Step 9:Apply silicone on the inside and outside of the door, and attach top caps A [30] A View from outside of door Allow 24 hours for silicone to dry before use DO NOT USE SHOWER Reverse to install the door from LH to RH.
One Year Limited Warranty on Jacuzzi® Branded Shower Doors Jacuzzi Luxury Bath (“Company”) offers a one year warranty to the original purchaser (“user”) of a Jacuzzi® branded shower door(s) for personal or single family residential use, subject to the following terms, conditions and limitations. The Company will repair or replace, at its sole option, the shower door(s) or its component parts in accordance with the terms, conditions and limitations set forth in this limited warranty.
MANUAL DE INSTALACIÓN CANCEL DE RUEDAS EXPUESTAS Instalación con entrada a la izquierda mostrada ¿Preguntas, problemas o partes faltantes? Antes de regresar a su distribuidor, contácte a nuestro departamento de servicio al cliente al 1800-288-4002, 9 a.m. - 8 p.m., EST, Lunes Viernes.
Importante: Jacuzzi Luxury Bath se reserve el derecho de alterar, modificar o rediseñar sus productos en cualquier momento sin previa notificación. Visite www.jacuzzi.com para encontrar la version más reciente de los manuales de instalación y documentos de garantía. Favor de inspeccionar cuidadosamente el product en busca de daño por distribución, partes faltantes o defectos de manufactura. Reclamos por daño de distribución no son responsabilidad de Jacuzzi Luxury Bath una vez aceptado el product.
Instrucciones sobre el cuidado Lave el cancel con agua y jabón después de cada uso. Esto es particularmente importante en áreas de agua dura, donde alto grado de depósitos de sal pueden acumularse. Este cancel ha sido tratada con agentes que reducen dichos depósitos para facilitar su aseo y cuidado. No utilice limpiadores abrasicos. Evite el uso de químicos Fuertes tales como solvents orgánicos. Mantenga estas instrucciones como referencia future.
Para modelos: SX60826-BN / SX60827-CH SX59826-BN / SX59827-CH SX48826-BN / SX48827-CH [27] [16] [28] [7] [26b] [31] [6] [30] [3] [8] [26a] [25] [15] [4] [19] [18] [21] [1] [5] [22] [2] [17] [13] [23] [24] [14] [32] [33] [12] [29] [9] [20] [10] [11] [1] 13xWall plugs [2] 8xScrews M4x35 [3] 2xWall jambs [4] 1xMagnet expander [5] 1xFixed panel [6] 4xFlat screws M5x35 [7] 1xTop rail [8] 2xFasteners [9] 1xAluminum seal [10] 1xBottom guide [11] 1xEnd cap [12] 1xU gasket [13] 1xScrew cap [14
PASO 1 CONTENIDO DE LA CAJA: 1xInstallation manual [1] 8xWall plugs [2] 8xScrews M4x35 PASO 3 PASO 2 [3] 2xWall jambs [4] 1xMagnet expander [5] 1xFixed panel [1] 4xWall plugs [6] 4xFlat screws M5x35 [25] 2xCushions [26] 2xWall connectors [27] 1xStopper [28] 2xWall fixings [7] 1xTop rail PASO 5 PASO 4 [8] 2xFasteners [9] 1xAluminum seal [1] 1xWall plug [10] 2xBottom guides [11] 2xEnd caps [12] 2xU gaskets [13] 2xScrew caps [29] 1xScrews M4x35 [14] 1xDoor panel [15] 2xTop rollers [33] 1xWrench [16] 2xA
PASOS DE INSTALACIÓN: Paso 1: Instale los marcos laterales NOTA: Sujete con cinta de pintor Ranura en forma de “v” al interior A [3] A A B B C C Vista por dentro del cancel B 6mm broca C [2] 5mm 39mm Tornillo M4 x35 Paso 2: Instale el vidrio fijo A B A Vista por dentro del cancel [5] B [4] Vista por dentro del cancel 16
Paso 3: Instale el riel superior A BCDE Alinear [7] A B D E [8] [28] A B [6] 6mm broca [25] [26b] [27] C D E [26a] Paso 4: Ajuste el riel superior y la guía inferior B A A [8] B [12] C 6mm broca C D [10] [9] [11] Si la puerta es instalada sobre una base, taladre los orificios a la base con una broca de 3.2mmñ vea el dibujo C. En caso contrario, perfore con una broca de 6mm.
Paso 5: Instale el vidrio deslizante A [15] [16] A B Rueda superior [17] B Anti - jump Paso 6: Instale los plásticos protectores y la manija [31] D1 B A D2 Tornillo M5 x30 Vista por dentro del cancel [19] B C A [18] [17] D1 Vidrio fijo C [20] Cortar 4” D2 Cortar 4” Vidrio deslizante Asegúrese que los marcos laterales estén nivelados. Ajuste para que la puerta quede nivelada. Debe estar nivelada para que las ruedas operen con suavidad.
Paso 7: Ajustes de nivel Vista por dentro del cancel Alinear la puerta con la pared Paso 8: Adhesión final Advertencia: No taladre sobre el vidrio Al hacer ajustes entre 0-10mm, taladre en la Línea 1 “V” más cercana a la pared. Vidrio fijo Vidrio fijo Línea 1 “V” Al hacer ajustes entre 10-15mm, taladre en la Línea 2 “V” más cercana al marco.
Paso 9: Aplique silicón en el perímetro del cancel, por dentro y por fuera y adhiera los tapones superiores A [30] A Vista por fuera del cancel Permita que el silicón seque por 24 horas NO UTILICE LA REGADERA Invierta para instalar la entrada de izquierda a derecha 20