R TOUCH-SCREEN DISPLAY AND JAGUARVOICE Publication Part No.
L This handbook forms part of the Owner literature supplied with your vehicle. Left hand drive and right hand drive conditions may be shown in the graphics and where information is specific to a particular country, it is indicated as such. The Quick start section designed to rapidly familiarise the driver with the initial set up and also explain some of the unique features. Please take the time to study the operating instructions with your vehicle as soon as you can.
R Handbook Contents Quick Overview Quick Overview . . . . . . . . . . . . . . . . . . . 7 Owner Information Introduction . . . . . . . . . . . . . . . . . . . . . 13 Touch-screen Display . . . . . . . . . . . . . 16 Climate Control Climate Control . . . . . . . . . . . . . . . . . . 21 Audio System Steering Wheel Controls . . . . . . . . . . . 31 Cassette Tape . . . . . . . . . . . . . . . . . . . 32 Single CD Player . . . . . . . . . . . . . . . . . 34 Compact Disc (CD) Changer . . . . . . . .
L 4
R Quick Start Quick Overview Climate Control . . . . . . . . . . . . . . . . . . . 7 Audio . . . . . . . . . . . . . . . . . . . . . . . . . . 8 Navigation . . . . . . . . . . . . . . . . . . . . . . . 9 JaguarVoice . . . . . . . . . . . . . . . . . . . .
L 6
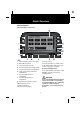
R Quick Overview Quick Overview Climate Control (XJ and S-TYPE panel shown) 1. Select climate control touch-screen. 13. Touch-screen. 2. Adjust blower speed. For more information on climate control for all Jaguar models with touch-screen controls, see page 21 onwards. 3. Select automatic operation. 4. Decrease left-hand zone temperature. Recommended Operation It is recommended that automatic control (AUTO) is selected as the normal operating mode. 5. Increase left-hand zone temperature. 6.
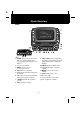
L Quick Overview Audio 1. AUDIO. Press to turn audio system ON, or to display relevant audio screen and associated touch-screen buttons. 9. CD (or TAPE). Select compact disc play when in other audio mode, or CD pause (when a CD is inserted and playing). 2. Touch-screen display. 10. AM/FM. Radio waveband select. 3. MENU. Press to access touch-screen options. 11. Seek AM/FM station, cue/review CD/MD. 4. MIX. Mix CDs or CD tracks. 12. MODE. Scroll to select sound settings. 5. PTY.
R Quick Overview Navigation Displaying point of interest icons: The starting position for all these functions is the map screen showing the current position of the vehicle. If any other screen is shown, push the NAV button to display the map screen. • Changing the map heading (north up/heading up): • Getting started Entering a destination by address: • Touch the Map Orientation button. Note: Heading up is not available if scale is greater than 2 miles or 4 kilometres.
L Quick Overview Navigation Menu Structure Menu screens are provided to select various functions. To select a menu item, use the touch button for the option required. After selecting a menu item, the next sub-menu or screen will be displayed. If a menu item cannot be currently selected, the button will be displayed in a light tint only.
R Quick Overview JaguarVoice Next - try some commands • Press and release the voice button before each command, and try the following: ‘Radio Tune 97.4 FM’ ‘Changer Play Track 4’ ‘Climate Control Temperature 21’ ‘Phone On’ Operating tips 1. After pressing the voice button (A), wait for the end of the single listening beep before giving the command. A single beep denotes when the voice system is listening for a command.
L Quick Overview Some Useful Voice Commands Telephone Commands PHONE ENTER (2 – 16 digits) The system responds by repeating the phone number back to you and then giving you the options below.
R Introduction Owner Information General Information Screen Cleaning The touch-screen provides touch-control of vehicle climate, audio, navigation and telephone systems, as fitted. A small Liquid Crystal Display (LCD) screen below the touch-screen provides a digital display of the ambient temperature and vehicle cabin set temperature and, for X-TYPE, a clock. Caution: Care must be taken to avoid spilling or splashing drinks onto the touch-screen.
L Introduction Navigation System This Jaguar navigation system assists the driver by providing a route to a selected destination. Guidance is given by means of audible instructions (voice guidance), complemented by map and turn information, which is displayed on the touch-screen. Digital map information is held on the Navigation System Digital Versatile Disc (DVD), which is loaded into the navigation control unit housed in the luggage compartment. ! WARNING: 1.
R Introduction JaguarVoice Window Tinting JaguarVoice provides a safe and convenient way for the driver and/or rear occupants to control the following vehicle systems (where fitted): • Sound system (radio, cassette tape player, CD player and CD changer – as applicable). • In-car telephone. • Climate control system (front user only unless 4-zone climate control is fitted). • Display screen (front user only). • Navigation (front user only).
L Touch-screen Display Touch-screen Display XJ and S-TYPE Touch-screen Display X-TYPE Touch-screen Display 16
R Touch-screen Display Vehicle Differences Note: When operating touch-screen buttons, always extend the tip of one finger, and withhold the thumb and remaining fingers from the screen. Touching the screen with more than one finger at a time may cause false inputs. Vehicle differences The main differences between Jaguar model touch-screens are: • Climate control: X-TYPE has a single cabin temperature control. S-TYPE has dual-zone temperature control. The XJ has dual-zone or four-zone controls.
L Touch-screen Display Volume Preset Brightness/Contrast After touching the Volume button, the screen displays the buttons for adjustment of volume associated with the navigation system, JaguarVoice, telephone, traffic announcements and automatic volume control (AVC). Adjustment of AVC varies the rate at which volume is increased or decreased relative to vehicle speed. After touching the Brightness/Contrast button, the screen displays the buttons for adjustment of the screen display characteristics.
R Touch-screen Display System Setup To select another language, touch the Change button and, if the language is not shown, scroll the screen as required. To select a language, touch the flag of the country required. Navigation Units provides either imperial or metric units for use with the navigation system. Confirm your selection by touching OK. Set clock After touching the System Setup button, the screen displays the buttons for selecting user settings or vehicle settings.
L Touch-screen Display The XJ vehicle settings After touching the Vehicle Settings button, the screen displays the buttons that switch certain functions on or off. Two-stage unlock If this function is switched on, the first press of the key transmitter ‘unlock’ button will only unlock the driver’s door. Press the unlock button a second time to unlock the remaining doors. If the function is switched off, pressing the unlock button once will unlock all of the doors.
R Climate Control Climate Control Information Panel illumination With the exterior lighting switched on, the graphics on the panel controls are illuminated by low level backlighting. A general introduction to the climate control system is given in the Owner’s Handbook. The operating information given here refers to the touch-screen and other controls. The illumination level is adjusted by the common instrument panel dimmer control.
L Climate Control Controls (XJ and S-TYPE) 1. Select climate control touch-screen. 2. Adjust blower speed. 3. Select automatic operation. 4. Decrease left-hand zone temperature. 5. Increase left-hand zone temperature. 6. LCD screen: interior and exterior temperatures. 7. Decrease right-hand zone temperature. 8. Increase right-hand zone temperature. 9. Heated rear screen/door mirrors. 10. Heated front screen. 11. Defrost operation. 12. Select air recirculation. 13. Touch-screen.
R Climate Control Controls (X-TYPE) 1. Select climate control touch-screen. 2. Adjust blower speed. 3. Air conditioner on/off. 4. Automatic operation. 5. LCD screen: interior and exterior temperatures and clock. 6. Decrease set temperature. 7. Increase set temperature. 8. Heated rear screen/door mirrors. 9. Heated front screen. 10. Defrost operation. 11. Select air recirculation. 12. Touch-screen.
L Climate Control Ignition On AUTO Mode The climate control system operates in position ‘II’ (run) of the ignition switch. When the ignition is switched to run or the engine is started, the Jaguar logo will be displayed briefly followed by the last touch-screen selected (e.g. radio). The climate control system will be set to the climate operating mode selected previously.
R Climate Control Temperature Selection External Temperature Set the required interior temperature with the red or blue arrowed buttons. Press the red buttons to increase temperature and the blue buttons to decrease temperature. The external (EXT) temperature is displayed on the LCD screen. Celsius/Fahrenheit Selection Touch the button to change the scale between degrees Celsius (°C) and degrees Fahrenheit (°F) for the displayed interior and external temperatures.
L Climate Control Deselecting air recirculation cancels AUTO mode. Latched Air Recirclation • Air conditioning switches on automatically and cannot be deselected. • Recirculation is cancelled and cannot be selected. • The front screen heater and the rear screen heater/door mirror heaters switch on automatically, provided the engine is running. To deselect defrost mode, press DEF again, or press AUTO (recommended operating mode).
R Climate Control Blower Mute In cold ambient conditions, at the start of a journey, the front and rear screen heaters will switch on automatically for the timed period. To reduce the interior noise level, the blower speed may be quickly reduced to a preset level by touching the Mute button. Where a front screen heater is not fitted, the windscreen has a wiper park zone heater which operates automatically with no manual control.
L Climate Control Switching Climate Control Off Any of the other air distribution modes may be selected manually using the touch-screen. With the blower switched off, the fresh airflow results from the forward motion of the vehicle (ram air mode). Climate Options To switch the system off, touch the system ON/OFF button on the CLIMATE CONTROL screen. The touch-screen will change to the system off/ram air climate control screen above.
R Climate Control • Items Relevant to the XJ Only Smog sensing Where fitted, the smog sensor detects road traffic pollutants and automatically selects air recirculation when the level of pollution outside the vehicle reaches a certain level. The level of pollution at which the smog sensor will respond can be adjusted on the Options screen. Touch Adjust Settings to alter the settings of the rear zones. A simulation of the rear control panel will be displayed on the touch-screen.
L 30
R Steering Wheel Controls Audio System XJ and S-TYPE Note: Switches illustrated as 2 and 4 are: • • The XJ and S-TYPE - rocker switches. X-TYPE - part rotating switches which self-centre when released. 1. Press to start a voice session, or mute when JaguarVoice is not fitted. Answer phone call when ringing. Send/End when in phone mode. 2. Press/rotate as required to increase or decrease volume. 3.
L Cassette Tape Cassette Tape 8. CDC. Select CD changer. 1. AUDIO. Press to turn audio system ON, or to display relevant audio screen and associated touch-screen buttons. 9. TAPE. Select cassette tape play when in other audio mode, or tape side change (when a tape is inserted and playing). 2. Touch-screen display. 3. MENU. Press to access touch-screen options. 10. AM/FM. Radio waveband select. 11. Seek AM/FM station, seek tape or cue/review CD. 4. MIX. Mix CDs or CD tracks playing order. 12. MODE.
R Cassette Tape Cassette Player Operation Dolby B When using a cassette with a ‘Dolby’ recording, the noise reduction system can be selected by pressing the DOLBY button. DOLBY will be displayed to indicate the system is active. Dolby noise reduction system is manufactured under licence from Dolby Laboratories Licensing Corporation. ‘Dolby’ and the double-D symbol are trademarks of Dolby Licensing Corp.
L Single CD Player Single CD Player 10. AM/FM. Radio waveband select. 1. AUDIO. Press to turn audio system ON, or to display relevant audio screen and associated touch-screen buttons. 11. Seek AM/FM station, cue/review CD/MD. 2. Touch-screen display. 12. MODE. Scroll to select sound settings. 3. MENU. Press to access touch-screen options. 13. ON/OFF and volume control. 4. MIX. Mix CDs or CD tracks playing order. Single CD Player Operation 14. Eject CD or MD. 5. PTY.
R Single CD Player In CD mode, touch-screen buttons (shown above) provide for selection of CD tracks. Seek up and down Touch and release to seek tracks up or down. Momentarily press the right-hand button to skip to the next track. Repeated pressing will select further tracks. The display will show the CD screen. The CD symbol will be displayed until the CD is ejected, regardless of the selected audio source. The left-hand button returns to the beginning of the current track.
L Compact Disc (CD) Changer Compact Disc (CD) Changer Loading the CD changer A CD changer (where fitted) is installed in the luggage compartment and will accommodate up to six discs, each mounted in a tray. Caution: The 8 cm diameter discs and associated adaptors available in some countries must not be installed in the CD changer magazine. Any attempt to install these items can result in permanent damage to the CD changer mechanism.
R Compact Disc (CD) Changer CD Changer Operation To play random tracks from all discs present in the magazine, touch and hold the Mix button for more than 2 seconds. MIX ALL will be displayed. To cancel, touch and hold the Mix button. CD changer mode Seek up and down Touch and release to seek tracks up or down. Momentarily press the right-hand button to skip to the next track. Repeated pressing will select further tracks. The left-hand button returns to the beginning of the current track.
L Rear Multimedia Rear Multimedia Rear Multimedia Operation This feature will allow the front occupants to turn on the rear speakers if the rear occupants have turned them off using the rear multimedia system. (The XJ only) The front user can turn the rear speakers on by pressing the ‘rear speakers on’ button. If the button is disabled, then the rear speakers are already on.
R Rear Multimedia Rear Multimedia Settings Balance and tone adjustment The XJ driver or front seat passenger can inhibit the Rear Multimedia System Controls. Bass, Treble, Balance (left to right), Fade (front to rear). Subwoofer level is also adjustable on Premium Audio Systems. Adjustments are made by pressing and releasing the MODE button on the audio panel and adjusting the required touch-screen ‘slides’ (see illustration above) by repeatedly pressing the ‘+’ or ‘–’ buttons.
L Radio Radio Radio Operation Volume control Reception FM reception offers the advantages of low noise interference, minimal distortion, wide dynamic range, extended frequency response, and is usually broadcast in stereo. FM frequency waves are however relatively short and travel in a straight line and can therefore be impeded by obstructions, which may adversely affect reception in certain parts of the country. This is a condition known as Multipath Interference.
R Radio Automatic volume control Audio Setup This maintains radio volume at a level sufficient to overcome road noise as vehicle speed increases or decreases. To activate AVC, press the MENU button, followed by the VOLUME PRESET button on the touch-screen. Once in the volume preset screen, AVC level can be adjusted (from OFF to 5) by repeatedly pressing the ‘+’ or ‘–’ buttons adjacent to the AVC volume indicator. This function enables the radio to be set to user operating preferences.
L Radio Country RDS/RBDS FM Volume Key Off Eject Tape Clean During initial factory installation, this is used to set the radio to one of the following regions: Europe, Australia or Japan. Regional settings determine the correct frequency increments required for seeking stations, automatic tuning etc. Note: The regions are preset at the factory. Should you require a regional change, consult your Jaguar Retailer.
R Radio Digital Signal Processing DSP (premium audio system only) facilitates optimisation of sound for specific seating positions and is accessed via the DSP button shown on the touch-screen (audio screens only). The chosen setting can then be selected by touching the appropriate zone. • Options available are: • • Front left. • Front right. • Front centre. • Rear seats. • All seats. RDS displays information on the type of material broadcast by the station or programme that is on e.g.
L Radio RDS Operation To activate RDS, press the TA button and hold for at least 2 seconds until RDS ON is displayed. TA operation To activate TA: Press the TA button momentarily (less than 2 seconds). TA will appear at the top of the display. The radio then checks that the station has RDS TP (Traffic Programme); indicated by TP at the top of the display. If TP is not available on the current station, the radio will perform a TP SEEK while it searches for a station.
R Radio RDS Trouble-shooting Guide Incorrect response from RDS Radio does not display programme name. Station name is lost and displays frequency only. Upon operating A MEM NO FM is displayed when most or all of the preset positions are selected. Upon pressing the TA button the radio re-tunes to another station and displays TP SEEK. Radio sound goes off and the display shows PI SEEK. Radio ‘beeps’ and the display shows NO TA/TP and turns off TA.
L Radio Programme Type (PTY) TA and priority PTY interrupt skip Interruptions for Traffic Announcements, NEWS or other selected priority PTY, can be skipped by pressing TA during the interrupt. The radio returns to the previously selected audio source. This has two functions; to display current station programme type and to select a programme type and re-tune to it. Note: Momentarily press the PTY button to display the current station programme type.
R Audio System Source Audio System Source Change the Audio Source Presetting memorised radio stations ! WARNING: In the interests of road safety, do not attempt to preset a radio station while driving. On each waveband, nine stations can be stored in the bank of nine buttons displayed on the touch-screen. To store a radio station as a preset, touch the selected button until a beep sounds to acknowledge the station has been stored. Press the desired audio system source button.
L Audio System Source Auto memory (A MEM) The automatic memory function programmes the nine strongest stations on a selected waveband to presets 1 to 9. Note: These are additional to the preset stations described earlier. To activate this function, press and hold A MEM button for at least 2 seconds. The radio will be briefly muted while it searches the waveband for the nine strongest stations. When programming is complete the radio will default to preset number 1 and audio volume is restored.
R Audio System Care Audio System Care Radio Caution: Do not use abrasive type cleaners as they can cause excessive wear of the playback head. Do not use gas, solvents or abrasive cleaners on the radio. Wipe the surface of the radio with a lint-free cloth to remove dust. Slightly moisten the cloth with clean water to remove any finger marks from the outside surface of the radio. Compact discs (CDs) When handling CDs, do not touch the playing surface.
L Audio System Care 50
R Navigation - Overview Navigation System Introduction Loading the Navigation DVD The navigation system will guide the driver to a specific location on a map. The location can be selected in a number of ways, from entering an address to touching the location on the touch-screen map. The area covered by the navigation system depends on which version of the Navigation System DVD is loaded. The driver is directed to the destination by voice guidance and/or the on-screen instructions.
L Navigation - Overview Errors in Vehicle Position Safety Information Under certain driving conditions, it is possible that the vehicle position shown on the map display may be incorrect. Some examples are shown below: • When the vehicle is transported by ferry or train. • Driving on steep roads. • After vehicle battery removal or supply fuse failure. • When using snow chains. • After the tyres have been replaced. • After the vehicle has been rotated on a turntable.
R Navigation - Overview Map information is regularly updated, but all areas are not necessarily covered to the same level of detail. Some areas, in particular private roads, may not be included on the database (non-digitised roads). While driving under route guidance, follow an instruction only when it is safe to do so, as the system cannot be aware of changing conditions, for example turn restrictions, roadworks or diversions.
L Navigation - Overview How the System Works The system uses signals from the Global Positioning System (GPS) satellites, which allow the approximate position of the vehicle to be calculated. This is combined with information from vehicle sensors and data from the Navigation System DVD to establish the true vehicle position. Some examples of situations likely to cause problems are shown below: GPS signals are highly directional and reception may occasionally be interrupted. 54 • Inside tunnels.
R Navigation - Overview Route Guidance Position Alternative Routes Under certain driving conditions, it is possible that the route guidance may be inaccurate. Some examples are shown below: During route calculation, up to three possible routes are calculated. The first route is calculated using the current route preference settings. The second route is also calculated using the preference settings, except that for Minimise Time/Dist., the alternative setting is used.
L Navigation - Overview Control Panel (the XJ shown) 1. Touch-screen. 2. NAV (Navigation) button Navigation forms part of the overall vehicle telematics system, having a combined front panel and LCD screen (1). Navigation is selected by pushing the NAV button (2). The ignition must be switched on (position ‘I’). Note: The navigation system is operated by using the buttons displayed on the screen. For an explanation of the basic navigation buttons, see ‘Function of On-screen Control Icons’, page 61.
R Basic Screen Displays Basic Screen Displays Screen Displays Initial Map Display NAV button Press the NAV button to select the navigation system. The road safety caution will be displayed. Touch Agree to acknowledge this information (See ‘Safety Information’, page 52). Note: While the navigation system is selected, the NAV button has the following additional functions: • Selects the initial map display from any other screen.
L Basic Screen Displays 6. Lower text area - Shows the current street name (present vehicle location). While operating the system, this text area is replaced by additional buttons. In certain locations (e.g. private roads) no road name will appear. The scale markings shown on the indicator are: 1/32, 1/2, 4, 128 miles (50 m, 1 km, 8 km, 256 km).
R Basic Screen Displays NAV button The NAV button has the following functions: 2. Repeat is also available while one of the other touch-screen systems is selected (but not during a telephone call). • Selects the navigation system. • While the navigation system is selected, selects the initial map display from any other screen. • After scrolling, returns to the map display of current vehicle position. Telephone button Calls the telephone number currently shown on the screen.
L Basic Screen Displays POI/POI Off buttons After selecting a menu item, the next sub-menu or screen will be displayed. If a menu item cannot currently be selected, it will be disabled, as shown (2). POI - Selects the quick points of interest function to display POI icons on the map. Note: To find a particular menu, see Navigation Menu Structure on page 10. POI Off - Deselects the display of icons. Name Lists Note: For more information see Points of Interest (POI) on page 83.
R Basic Screen Displays Character Input Number Input • • Enter the desired name by touching each button in turn (1). The digits entered are displayed on the screen (2). The characters entered are displayed on the screen (2). As characters are entered, only the characters available to complete names stored in the database are shown highlighted. It is not necessary to enter all the characters. The number of possible names from the characters entered is shown (3).
L Basic Screen Displays Next manoeuvre point Indicates the location of the next instruction on the route ahead. GPS icon - Indicates that insufficient GPS satellite signals are being received for accurate map positioning. The icon is not displayed under normal operation. Next turn icon - Shows the action to be taken at the next manoeuvre point on the route ahead. (A typical example is shown.) Roundabout icon - Shows the direction to be taken at the next roundabout.
R Screen Types Screen Types Map Screen Guidance Screen (Turn Arrows) • The guidance screen overlay is always displayed while the Split Screen option is selected, and is also displayed when selected manually while the Full Screen option selected. Choose Display Options from the Navigation menu and select split screen or full screen. Split screen When set to split screen, the map display always shows the guidance screen overlay while a route is set.
L Navigation Menu Navigation Menu Navigation Menu The Navigation menu is the top level menu of the system, showing the functions that are available: Destination Entry - see page 76. Route Options - see page 69. Navigation Set Up - see page 72. Display Options - see page 74. Stored Locations - see page 89. • Select the menu item required. Audible instructions The highlighted button shows whether the setting for voice guidance is currently On or Off.
R Route Setting Route Setting Setting a Route Map Display This is a simple example showing how to use the basic features of the system to set a route. It describes each screen in turn and explains how to use the controls. For information relating to the other features of the system, see the relevant chapter in this handbook. Note: Before using the system, check that the correct Navigation System DVD is loaded, see ‘Loading the Navigation DVD’, page 51.
L Route Setting Destination Entry Menu The list of possible streets from the characters entered is displayed. • Select the street required. Note: In this example the street name is entered first. Addresses can be entered in other ways, e.g. city name first. Select City The Destination Entry menu shows the options available for setting a route. The map inset shows the currently selected area, which the system will use when searching for destination addresses.
R Route Setting Enter House Number Confirm Destination • The map screen showing the destination details, and the current route settings is displayed. Enter the house number by touching the buttons required. For more information, see ‘Number Input’, page 61. • • When all the digits have been entered, touch OK. Touch Dest. to confirm as a destination. The screen shows ‘Calculating Route’ while the route is calculated.
L Route Setting Arrival at Destination Alternative routes The system will also calculate at least one alternative route (where possible). The alternative route(s) can be viewed and selected in place of the original route if required. • To view an alternative route, touch Next. Route Guidance When the vehicle reaches the end of the route, the screen shows the destination address details. Arrival at the destination is also confirmed by voice guidance. The system is now ready for further use.
R Route Options Route Options Route Options Menu Freeways: 5, 10, 15, 20, 25, 50, 100 miles (or kilometres). • Touch the appropriate buttons to change the detour settings as required. Route detour • Touch the Detour button. The route ahead is recalculated using the current detour distance settings. The menu shows the route options available: Alternative route • Detour The system uses different combinations of the route preference settings to calculate an alternative route (where possible).
L Route Options Note: The system will use your route preference settings wherever possible. However in some circumstances, to calculate a satisfactory route, one or more of the alternatives may have to be used. End of route display Display Whole Route After touching Dest Map, the screen shows the last portion of the route, with the destination address displayed at the top of the screen.
R Route Options Calculate Avoid point/area This is a quick way to start a route calculation after making changes to the route preferences. For more information, see ‘Calculating the Route’, page 95. Note: The route will be calculated using the destination and/or way point addresses previously entered. Cancel Guidance The map showing the whole route is displayed. Any point on the route can be avoided if required. • • Touch the Avoid button next to the required entry in the turn list.
L Set Up Menu Set Up Menu Navigation Set Up Menu Note: These settings do not affect route calculation, they are only used in displaying the time to destination. Choose your own usual speeds, so that the time shown matches your own driving style as closely as possible. Restore System Defaults The default settings are as follows: Guidance Voice: On. Search Area: US9. The menu shows the setup options available: Route Preferences: Average Speed Settings - Use Major Roads: Yes.
R Set Up Menu Map Options Position procedure - Memory Point Icons: Show. - Time To Destination: Show. - Message Centre Guidance: Off. - Low Fuel Warning: On. • To select the complete set of default settings, touch OK. Map version The screen shows the issue date of the Navigation System DVD currently loaded. The map showing the current vehicle position is displayed. Calibration • Scroll the map until the navigation symbol (vehicle position) is in the correct geographical location.
L Set Up Menu Display Options Time To Destination - Show/Hide. Message Centre Guidance - On/Off provides supplementary information, displayed on the vehicle message centre. Low Fuel Warning On/Off -displays the gas station icons automatically, when the fuel level is down to the normal low level warning. Changing the Display Language The screen text and voice guidance are available in a number of languages. See ‘User settings’, page 19.
R Set Up Menu • Search Area/Country Change Touch Agree on the Caution screen, touch the Nav Menu button on the Initial Map screen, press Destination Entry on the Nav Menu screen. The currently selected area is shown highlighted on the map. To reduce the time taken to calculate a route, some map databases are divided into countries, or in the case of some larger countries, into areas of countries, called Search Areas.
L Destination Entry Destination Entry Destination Entry Menu Search area To reduce the time taken to calculate a route, the map database is divided into a number of regions. When setting a route, the destination (or way point) being entered must be in the currently selected search area. Using the destination entry menu The Destination Entry menu is used for both destination and way point entry. (Way points and the destination can be entered in any order.
R Destination Entry • Enter the street name required. • Touch List to display the list of possible streets. House number entry The list of possible streets from the characters entered is displayed. • Select the street required. Select city The number pad screen is displayed, showing the house number range for the street selected. • The destination details are displayed for confirmation of the address. The screen shows the list of cities where the street name entered occurs.
L Destination Entry Order of Address Entry Entering city names When entering the name of a citycity in another country, the name must be entered according to the usual spelling in the country concerned. The example just described shows how to enter an address with the street name first, followed by selecting the city, and finally the house number. You should find this the best method in most cases, however other methods are possible.
R Destination Entry Using a Memory Point Using the Home Position After selecting Memory Point from the Destination Entry menu, the screen shows the list of stored memory points. After selecting Home from the Destination Entry menu, a route is calculated to the stored home position. • The location of the home position is displayed, and the screen shows ‘Calculating Route’ while the route is being calculated. Select the item required.
L Destination Entry Using a Freeway Entrance/Exit Note: While driving, the list scrolling function is not active. You can only choose from the items shown at the top of the list. Previous starting point If the Previous Starting Point button is selected, the location used for the destination will be the starting point of your last journey, irrespective of whether you were driving under guidance or not.
R Destination Entry Using an Intersection Select entrance/exit Enter first street name • Touch Entrance if you wish to join the freeway at this junction. • Touch Exit if you wish to leave the freeway at this junction. After selecting Intersection from the Destination Entry menu, the alpha keyboard screen is displayed showing ‘Input First Street Name’. Select junction • Enter the name required for the first street and touch List.
L Destination Entry The list of possible streets from the characters entered is displayed. • Select the street required. Note: Not all the possible streets listed will have an intersection with the first street. A pop-up will notify you if you inadvertently select two streets that do not intersect. Select city The screen shows the list of cities where the selected intersection occurs. • Select the city required. The destination details are displayed for confirmation of the address.
R Points of Interest (POI) Points of Interest (POI) Introduction Local POI search This selects the points of interest in all categories within 20 miles (32 kilometres) of the vehicle. • Touch the All Local POI’s button. POI Icon Display The Navigation System DVD contains information about a large number of points of interest (POI). There are many categories of POI, including gas stations, restaurants, railway stations and hospitals.
L Points of Interest (POI) POI Information Cancelling POI Icon Display If the display of POI icons is no longer required, they can be turned off as follows: • Touch the map screen to display the additional buttons. • Touch POI Off to cancel the display of POI icons on the map. Jaguar Retailer Locations Details of Jaguar Retailers (Dealers) are held on the Navigation System DVD as a points of interest (POI) category. Certain Retailers may be located in areas that are not fully mapped on the DVD.
R Points of Interest (POI) • Entry by Category Select the POI required. The map location of the POI is displayed. Note: If entering a POI name results in too many matches being listed, try entering the city name first. If you do not know the name of the POI you want, try selecting a POI category. Entry by City If a POI category is selected first, the points of interest listed will be restricted to that category. • From the Input POI Name screen, touch Category.
L Points of Interest (POI) City centres The POI database also holds city centre locations. To select a city centre, proceed as follows: City followed by category In this example the order is: city, followed by category, then POI name. • • From the Input POI Name screen, touch City. From the Input POI Name screen, enter the city name required in the Name text area. (Do not select the City button.) • Touch List to display the list of matches.
R Points of Interest (POI) POI details • Search area When searching the database, only points of interest in the current search area are included, except for the sub-categories marked ‘All search areas’ in the POI category list. To view the details of the selected POI, touch Info. from the map display. The details include Name, Address, City and Tel. Telephone number The telephone number can be called by touching the telephone button (if a Jaguar telephone is fitted).
L Points of Interest (POI) The screen shows the full list of POI categories. • Memory point details • Select the new category required from the list. The details include Icon, Name, Position and Tel. The screen shows the new selection of category icons. • Repeat for another category icon if required. • Touch OK to apply the new settings. Touch Info. to display the details of the selected memory point.
R Stored Locations Stored Locations Stored Locations Menu Note: If an action is not available for the stored location you have chosen, its button will be disabled. For example, if a home position has already been stored, another one cannot be added. Calculate If required, a new route calculation can be made. Memory Points In the upper portion of the menu, the various types of stored location are shown: Add a memory point Memory Points Home Avoid Area Previous Dest. Dest. & Way Pt.
L Stored Locations The location details include Icon, Name, Position and Tel. List • Touch the appropriate button to change or enter any of the location details. • Touch the telephone button to call the telephone number (if a Jaguar telephone is fitted). Navigation nametags This feature is part of JaguarVoice. • After touching List, the list of stored memory points is displayed showing ‘Edit Points’ at the top of the screen. • Select an entry to view its location details.
R Stored Locations Home Delete Add After touching Delete, the list of memory points is displayed showing ‘Delete Points’ at the top of the screen. • After touching Add, the Set Home menu is displayed. Select the entry to be deleted. The screen shows the details of the selected point and ‘Delete this Memory Point? Yes/No’. • • Select the menu item you wish to use. • Enter or select the details required. The home position is stored. The screen briefly shows ‘Memory Point Deleted’.
L Stored Locations Note: Delete 1. The Store Avoid Area menu is used in the same way as the Destination Entry menu. For more information, see ‘Destination Entry Menu’, page 76. 2. In some circumstances, to calculate a satisfactory route, it may not be possible to avoid all the selected areas. List The screen shows the location of the current home position and ‘Delete Home Position? Yes/No’. • Touch Yes to confirm. The screen briefly shows ‘Home Deleted’. Del. All The Del.
R Stored Locations The screen briefly shows ‘Avoid Area Deleted’. The screen briefly shows ‘Previous Destination Deleted’. Del. All After touching Del. All, the screen shows ‘Delete all Avoid Areas? Yes/No’. Del. All After touching Del. All, the screen shows ‘Delete all Previous Destinations? Yes/No’. • Touch Yes to confirm. • The screen briefly shows ‘All Avoid Areas Deleted’. Touch Yes to confirm. The screen briefly shows ‘All Previous Destinations Deleted’.
L Stored Locations • 2. The Store Dest. & Way Point menu is used after a destination or way point has been entered for the first time using the Destination Entry menu. To return to the previous screen, touch Chg. Location. The Undo button can be pressed to clear the new selected order (made using the Chg. Order button) and allow the order to be reset. List Delete After touching List, the list showing the stored way points and destination (if entered) is displayed.
R Route Calculation Route Calculation Confirm Destination After storing the destination (or final way point), the map screen shows ‘Calculating Route’ while the route is calculated. • To change route settings, touch Chg. Route. See ‘Route Preferences’, page 69. Confirm Route After entering an address, or selecting a map location, the map screen is displayed showing its location. The address details are shown at the top of the screen. The address can be stored as a destination or as a way point.
L Storing Way Points Storing Way Points First way Point Additional Way Points A way point is a stop-off or mid-point between your current location and your destination. After selecting Way Pt. again from the Confirm Destination screen, the Add Way Point screen is displayed. This screen lists the way points already entered, and the destination (if entered). After selecting Way Pt.
R Storing Way Points Calculate Route If the destination has been entered, then, after storing the final way point, the route calculation can be started from the Route Information screen. This screen should now show details of the destination, and the number of way points entered. • To start the route calculation, touch Calculate. See ‘Calculating the Route’, page 95. Note: If the destination has not been entered at this stage, touch Dest Entry.
L Route Guidance Route Guidance Following Guidance Time/distance to destination While driving under guidance, the estimated time (if selected) and distance remaining to the end of the route are shown on the screen. While far-out – Before the vehicle reaches the start of the highlighted route, and during route recalculation, the straight line distance and direction to the destination are shown.
R Route Guidance Avoid areas can also be set up to be avoided permanently in all route calculations. See ‘Avoid Area’, page 92. Map orientation buttons - These buttons select the desired map orientation (north or vehicle heading to the top of the screen). The current selection is shown on the map. Touch buttons The buttons displayed on the guidance map screen are as follows: Note: Above the 2 miles (4 kilometres) zoom level, only north orientation is available.
L Route Guidance Arrival Guidance Way Points When the vehicle arrives at the destination, the screen shows the destination location details. This is confirmed by voice guidance. The system is now ready for further use. When the vehicle arrives at a way point, the screen shows ‘You have arrived at your Way Point’. When the journey is resumed, route guidance continues automatically, either to the next way point or to the final destination.
R End User Licence Agreements End User Licence Agreements Ordnance Survey Data Limitations of use The OS Code-Point data is restricted for use in the specific system for which it was created. Except to the extent explicitly permitted by mandatory applicable laws, you may not extract or re-utilise any part of the contents of the OS Code-Point data, not reproduce, copy, modify, adapt, translate, disassemble, decompile, or reverse engineer any portion of the OS Code-Point data.
L End User Licence Agreements THE DISCLAIMER OF WARRANTY AND LIMITATION OF LIABILITY, SET FORTH IN THIS AGREEMENT, DO NOT AFFECT OR PREJUDICE YOUR STATUTORY RIGHTS WHERE YOU HAVE ACQUIRED THE DATABASE OTHERWISE THAN IN THE COURSE OF A BUSINESS. Limitations of use The DATABASE is restricted for use in the specific system for which it was created.
R End User Licence Agreements Limitation of liability The price of the DATABASE does not include any consideration for assumption of risk of consequential, indirect or unlimited direct damages which may arise in connection with your use of the DATABASE. ! WARNING: The DATABASE reflects reality as existing before you received the DATABASE and it comprises data and information from government and other sources, which may contain errors and omissions.
L 104
R General Information JaguarVoice Introduction to JaguarVoice Volume Level Adjustment The verbal feedback volume level can be adjusted independently for the JaguarVoice system. To adjust, operate the sound system volume control or the steering wheel volume control whilst the voice system is being used. The speaker volume level can also be adjusted within the volume preset menu of the audio system.
L General Information Steering wheel voice switches The XJ rear switchpack (where fitted) located in armrest 1. Volume – left. 2. Headphone mode – left. 3. Cabin mode. 4. Voice text. 5. Headphone mode – right. 6. Volume – right. 7. Voice button – right. 8. Voice button – left. 1. Message centre display. 2. Voice button – The XJ and S-TYPE. 3. Voice button – X-TYPE. 4. Menu button. 5. Display screen.
R Using the System Using the System Initialisation Rear Occupant Voice Controls JaguarVoice is ready to operate 10 seconds after the ignition switch is turned to position ‘II’ (ignition on). There are two voice buttons on the XJ rear multimedia switchpack, see items 7 and 8 Voice button – right and Voice button left respectively, on the previous illustration. Driver Voice Controls The voice button is on the left-hand side of the steering wheel, see ‘Steering wheel voice switches’, page 106.
L Using the System First try some of these commands Tuning the radio Your instructions to the system Press and release the voice button After the beep say ‘Radio tune 98.9 FM’ System response ‘Beep’ The system responds with: ‘Radio tune 98.9 FM’ and tunes the radio to this frequency Now try entering a frequency of your own preference, see ‘How to Say Numbers’, page 113.
R Using the System Recalling the nametag you have just stored Your instructions to the system Press and release the voice button After the beep say ‘Radio tune my favourite station’ System response ‘Beep’ The system responds with: ‘Radio tune my favourite station’ and tunes the radio to the frequency stored with this name Now try storing a nametag of your choice, and then recalling it.
L Using the System Operating Tips Command Confirmation • After pressing the voice button, wait for the end of the single listening beep before giving the command.* ‘LISTENING’ will be displayed on the instrument pack or on the rear multimedia switchpack. • Face forward and speak naturally, as if you were talking to a passenger or on the phone. After a command has been given, the system will give feedback of what it understood.
R Using the System Nametags Hints on Storing Nametags Nametags are a unique name or phrase of your choice which can be used to recall a radio station or dial a phone number. • You will have greater success of recalling, and remembering, nametags of two, three, or four words in length. Nametags of one word in length are also acceptable. • For best results, store nametags in a quiet environment, i.e.
L Using the System Some Useful Notes • Only one person at a time can use the voice system. • Excessive noise, for example while driving with windows open or in demist mode, may cause voice command misrecognition. If it is too noisy to use the phone, it is likely that voice commands will not be recognised. • Voice commands cannot be given while hands free phone call or radio traffic announcement is in progress.
R How to Say Numbers How to Say Numbers Phone Numbers Numbers in voice commands must be given as shown below. Either ‘zero’ or ‘oh’ can be used for ‘0’, most users will find that ‘zero’ gives better results. For information about specific commands, see ‘Voice Command List’, page 114. All phone numbers are said as single digits, as in the following example. Double, Triple and Treble are also acceptable commands if preceding a single digit.
L Voice Command List Voice Command List Key to functions Cassette Tape Player Commands Certain commands are only available to the driver, these are indicated in the following list: (If fitted) • TAPE PLAY or TAPE ON ( ) denotes an option, e.g. (ON/OFF) use either ON or OFF with this command. • [TAPE] REVERSE < > indicates where to say a number or stored nametag.
R Voice Command List • Radio Commands • Deletes all currently stored radio nametags. RADIO PLAY or RADIO ON Turns the sound system on. • RADIO DELETE DIRECTORY RADIO OFF Turns the sound system off. Use this command to turn off the CD, Tape or CD changer.
L Voice Command List Phone Commands Calls the phone number stored in the phone memory location given. (if fitted) See ‘How to Say Numbers’, page 113. Note: In noisy conditions, for example, in heavy rain or driving at high speed on a rough road surface, use the PHONE ENTER command, entering the number in several groups for improved recognition.
R Voice Command List This command will not be executed if the climate control system is in defrost mode. Note: • • When an outgoing phone call is terminated, the sound system will remain in phone mode. To change to another mode, give the appropriate voice command. • When the driver gives this command the temperature of all zones are set to the same as the driver’s side temperature. When a rear occupant gives this command the temperature of both rear zones will be set to the same.
L Voice Command List Navigation Commands (Front use only) • [NAVIGATION] SHOW DESTINATION • [NAVIGATION] SHOW [CURRENT] POSITION • [NAVIGATION] SHOW WHOLE ROUTE • [NAVIGATION] SHOW NORTH UP • • [NAVIGATION] VOICE GUIDANCE ON • [NAVIGATION] VOICE GUIDANCE OFF • [NAVIGATION] REPEAT [LAST] INSTRUCTION • [NAVIGATION] ZOOM LEVEL Note: There are 13 zoom levels. Zoom level 1 represents maximum magnification.
R Voice Command List • • Sets the navigation system route preferences to select the shortest route. Navigation nametag features within the navigation system (front use) To create a new memory point with a nametag at your current position: [NAVIGATION] MINIMISE TIME • [NAVIGATION] MINIMISE DISTANCE Ensure the display is showing the map. You can do this by giving the command ‘NAVIGATION SHOW CURRENT POSITION’ command or by pressing the NAV key next to the screen twice.
L Voice Command List To list navigation memory points with nametags To add a nametag to an existing navigation memory point • Press the NAV key next to the screen to select the navigation system, if required press again to select the map view. • • Touch the ‘Nav Menu’ button on the map screen. Follow the steps 1–4 shown on the previous page (to list navigation memory points with nametags) to list all memory points then select the desired memory point.
R Voice Command List To play the nametag associated with a memory point • Follow steps 1–4 (to list navigation memory points with nametags) to list all memory points then select the desired memory point. • Touch the talking head button (see the previous illustration) to play the nametag. To delete a nametag associated with a memory point • Follow steps 1–4 (to list navigation memory points with nametags) to list all memory points, then select the desired memory point.
L Voice Training Voice Training Training Introduction The voice system is able to interpret most English speakers without difficulty. If, however, you find that commands are sometimes not being recognised, you can train the voice system to recognize your voice. The voice system can be trained for two people using voice memories A and B. Note: Touch-screen buttons A and B, shown above, cannot be used if the vehicle is in motion.
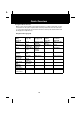
R Voice Training Training Command List 25. radio tune one oh seven point one FM The ‘sounds’ of the following training commands are required for the voice system to ‘learn’, although some of the equipment (navigation, telephone etc.) stated in the commands may not be fitted to a particular vehicle. 26. screen select automatic colours 27. repeat last instruction 28. phone enter gate double three one oh 29. cassette reverse 30. tape fast forward 31. radio tune two sixteen long wave 2.
L Trouble-shooting Trouble-shooting Error Messages In addition to the voice command prompts given by the system, the error messages shown on this and the following pages may be displayed on the instrument cluster display or on the rear multimedia switchpack. Most of these messages are accompanied by an advisory double beep. Voice Command Group General Message Meaning VOICE NOT READY The voice system is initialising (when ignition is first turned on).
R Trouble-shooting Voice Command Group General (continued) Message Meaning COMMAND NOT RECOGNISED The voice system has failed to recognise your command. • Ensure that the command format is valid, see ‘Voice Command List’, page 114. • Ensure that the command is given after the end of the beep. • Look forward and speak clearly without pausing between words and at a level appropriate to the ambient noise level; imagine you are talking to a passenger or making a hands free phone call.
L Trouble-shooting Voice Command Group General (continued) Message Meaning VOICE IN USE Another occupant is using the voice system. Only one occupant can use the system at a time. After a voice session has been started only the button that was used to start the session can be used to continue or cancel the session. The command given is not available to rear occupants. These commands are highlighted as - (front use only) in the Voice Command List section.
R Trouble-shooting Voice Command Group Nametags (continued) Phone Navigation Message Meaning NAMETAG TOO LONG The nametag given is too long. The voice system accepts a maximum nametag length of up to 3.75 seconds. STORE FAILED Displayed when the voice system fails to store a nametag. Possible reasons could be that the nametag is too long or there is too much noise. Try the command again.
L Trouble-shooting Voice Command Group Navigation (continued). Message Meaning UNABLE TO FIND WAYPOINT Displayed by the voice system when the ‘NAVIGATION ADD WAY POINT ’ command is given and the navigation system cannot locate the tagged way point in its memory. When this occurs the voice system will delete this nametag. Check that the nametag has been deleted by giving the ‘NAVIGATION DIRECTORY’ command.
R Trouble-shooting Voice Command Group Navigation (continued). Voice Training Message Meaning NAV SYSTEM NOT RESPONDING SET HANDBRAKE TO CONTINUE VOICE TRAINING UNSUCCESSFUL 129 Displayed during a Navigation nametag storage session when the voice system fails to obtain a response from the Navigation system. Press the NAV key next to the display and check that the navigation caution screen has been cleared. Navigation will not respond to voice commands until the caution screen has been cleared.
L 130
R Index Climate control. . . . . . . . . . . . . . . . . . air conditioning. . . . . . . . . . . . . . . . auto mode . . . . . . . . . . . . . . . . . . . blower mute . . . . . . . . . . . . . . . . . . blower speed . . . . . . . . . . . . . . . . . Celcius/Fahrenheit selection . . . . . climate options. . . . . . . . . . . . . . . . controls XJ and S-Type . . . . . . . . . controls X-Type . . . . . . . . . . . . . . . displays . . . . . . . . . . . . . . . . . . . . . dual temperature zones . . . . . . .
L Index Navigation overview alternative routes . . . . . . . . . . . . . . control panels . . . . . . . . . . . . . . . . end user agreement . . . . . . . . . . . errors . . . . . . . . . . . . . . . . . . . . . . . how it works. . . . . . . . . . . . . . . . . . introduction . . . . . . . . . . . . . . . . . . loading the DVD . . . . . . . . . . . . . . . road junction layouts . . . . . . . . . . . route guidance position . . . . . . . . . safety information . . . . . . . . . . . . . screen cleaning . . .