
Instructions / Assembly

Mounting the brackets:
Mounting the brackets:Mounting the brackets:
Mounting the brackets:
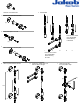
Determine the mounting location for both Spacers top and bottom.
1Remove the base plate of the spacer. (C)
2Mark the drill hole with a pencil using the center hole.
3Drill the hole using
Drill bit 5/16” Concrete/ masonry wall.
Drill bit 5/16” Concrete/ masonry wall.Drill bit 5/16” Concrete/ masonry wall.
Drill bit 5/16” Concrete/ masonry wall.
4Insert plastic anchor. (A)
Gently tap them with a hammer until they are flush with the wall face.
5Seal the wall penetration hole by squeezing a ring of premium exterior grade sealant around
the drill hole before attaching the base plate (C). Be sure to check with your local
hardware/paint store for recommendations on the proper sealant to use given your surface and
attachment conditions.
6Attach the spacer.
See installation details (3)
See installation details (3)See installation details (3)
See installation details (3)
Note: To cut cable to the proper length
Note: To cut cable to the proper length Note: To cut cable to the proper length
Note: To cut cable to the proper length
measure the distance from center to center
measure the distance from center to centermeasure the distance from center to center
measure the distance from center to center
of top
of top of top
of top
and bottom spacer (S) and subtract 2”.
and bottom spacer (S) and subtract 2”. and bottom spacer (S) and subtract 2”.
and bottom spacer (S) and subtract 2”.
7Attach the cables to the tensioners. See installation details (4)
8Insert the tensioner through the holes of the top and bottom spacers.
See installation details (5)
9To tension the cables spin the nut by hand until threads engage and you start to feel
resistance.
IMPORTANT:
IMPORTANT: IMPORTANT:
IMPORTANT: Do not over tension the cables; they should simply hang straight and
Do not over tension the cables; they should simply hang straight and Do not over tension the cables; they should simply hang straight and
Do not over tension the cables; they should simply hang straight and
flex easily. See installation details (
flex easily. See installation details (flex easily. See installation details (
flex easily. See installation details (6
66
6)
))
)
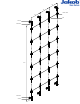
HANGING THE RODS:
HANGING THE RODS:HANGING THE RODS:
HANGING THE RODS:
10With a measuring tape and Sharpie felt pen, mark each cable (E) at the points where you’d
would like to attach the rods (R).
11Remove sets screws from plastic Cross Clamps (cc). Use Allen wrench.
Loosely attach the rods (R) to each cable by sliding the slotted Cross Clamps onto each cable
and then inserting and gently tightening the Cross Clamps setscrews.
See installation details (7)
See installation details (7)See installation details (7)
See installation details (7)
IMPORTANT: Do not force the setscrews into the Cross Clamp as this might damage the
IMPORTANT: Do not force the setscrews into the Cross Clamp as this might damage the IMPORTANT: Do not force the setscrews into the Cross Clamp as this might damage the
IMPORTANT: Do not force the setscrews into the Cross Clamp as this might damage the
threads.
threads. threads.
threads. If you encounter any resistance, simply back off the setscrews slightly to realign the
threads and then try again. The Cross Clamps may be attached with the setscrews facing the
wall or toward the wall.
12Adjust the position of the rods on each cable so that the Cross Clamp are centered on the
felt pen marks, and then securely tighten the setscrews on all Cross Clamp fittings to lock the
rods in position.
QUESTIONS: 1866 215 1421 EMAIL: info@jakob
QUESTIONS: 1866 215 1421 EMAIL: info@jakobQUESTIONS: 1866 215 1421 EMAIL: info@jakob
QUESTIONS: 1866 215 1421 EMAIL: info@jakob
usa.com
usa.comusa.com
usa.com