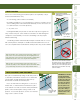
General Product Information ColorPlus Technology is a factory applied, oven-baked finish available on a variety of James Hardie siding and trim products. See your local dealer for details and availability of products, colors and accessories. General Installation Requirements HardiePlank lap siding is also available with ColorPlus® Technology as one of James Hardie’s prefinished products.
General Product Information Installation of HardiePlank® Lap Siding 10.1 HardiePlank® lap siding requires a starter strip beneath the first course to set it on the proper angle and to create a proper drip edge at the bottom of the siding. Starter strips are easily made by ripping 11/4-in. pieces of HardiePlank siding from full or partial planks. HardieTrim® HardieWrap® Boards/Battens Weather Barrier Install starter strip over the weather barrier and even with the bottom of the sheathing.
General Product Information INSTALLING THE PLANKS Working Safely 10.3 Tools for Cutting and Fastening The first course of HardiePlank® siding is critical to the proper installation of the plank on the rest of the building. The first course should start at the lowest point of the house and within required clearances. Special attention should be made to ensure that it’s straight and level.
General Product Information Installation of HardiePlank® Lap Siding (continued) ESR-1844 & 2290 Report Appendix/ Glossary HardiePanel® Vertical Siding HardieShingle® Siding HardiePlank® Lap Siding HardieSoffit® Panels HardieTrim® HardieWrap® Boards/Battens Weather Barrier Finishing and Maintenance General Fastener Requirements General Installation Requirements Tools for Cutting and Fastening Working Safely BLIND NAILING (nailing through top of plank) 86 10.
General Product Information JOINT FLASHING Flashing behind to add an additional layer of protection from water infiltration Tools for Cutting and Fastening A. Joint Flashing (James Hardie recommended) General Installation Requirements B. Caulking* (Caulking is not recommended for ColorPlus for aesthetic reasons as the Caulking and ColorPlus will weather differently. For the same reason, do not caulk nail heads on ColorPlus products.} C. “H” jointer cover Extend flashing 1 in.
General Product Information Installation of HardiePlank® Lap Siding (continued) ESR-1844 & 2290 Report Appendix/ Glossary HardiePanel® Vertical Siding HardieShingle® Siding HardiePlank® Lap Siding HardieSoffit® Panels HardieTrim® HardieWrap® Boards/Battens Weather Barrier Finishing and Maintenance General Fastener Requirements General Installation Requirements Tools for Cutting and Fastening Working Safely CONTINUING THE INSTALLATION 88 10.
10.13 Tip for fast gable installation Working Safely 4 Draw the angle, cut and 1) Tack up a small scrap piece of siding where the first gable course is going. repeat the process for the next course. 2) Hold a second small piece of siding against the eave or rake board. 10.14 3 Place a plank for the next piece on the overlap lines and mark the length. Angle Template Draw line here 2 Before installing, measure down the 11/4-in. overlap at the top of the board.
Lap Siding INSTALLATION REQUIREMENTS - PRIMED & COLORPLUS® PRODUCTS EFFECTIVE MAY 2016 Visit www.hardieinstallation.com for the most recent version.
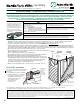
CLEARANCE AND FLASHING REQUIREMENTS Figure 3 Figure 4 Roof to Wall Figure 5 Horizontal Flashing Min. ¼ in. Do not caulk Min. 1 in.-2 in. Deck to Wall Slabs, Path, Steps to Siding As required by IRC code min 4 in. x 4 in. Z-Flashing Figure 7 Figure 6 Kickout Flashing Figure 8 Min. 1 in.-2 in. Figure 9 Ground to Siding Figure 10 Figure 11 Gutter to Siding Sheltered Areas Mortar/Masonry L-Flashing Z-Flashing Z-Flashing Min. 1 in.-2 in. Z-Flashing Min. ¼ in. 6 in. Figure 12 1 in.
GENERAL FASTENING REQUIREMENTS PNEUMATIC FASTENING Fasteners must be corrosion resistant, galvanized, or stainless steel. Electro-galvanized are acceptable but may exhibit premature corrosion. James Hardie recommends the use of quality, hot-dipped galvanized nails. James Hardie is not responsible for the corrosion resistance of fasteners. Stainless steel fasteners are recommended when installing James Hardie® products near the ocean, large bodies of water, or in very humid climates.
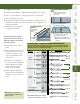
COVERAGE CHART/ESTIMATING GUIDE Number of 12 ft. planks, does not include waste COVERAGE AREA LESS OPENINGS HARDIEPLANK® LAP SIDING WIDTH (1 SQ = 100 sq.ft.
Información general del producto Trabajar con seguridad Herramientas para corte y sujeción Requisitos generales de instalación La tabla de revestimiento solapado HardiePlank es una tabla con revestimiento solapado de fibrocemento con imprimación de fábrica disponible en diferentes estilos y texturas. Consulte a su proveedor local de productos James Hardie® para conocer la disponibilidad de este producto. La tabla de revestimiento solapado de HardiePlank® está disponible en longitudes de 12 pies.
10.1 CONSEJO: Para una sujeción precisa, Acabado y mantenimiento sujete tiralíneas verticales en la barrera resistente al agua en el centro de la ubicación de cada montante. Requisitos generales del sujetador Visión general de las tablas de revestimiento solapado HardiePlank Listón de inicio Requisitos generales de instalación La parte inferior del listón de inicio debería instalarse a nivel de la parte inferior de la zapata de asiento o el borde inferior del recubrimiento.
Información general del producto Trabajar con seguridad Herramientas para corte y sujeción Requisitos generales de instalación Requisitos generales del sujetador Acabado y mantenimiento Barrera meteorológica HardieWrap® Tablas de Paneles de Revestimiento de Paneles de sofito Tablas/Listones revestimiento revestimiento HardieTrim® las tejas HardieSoffit® solapado vertical HardieShingle® HardiePlank® HardiePanel® Apéndice/ Glosario Informe ESR-1844 y 2290 88 Instalar los tableros La primera capa de la tabla
10.5 Medidas de claveteado ciego 10.6 Claveteado ciego Los clavos para el claveteado ciego deben estar entre ¾ de pulgada y 1 pulgada desde la parte superior del tablero Los sujetadores quedan sujetos por la capa superior. 10.7 Claveteado frontal Tablas de revestimiento solapado HardiePlank® Escalonar las juntas de tope Las piezas de recorte forman las piezas de inicio de las siguientes capas.
Información general del producto Trabajar con seguridad Herramientas para corte y sujeción Requisitos generales de instalación Requisitos generales del sujetador Acabado y mantenimiento Barrera meteorológica HardieWrap® Tablas de Paneles de Revestimiento de Paneles de sofito Tablas/Listones revestimiento revestimiento HardieTrim® las tejas HardieSoffit® solapado vertical HardieShingle® HardiePlank® HardiePanel® Apéndice/ Glosario Informe ESR-1844 y 2290 90 Protección de juntas 10.
10.12 Tableros alrededor de ventanas Mantenga las juntas de tope a más de una capa de la parte superior de la ventana. Requisitos generales de instalación Requisitos generales del sujetador Acabado y mantenimiento Barrera meteorológica HardieWrap® CONSEJO COLORPLUS: La tabla de Para estimar la cantidad de revestimiento necesario para completar un hastial, utilice las herramientas de estimación que se encuentran en el Apéndice C.
Informe ESR-1844 y 2290 92 10.13 2) Sujete una segunda pieza pequeña de revestimiento contra el alero o tabla inclinada. Consejo para una instalación rápida 4 Dibuje el ángulo, corte y repita el proceso para la siguiente capa. 3) Dibuje un ángulo en el sobrante. 4) Corte esa línea y etiquete el sobrante como la plantilla para el ángulo hastial. La plantilla puede usarse para transferir el ángulo a piezas más grandes para su corte e instalación.
Tablas de Revestimiento Solapado EN VIGOR DESDE SEPTIEMBRE 2013 REQUISITOS DE INSTALACIÓN - PRODUCTOS CON PRIMER Y COLORPLUS® Visite www.jameshardie.com para obtener la versión más reciente.
REQUISITOS PARA EL ESPACIADO Y LA PROTECCIÓN Ilustración 3 Del techo a la pared Ilustración 6 Losa, camino, pasos para Protección del tapajuntas el revestimiento Ilustración 4 Ilustración 5 Protección horizontal Como es requerido por el código IRC, 4” x 4” Protección Z ¼" como mínimo. No calafatear.
REQUISITOS DE SUJECIÓN continuado Ilustración 15 Montante Montante Ilustración 16 Máx. 24” o.c. 24” Máx O.C.
MASILLA, RETOQUES Y LAMINADO CON COLORPLUS® TECHNOLOGY • Se debe tener cuidado al manipular y cortar los productos ColorPlus de James Hardie. Durante la instalación, utilice un paño suave y húmedo, o un cepillo suave para quitar con delicadeza cualquier residuo o polvo de construcción que haya quedado en el producto. Luego, enjuague con una manguera de jardín. • Retoque las muescas, arañazos y cabezales de los clavos usando el aplicador de retoques ColorPlus® Technology.