
Installation Guide


98
General
Product
Information
Working
Safely
Tools for
Cutting and
Fastening
General
Installation
Requirements
General
Fastener
Requirements
Finishing and
Maintenance
HardieTrim®
Boards/Battens
HardieWrap®
Weather Barrier
HardieSoffit®
Panels
HardiePlank®
Lap Siding
HardieShingle®
Siding
HardiePanel
®
Vertical Siding
ESR-1844 &
2290 Report
Appendix/
Glossary
Installation of HardieShingle
®
Siding (continued)
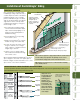
Sheathed
wall
Water-resistive
barrier
7 in.
between
courses
Keep half rounds
centered on the
keyways of the
course below.
Cut panels to land
over framing.
Starter course covers keyways
on rst shingle course.
Starter
strip starts
shingles at
the proper
angle.
11.5
For best appearance, half-round shingle panel installations on gable ends
should end with a single round shingle at the gable peak. To make this
happen, calculation of the actual number of courses is necessary. Follow the
simple steps below to achieve this effect.
1) Measure the horizontal width of the gable being sided and locate the
center of the gable. Using a level or chalk line, draw a line from the gable
peak to the center mark.
2) Measure the entire height of the gable area to be sided above the
band board.
3) Divide the total height of the gable by 7. (Half round shingles have an
exposure of 7 in. and this figure is the number of courses to be installed.
4) If the answer is an even number (example: 70 in. divided by 7 = 10 courses),
center the first panel course on a keyway on the vertical center line (fig. 9.7).
If the answer is an odd number, (example: 77 in. divided by 7 = 11 courses)
center the first course on the center of a half-round shingle (fig. 9.8).
5) Using this planning method, the
final piece at the peak should be a centered shingle.
To install the first course of half-round panel in a gable:
1) position the first piece of panel on the gable centerline marked earlier.
The panel may be moved left or right to make the edge lands on a
stud as long as the shingle face or keyway is centered (depending on
the number of courses needed as discussed above).
2) Drive nails approximately
1
/4 in. above the top of every other keyway.
Avoid driving nails between the keyways because the heads may be
visible through the keyways of subsequent courses.
3) Complete the installation on the left and right sides using the rake-
angle template to cut the proper rake angle. Leave a
1
/8-in. gap
between the siding and trim boards.
4) Use the rake angle template to trim back the start panel for the 2nd
course. Install the 2nd and following courses the same way. At the
peak of the gable, face nail the final piece with a finish nailer.
HALF-ROUND DECORATIVE SHINGLE PANELS (CONTINUED)
Use a rake
template to trim
panels where
they meet the
rakes.
HardieShingle
panels
Band board
Center line
With even number
of courses align
the keyway on the
center line.
HardieShingle
®
panel
Band board
Center line
11.6
11.8
With odd number
of courses align the
half round on the
center line.
HardieShingle
panel
Band board
11.7
Center line