
Installation Guide


96
General
Product
Information
Working
Safely
Tools for
Cutting and
Fastening
General
Installation
Requirements
General
Fastener
Requirements
Finishing and
Maintenance
HardieTrim®
Boards/Battens
HardieWrap®
Weather Barrier
HardieSoffit®
Panels
HardiePlank®
Lap Siding
HardieShingle®
Siding
HardiePanel
®
Vertical Siding
ESR-1844 &
2290 Report
Appendix/
Glossary
For HardieShingle
®
panels start at one end
and work across the wall.
1) Measure and trim the first panel to
make sure the end of the panel falls
over framing.
2) Using the chalk line as a guide along
the panel top edge. For straight edge
panels align bottom panel edges to
maintain a uniform straight line carefully
position the panels and secure with
suitable fasteners and spacing for your
particular application as noted in the
ESR 1844 & 2290 Report.
3) Align the bottom edges of the trim and
the siding for the best appearance.
Where the panel begins at a corner
board or at door or window casings,
cut the upper portion of the panel back
even with the edge of the keyway.
4) Where the siding meets the HardieTrim
®
board, leave a
1
/8-in. gap between the
siding and trim. Install HardieShingle
panels with joints in moderate contact.
When installing panels
over minimum
7
/16-in. OSB
rated sheathing, drive
nails no more than 13
3
/4
in. apart.
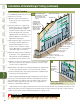
Starter strip starts shingles at the proper angle.
Sheathed wall
Starter course covers
keyways on rst shingle course.
Keep nails at least
3
/8 in. in
from the shingle edges.
Drive nails into framing
wherever possible.
Stagger panels
so that keyways
do not align on
successive courses
Water resistive barrier
Snapped chalk
lines help guide
installation, use a
straight edge on
bottom of Straight
Edge panels if
uniform straight
edge is desired
HARDIESHINGLE
®
PANELS
Align bottom
of the panel
with bottom of
the trim.
6 in.
Snapped chalk lines
guide the installation.
TIP: A straight edge panel can be used on the
bottom course if desired
5) Measure and cut the first panel for the second course of HardieShingle
panel so that it lands on the stud before the panel on the first course.
Use the cut end to abut the trim.
6) Start the third course with the end of the panel landing on the stud before the
second course. Save the cut pieces to use on the other end of the wall.
7) Continue alternating these three lengths up the wall to establish proper
positioning of the shingle keyways.
When installing HardieShingle Staggered Edge panel, measure up 6-in.
from the top of the installed panel and make a mark. Make another mark
at an equal height on the opposite end of the wall and snap a chalk line
between the marks. Align the top of the next course of panel with the
chalk line to maintain proper exposures.
Keep the bottom of the siding even with the bottom of the trim. If desired, the trim may extend below the bottom of the
siding, but the siding should not hang below the trim. Make sure that clearances above the ground, roof lines and hard
surfaces are in accordance with the General Requirements on pages 13-26.
11.2
11.3
WARNING
James Hardie recommends installing HardieShingle panel over rated wood sheathing.
!
Installation of HardieShingle
®
Siding (continued)