
Full Product Manual


82
IMPORTANT: FAILURE TO FOLLOW JAMES HARDIE WRITTEN INSTALLATION INSTRUCTIONS AND COMPLY WITH APPLICABLE BUILDING CODES MAY VIOLATE LOCAL LAWS, AFFECT
BUILDING ENVELOPE PERFORMANCE AND MAY AFFECT WARRANTY COVERAGE. FAILURE TO COMPLY WITH ALL HEALTH AND SAFETY REGULATIONS WHEN CUTTING AND INSTALLING
THIS PRODUCT MAY RESULT IN PERSONAL INJURY. BEFORE INSTALLATION, CONFIRM YOU ARE USING THE CORRECT HARDIEZONE® PRODUCT INSTRUCTIONS BY VISITING
HARDIEZONE.COM OR CALL 1-866-942-7343 (866-9-HARDIE)
Visit jameshardiepros.com for the most recent version.
EFFECTIVE APRIL 2018
HardieSoffit
®
Beaded Porch Panels
SF1205-P1/3 04/18
• HardieSoffit
®
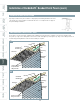
beaded porch panels may be installed as a soffit or ceiling over either wood or steel 20 gauge (33 mils) minimum to 16 gauge (54 mils) framing
complying with the local building code. See general fastening requirements. Install soffits to nominal 2 x 4 framing members spaced a maximum of 24" on center
(fig.1), with the long dimension perpendicular to the rafter or joist framing.
• All edges must be supported by framing. (fig. 1)
• Install water barriers and air barriers as required by local building codes. James Hardie will assume no responsibility for moisture infiltration.
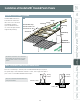
• Ensure gutters have end caps. Maintain a minimum 1" gap between end caps and siding & trim (fig.5).
• Install kickout flashing at roof-wall junctions. (fig 6.)
• DO NOT use finish nails.
• James Hardie Building Products provides installation/wind load
information for buildings with a maximum mean roof height of
85 feet. For information on installations above 60 feet, please
contact JH technical support.
GENERAL REQUIREMENTS:
INSTALLATION:
• HardieSoffit beaded porch panels must be fastened to a solid,
nailable substrate such as wood.
• Additional framing may be needed to ensure proper fastening.
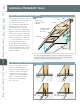
• Panels can be installed as shown in figure 1.
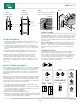
Fastener Positioning
• Position fasteners 3/8" from panel edges and and no closer
than 2" away from corners (Figure 2).
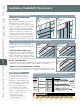
Jointing Methods
• Panel ends are to be butted together as shown in Figure 3.
• Install panels in moderate contact at ends with or without
battens (Figure 4).
Figure 1
24" o.c.
max
2"
2"
3/8"
Figure 2
Store flat and keep dry and covered prior to
installation. Installing siding wet or saturated may
result in shrinkage at butt joints. Carry planks on
edge. Protect edges and corners from breakage.
James Hardie is not responsible for damage caused
by improper storage and
handling of the
product.
OUTDOORS
1. Position cutting station so that airflow blows dust away from the
user and others near the cutting area.
2. Cut using one of the following methods:
a. Best: Circular saw equipped with a HardieBlade
®
saw blade
and attached vacuum dust collection system. Shears
(manual, pneumatic or electric) may also be used, not
recommended for products thicker than 7/16 in.
b. Better: Circular saw equipped with a dust collection feature
(e.g. Roan
®
saw) and a HardieBlade saw blade.
c. Good: Circular saw equipped with a HardieBlade saw blade.
INDOORS
DO NOT grind or cut with a power saw indoors. Cut using shears (manual, pneumatic or
electric) or the score and snap method, not recommended for products thicker than 7/16 in.
- DO NOT dry sweep dust; use wet dust suppression or vacuum to collect dust.
- For maximum dust reduction, James Hardie recommends using the “Best” cutting
practices. Always follow the equipment manufacturer’s instructions for proper operation.
- For best performance when cutting with a circular saw, James Hardie recommends
using HardieBlade
®
saw blades.
- Go to jameshardiepros.com for additional cutting and dust control recommendations.
CUTTING INSTRUCTIONS
STORAGE & HANDLING:
IMPORTANT: The Occupational Safety and Health Administration (OSHA) regulates workplace exposure to silica dust. For construction sites, OSHA has deemed
that cutting fiber cement with a circular saw having a blade diameter less than 8 inches and connected to a commercially available dust collection system per
manufacturer’s instructions results in exposures below the OSHA Permissible Exposure Limit (PEL) for respirable crystalline silica, without the need for additional
respiratory protection.
If you are unsure about how to comply with OSHA silica dust regulations, consult a qualified industrial hygienist or safety professional, or contact your James
Hardie technical sales representative for assistance. James Hardie makes no representation or warranty that adopting a particular cutting practice will assure
your compliance with OSHA rules or other applicable laws and safety requirements.