
Installation Guide

95
General
Product
Information
Tools for
Cutting and
Fastening
General
Installation
Requirements
General
Fastener
Requirements
Finishing and
Maintenance
HardieTrim®
Boards/Battens
HardieWrap®
Weather Barrier
HardieSoffit®
Panels
HardiePlank®
Lap Siding
HardieShingle®
Siding
HardiePanel
®
Vertical Siding
ESR-1844 &
2290 Report
Appendix/
Glossary
Working
Safely
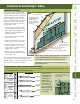
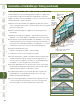
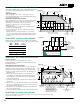
Installation of HardieShingle
®
Siding
Like conventional wood-shingle siding,
HardieShingle
®
siding requires the use of
a starter strip and a starter course before
installing the first full course of shingle
panels or individual shingles. The starter
strip sets the initial shingles at the proper
angle and the starter course provides
solid backing and keyway coverage for
the first shingle course.
1) The starter strip should be installed
over the water-resistive barrier. Starter
strips can be made by ripping 1
1
/4-in.
lengths from full or partial planks of
HardiePlank
®
siding.
2) Use HardiePlank 8
1
/4-in. lap siding
for the starter course.
3) Snap a level chalk line 8
1
/4 in. up from
the bottom edge of the starter strip.
4) Position the top of the starter course
along the chalk line, use a straight
edge on bottom of shingles if uniform
straight edge is desired
5) The first course of shingle siding is
then installed even with bottom edge
of the starter course.
Sheathed wall
Starter strip starts shingles at the proper angle.
Starter course covers keyways
on rst shingle course.
Leave at least 1¼ in.
between keyways on
successive courses.
Water resistive barrier
Snapped chalk lines
guide installation, use
a straight edge on
bottom of shinlges if
uniform straight edge
is desired
INDIVIDUAL SHINGLES
TIP: For the best appearance, apply shingle widths in a random manner
to avoid creating a repeat pattern. Pre-planning of each course is
recommended to aid appearance and to avoid stacked seams.
TIP: Stainless steel fasteners are recommended when installing
James Hardie products.
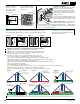
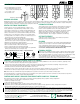
Corrosion-resistant
siding nails 1
1
/4-in.
long should be used
to apply individual
HardieShingles
®
to
minimum
7
/16-in.
OSB rated sheathing.
Position nails
1
/2 in.
to 1 in. from the side
edges of the shingles
and 8
1
/2 in. to 9 in. up
from the bottom edge
of the shingle.
2 nails per shingle on 4.2-in.,
5.5-in., 6.75-in., 7.25-in., and
10-in. shingles
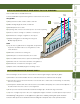
Individual
Shingles
Minimum
15/32 in.
thick
plywood
Minimum
7/16 in. OSB
Sheathing
HardieShingle
Panels
16 in. or
24 in. O.C.
wood studs
Directly to
minimum
7/16 in.
thick OSB
Individual and
Shingle Panels
16 in. or
24 in. O.C.
steel studs
ring shank
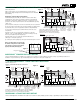
siding nail
6
.083 in. x .187 in. x 1.5 in.
roofing nail
9
[11 GA] .121 x .371 in. x 1.25 in.
siding nail
4
.091 in. x .221 in. x 1.5 in.
9
6
4
Fastening Substrate
Fastening Types
Approved
Fastener
HARDIESHINGLE SIDING FASTENER SPECIFICATIONS
The Fastener Specifications table shows fastener options for a variety of different nailing substrates. Please refer to the applicable ESR report online (see back
page) to determine which fastener meets your wind load design criteria.
9.2
When installing individual HardieShingles
®
,
be sure to
space shingles no more than
1
/4 in. apart. Spaces
between shingles should not be within 1
1
/2 in. of the
spaces in the courses above and below.
11.1
masonry nail
ET&F
Panelfast
14
ASM-144-125
(.30 in. x .14 in. x 1.25 in.)
13
AGS-100-0150
(.313 in. x .100 in. x 1.5 in.)
13
14