General Product Information Working Safely HardieShingle® Siding Product Description General Installation Requirements Tools for Cutting and Fastening HardieShingle® siding is fiber-cement shingle siding for sidewall applications. HardieShingle siding is available as straight-edge panels or staggered-edge panels 48-in. long by 16-in. high. HardieShingle panels also come as decorative half-round shingles. For smaller coverage areas, individual shingles are also available in 4.2 in., 5.5 in., 6.75 in., 7.
Installation of HardieShingle Siding General Product Information ® INDIVIDUAL SHINGLES 11.1 Water resistive barrier Working Safely Like conventional wood-shingle siding, HardieShingle® siding requires the use of a starter strip and a starter course before installing the first full course of shingle panels or individual shingles. The starter strip sets the initial shingles at the proper angle and the starter course provides solid backing and keyway coverage for the first shingle course.
General Product Information Installation of HardieShingle Siding (continued) ® For HardieShingle panels start at one end and work across the wall. 1) Measure and trim the first panel to make sure the end of the panel falls over framing. 2) Using the chalk line as a guide along the panel top edge.
General Product Information INSTALLING HARDIESHINGLE® PANEL DIRECT TO 7/16 IN. SHEATHING Panel and Individuals may be mixed together to reduce waste and save time. 1) Always work from center of wall to outside corner trim Left Right 11.4 16 in. or 24 in.
General Product Information Installation of HardieShingle Siding (continued) ® ESR-1844 & 2290 Report Appendix/ Glossary HardiePanel® Vertical Siding HardieShingle® Siding HardiePlank® Lap Siding HardieSoffit® Panels HardieTrim® HardieWrap® Boards/Battens Weather Barrier Finishing and Maintenance General Fastener Requirements General Installation Requirements Tools for Cutting and Fastening Working Safely HALF-ROUND DECORATIVE SHINGLE PANELS (CONTINUED) 98 For best appearance, half-round shi
Siding STRAIGHT EDGE, STAGGERED EDGE, HALF ROUNDS & INDIVIDUAL SHINGLES INSTALLATION REQUIREMENTS - PRIMED & COLORPLUS® PRODUCTS EFFECTIVE SEPTEMBER 2013 Visit www.jameshardie.com for the most recent version. IMPORTANT: FAILURE TO INSTALL AND FINISH THIS PRODUCT IN ACCORDANCE WITH APPLICABLE BUILDING CODES AND JAMES HARDIE WRITTEN APPLICATION INSTRUCTIONS MAY LEAD TO PERSONAL INJURY, AFFECT SYSTEM PERFORMANCE, VIOLATE LOCAL BUILDING CODES, AND VOID THE PRODUCT ONLY WARRANTY.
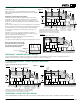
KICKOUT FLASHING Figure 7 Maintain a minimum 1" gap between gutter end caps and siding & trim. Maintain a 1/4" clearance between the bottom of James Hardie® products and horizontal flashing. Do not caulk gap.
HARDIESHINGLE® STAGGERED EDGE PANELS INSTALLATION Figure 15 Fastener Requirements 0.083" x 0.187" HD x 1 1/2" long ringshank nails are used for fastening Steps 1- 4 HardieShingle® Staggered Edge Panels to both framing and to 7/16" thick APA rated sheathing. 16" or 24" o.c. 1/8” min. Trim gap for caulk water-resistive barrier sheathing HardieShingle Staggered Edge Panel Installation DO NOT NAIL THROUGH 6" THIS AREA Install HardieShingle® panels with joints butted in moderate contact.
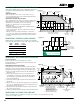
HARDIESHINGLE® INDIVIDUAL SHINGLE INSTALLATION HardieShingle® Individual Shingles must be installed with the widest part of Figure 18 the shingle placed downwards and directly to minimum 7/16" thick Trim 1/8” min. sheathing. gap for Fastener Requirements caulk 0.091" x 0.221" HD x 1 1/2" or 0.121" x 0.371" HD x 1 1/4" long corrosion resistant siding nails are used for fixing HardieShingle siding to 7/16" thick APA rated sheathing.
CORNER DETAILS Figure 21 A. Panels butted against corner boards. B. Panels butted against square wood strip on inside corner, flashing behind. C. Laced outside corner. D. Laced inside corner. minimum (1") thick trim WINDOWS AND DOORS Building wall components such as windows, doors and other exterior wall penetrations shall be installed in accordance with the component manufacturer’s written installation instructions and local building codes.
Información general del producto Requisitos generales de instalación Requisitos generales del sujetador El revestimiento de las tejas HardieShingle es un producto preacabado James Hardie con Tecnología ColorPlus®. El acabado ColorPlus es un acabado aplicado en fábrica, cocido al horno y disponible en una variedad de productos de revestimiento y acabado de James Hardie. Consulte a su proveedor local para obtener detalles y conocer la disponibilidad de productos, colores y accesorios.
Información general del producto Trabajar con seguridad Herramientas para corte y sujeción Requisitos generales de instalación Requisitos generales del sujetador Instalación de revestimientos de las tejas HardieShingle ® Tejas individuales 11.1 Al igual que el revestimiento de tejas de madera convencional, el revestimiento de las tejas HardieShingle® requiere el uso de un listón de inicio y una capa de inicio antes de instalar la primera capa completa de paneles de tejas o las tejas individuales.
® 1) Mida y ajuste el primer panel para asegurarse de que el panel descansa sobre el armazón. Las líneas de tiza ayudan a guiar la instalación, utilice una paralela en la parte inferior de los paneles de borde recto si desea obtener bordes rectos. Requisitos generales del sujetador ® 7) Continúe alternando estas tres longitudes en la pared para lograr un posicionamiento correcto de los chaveteros de las tejas.
Información general del producto Trabajar con seguridad Herramientas para corte y sujeción Requisitos generales de instalación Requisitos generales del sujetador Acabado y mantenimiento Barrera meteorológica HardieWrap® Tablas de Paneles de Revestimiento de Paneles de sofito Tablas/Listones revestimiento revestimiento HardieTrim® las tejas HardieSoffit® solapado vertical HardieShingle® HardiePlank® HardiePanel® Apéndice/ Glosario Informe ESR-1844 y 2290 100 Instalar el panel HardieShingle® directamente en
1) Mida el ancho horizontal del alero que va a revestir y localice el centro 11.5 Pared con cubierta El listón de inicio da comienzo a las tejas en el ángulo adecuado. Requisitos generales de instalación del alero. Utilizando un tiralíneas, dibuje una línea desde el pico del alero hasta la marca del centro.
Revestimiento BORDE RECTO, BORDES ESCALONADOS, TEJAS INDIVIDUALES Y REDONDEADAS REQUISITOS DE INSTALACIÓN - PRODUCTOS CON IMPRIMACIÓN Y COLORPLUS® VIGENTE A PARTIR DE SEPTIEMBRE DEL 2013 Visite www.jameshardie.com para obtener la versión más reciente.
Mantenga un margen de 1/4 de pulgada entre los productos James Hardie® y tapajuntas horizontales. No selle la separación. Mantenga una separación mínima de 1 pulgadas entre las tapas de los extremos del canalón, el revestimiento y la moldura.
HARDIESHINGLE® INSTALACIÓN DE PANELES DE BORDE ESCALONADO Espacio mín.16 o 24 pulgadas Barrera Figura 15 resistente Moldura 1/8 de de centro Requisitos de sujeción al agua Pasos 1-4 pulgada para a centro Los clavos largos de revestimiento de 0.083 pulgadas x 0.187 pulgadas masilla HD x 1 1/2 pulgadas se utilizan para la fijación de paneles con borde escalonado Revestimiento HardieShingle® para armazón y recubrimiento clasificado APA de 7/16 de pulgada de grosor.
INSTALACIÓN DE TEJA INDIVIDUAL HARDIESHINGLE® Figura 18 Las tejas individuales HardieShingle® se deben instalar con la parte más ancha de la teja colocada hacia abajo y directamente en el recubrimiento de 7/16 de pulgada de grosor mínimo. Moldura Requisitos de sujeción 0.091 pulgadas x 0.221 pulgadas de AD x 1 1/2 pulgadas o 0.121 pulgadas x 0.
DETALLES DE LA ESQUINA Figura 21 A.Paneles ensamblados contra las tablas de esquina. B.Paneles ensamblados contra el listón de madera cuadrada en la parte interior de la esquina, detrás de la protección. C.Esquina exterior entrelazada. D.Esquina interior entrelazada.