
Installation Guide


44
For Corners, Band Boards, Windows, and Door Applications: HardieTrim
®
boards can be installed with Flat Tabs
(JH sku no. 280154) and Corner Tabs (JH sku no. 280155) which provide concealed fastening. Only Flat and Corner
Tabs can be used with HardieTrim
®
boards to create a concealed fastening. Additional framing may be required to
ensure the Flat and Corner Tabs are fastened properly to the structure. Special attention should be paid to the framing
when using a sheathing that does not have fastener holding equivalent to OSB or Plywood sheathing.
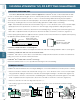
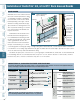
Step 1: Attach Flat Tabs to the back side of the trim with 4 18 ga. ½ in. L x ¼ in. W narrow crown corrosion resistant staples,
equally spaced in one row, positioned no closer than ½ in. from trim edges, using a pneumatic staple gun. (Figure 8.1)
Step 2: For wood frame construction, attach the trim to the building using 2, 6d siding nails fastened through the Flat
Tabs. ET&F or equivalent fasteners may be used to attach the Flat Tabs to steel frame construction. (Figures 8.2)
Fastener spacing will vary based on application. Refer to specific sections in these instructions for required fastener spacing
by application (window, band board, etc.). (Figures 8.13)
Installation of HardieTrim tabs in Coastal Regions:
James Hardie requires that stainless steel staples & fasteners be used when installing HardieTrim
™
Tabs in coastal regions.
Installation of HardieTrim Tabs over Pressure Treated Lumber:
HardieTrim
™
tabs shall not come in direct contact with ACQ or CA preservative-treated wood. Refer to the General Fas-
tening section of this document for further information.
HardieTrim
®
NT3
™
boards with ColorPlus
®
Technology:
Remove the laminate sheet as soon as possible after attaching the trim to the building.
HardieTrim
®
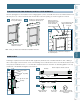
boards are installed around corners by pre-building the corner off the wall with the Corner Tabs (JH sku no. 280155).
• Attach Corner Tabs to the back side of the trim with 8 18 ga. ½ in. L x ¼ in. W narrow crown corrosion resistant staples
using a pneumatic staple gun. Ensure the Corner Tabs are fastened tight and straight to the trim boards. (Figures 8.3)
• For wood frame construction, attach the trim to the building with 2, 6d siding nails fastened through the Corner Tabs.
ET&F or equivalent fasteners may be used to attach the Corner Tabs to steel frame construction. (Figures 8.4)
• Attach a Corner Tab 1 in. from each edge and every 20 in. o.c.
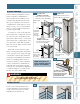
• TIP: Creating a jig for the work station is recommended to ensure the corners are fastened securely and straight.
(Figures 8.6)
Installation of HardieTrim
®
5/4, 4/4 & NT3
®
Back Grooved Boards
CONCEALED FASTENING TABS
TRIMMING CORNERS
2 in. min.
1/2 in. min.
Fasten 4 staples to the
center of the nailing ridge.
Fasten HardieTrim
Flat Tab to min. 7/16 in. OSB
with min. 2, 6d siding nails
Use 4 staples per
piece of trim to fas-
ten the L-shaped
tab to the pre-built
corner. Use the nail
line on the tabs as
a guide.
HardieTrim
™
Flat Tab
HardieTrim
™
Corner Tab
Corner studs
Corner Tab
22.5º - 45º
weather cut
Fasten
2 in. x 4 in.
timber blocks
to a work
bench
Fasten 2 in. x 8 in.
stud to the timber
blocks
HardieTrim
Corner Tabs
Siding Nail
8.1 8.2
8.3
8.4 8.5 8.6
General
Product
Information
Working
Safely
Tools for
Cutting and
Fastening
General
Installation
Requirements
General
Fastener
Requirements
Finishing and
Maintenance
HardieTrim®
Boards/Battens
HardieWrap®
Weather Barrier
HardieSoffit
®
Panels
HardiePlank
®
Lap Siding
HardieShingle
®
Siding
HardiePanel
®
Vertical Siding
Appendix/
Glossary
ESR-1844 &
2290 Report