
How to Guide
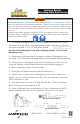
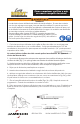

Fig. 2B Splice Repair
1. Cut away damaged section(s) of berglass rod with a ne-tooth
hacksaw or sharp knife. Strip protective jacket back about 7/8” for
end ferrule repair or 3/4” for rod splice repair.
Do not cut into berglass core when stripping jacket. Do not crush
berglass core.
2. Use emery cloth provided to roughen surface of berglass core
end (Fig. 1). Do not remove large amounts of material during sanding.
3. Clean ends of berglass core with a cleaning solvent such as
lacquer thinner or denatured alcohol before applying glue.
4. Allow cleaning solvent to evaporate.
5. Throughly mix adhesive per product instructions.
6. Apply drop of adhesive to berglass core end (in case of a
splice, do one end at a time as in Fig. 2A) and spread over core
with toothpick or nail.
7. Twist ferrule as you insert rod (Fig. 2A and 2B). Clean off excess
glue. Return unused materials to kit.
8. Allow sufcient time for adhesive to cure. Adhesive will set in
approximately 20 minutes, but requires 24 hours for full cure.
Splicing Rod Or
Attaching New End Ferrule
ADHESIVE
Read manufacturer’s instructions before using adhesive. In case of eye contact,
ush with water and seek medical attention If skin contact occurs, apply solvent
(such as nail polish remover) to area and gently remove adhesive. Wash solvent
off with water. Solvents should not be used in case of contact with eyes or open
wounds.
Always wear safety goggles (ANSI Std. Z87.1) and gloves when working with
adhesive and/or unprotected berglass rod. See adhesive product label for
Safety Data Sheet (SDS).
EB_SPL_MO4
800.346.1956 WWW.JAMESONLLC.COM
Since 1956
Fig. 2A End Ferrule Repair
Fig. 1