Indoor/Outdoor 1A2, 3A2, 3S, 3T, 8A2 1
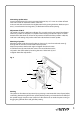
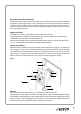
Congratulations on your purchase of Jamo Indoor/Outdoor speakers. Congratulations on your purchase of Jamo Indoor/Outdoor speakers content. Package Speaker (2) Port plug “i” (4) Assembled bracket (2) Thumb screw “j” (4) Package content Screw plug “g” (8) Port plug “i” (4) Covers “k” (4) Speaker (2) Allen wrench (1) Assembled bracket (2) Thumb screw “j” (4) Allen wrench (1 Manual (1) Manual (1) Screw plug “g” (8) Covers “k” (4) Bracket. The brackets comes pre-assembled.
Connecting speaker wires Loosen speaker terminals by turning counter clockwise. Strip ½”/12 mm in-sulation off each wire. Twist strands on each wire to form “solid” wire. Insert one wire into each terminal and tighten terminal by turning clockwise. Make sure positive (+) is to red terminal and negative (-) to black terminal for correct phasing. Adjustment of I/O 3T This model is for 70V or 100V line installation.
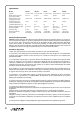
Specifications Model System Woofer (in/mm) Tweeter (in/mm) Power (W long/short term) Sensitivity (dB/2.83V/1m) Frequency range (Hz) Impedance (Ohm) Weight (lb/kg) Dimensions HxWxD (in/mm) I/O 1A2 2 way ported 4½/114 ½/13 Dome 20/40 86 77-20.000 6 5.1/2.3 9.1x6.3x6.6 232x160x168 I/O 3A2 2 way ported 5¼/133 1/25 Dome 40/80 88 64-20.000 8 6.9/3.2 11.4x7.9x8.2 290x200x209 I/O 3S 2 way ported 5¼/133 2x1/25 Dome 40/80 88 55-20 000 8+8 8.3/3.8 11.4x7.9x8.
Enceintes à usage intérieur et extérieur 1A2, 3A2, 3S, 3T, 8A2
Congratulations on your purchase of Jamo Indoor/Outdoor speakers. Toutes nos félicitations pour avoir acheté ces enceintes Jamo pour usage intérieur et extérieur content. Package Speaker (2) Port plug “i” (4) Assembled bracket (2) Thumb screw “j” (4) Contenu de l’emballage Screw “g” (8) Covers “k”hexagonale (4) Enceintesplug (2) Porte-prises “i” (4) Clé (1) Support assemblé (2) Vis à serrage “j” (4) Allen wrench (1 Manual (1) Manuel (1) Cache vis “g” (8) Cache “k” (4) Bracket.
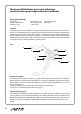
Raccordement des fils de l’enceinte Tournez les borniers pour haut-parleurs dans le sens anti-horaire pour les desserrer. Dénudez chaque fil sur une longueur de ½”/12 mm. Tressez les brins des de chaque fil pour les renforcer. Insérez un fil dans chaque bornier et serrez ce dernier en le tournant dans le sens horaire. Assurez-vous que le positif (+) va dans le bornier rouge et le négatif (-) dans le bornier noir pour une mise en phase correcte.
Specifications Modèle Système Woofer (haut-parleur de graves) (pouce/mm) Tweeter (haut-parleurs d'aigus) (pouce/mm) Puissance (Puissance continue/instantanée) Sensibilité (dB/2,83 V/1 m) Gamme de fréquences (Hz) Impédance (Ohm) Poids (livre/kg) Dimensions (HxLxP) (pouce/mm) I/O 1A2 2 voies à évent 4½/114 I/O 3A2 2 voies à évent 5¼/133 I/O 3S 2 voies à évent 5¼/133 I/O 3T 2 voies à évent 5¼/133 I/O 8A2 2 voies à évent 8/203 à dôme ½/13 à dôme 1/25 à dôme 2x1/25 à dôme 1/25 à dôme 1/25 20/40 40/80