
Operation Manual


2
Congratulations on your purchase of
J
amo Indoor/Outdoor speakers.
P
ackage content.
Speaker (2) Port plug “i” (4) Allen wrench (1)
Assembled bracket (2) Thumb screw “j” (4) Manual (1)
Screw plug “g” (8) Covers “k” (4)
B
racket.
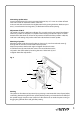
The brackets comes pre-assembled. If disassembling the bracket for paint-
ing, re-assemble it as follow: Place the curved bracket (a) between the wall
bracket (b) and wall bracket cover (c) as shown in fig. 1. Insert two 1” allen
bolts (d) through wall bracket into wall bracket cover and tighten with the
supplied allen wrench. Insert two ½” allen bolts (e) into each side of wall
bracket and tighten towards curved bracket.
M
ounting of bracket.
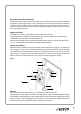
The bracket can be mounted for horizontal or vertical placement of the
speaker. Mount the bracket with four screws (not included) appropriate for
the surface the bracket is mounted to (wood, brick, concrete or other). Take
into account the weight of the speaker (specications on back). A hole (f) in
the middle of the bracket allows for running the speaker wire through the
bracket if so desired. Cover the screws with four screw plugs (g) fig. 2.
M
ounting of port plugs.
If the front of the speaker is exposed to rain directly entering the bass reex
ports (under the grill), the ports should be closed to avoid lling the
speaker with water. High moisture is not a problem. Remove the grill (h)
from the speaker and insert two port plugs (i) into the bass ports. Re-install
the grill. The speaker will reproduce less bass with the ports closed.
Fig. 1
b
c
d
e
a
d
e
f
Congratulations on your purchase of
Jamo Indoor/Outdoor speakers
Package content
Speaker (2) Port plug “i” (4) Allen wrench (1)
Assembled bracket (2) Thumb screw “j” (4) Manual (1)
Screw plug “g” (8) Covers “k” (4)
Bracket
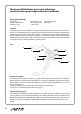
The brackets comes pre-assembled. If disassembling the bracket for paint-ing, re-assemble it
as follow: Place the curved bracket (a) between the wall bracket (b) and wall bracket cover
(c) as shown in g. 1. Insert two 1” allen bolts (d) through wall bracket into wall bracket cover
and tighten with the supplied allen wrench. Insert two ½” allen bolts (e) into each side of wall
bracket and tighten towards curved bracket.
Mounting of bracket
The bracket can be mounted for horizontal or vertical placement of the speaker. Mount the
bracket with four screws (not included) appropriate for the surface the bracket is mounted to
(wood, brick, concrete or other). Take into account the weight of the speaker (specications on
back). A hole (f ) in the middle of the bracket allows for running the speaker wire through the
bracket if so desired. Cover the screws with four screw plugs (g) g. 2.
Mounting of port plugs
If the front of the speaker is exposed to rain directly entering the bass reex ports (under the
grill), the ports should be closed to avoid lling the speaker with water. High moisture is not a
problem. Remove the grill (h) from the speaker and insert two port plugs (i) into the bass ports.
Re-install the grill. The speaker will reproduce less bass with the ports closed.
Fig. 1