OWNERS MANUAL Jamo R 909 1
english 4
CON T E N TS Introduction 6 Placement 7 Listening position 8 Spikes 9 Connecting 10 Front and back fabric covers 11 Cleaning 12 Specifications 12 The scope of the warranty 13 5
INTRODUCTION Welcome to the exclusive circle of Jamo R 909 owners! This manual will give you a quick overview of how to set up your speakers in your room. For more in-depth information about the technologies please refer to the R 909 technical description. The first word of advice. After setting up your R 909s for the first time, please allow yourself a couple of days to listen to them before you start fine-tuning the sound. This will serve two purposes.
P L AC E M E N T As a starting point, we suggest you initially position the R 909s 3 feet from the back wall and 4 feet from the side wall. Angling the speakers 10 degrees to the back wall will reflect the generated sound off your back and side walls, which will give you the acoustic impression of a much larger room. Also remember that a dipole speaker emits virtually no sound from the side. You can take advantage of this trait to cancel reflections from the side wall by varying the toe-in angle.
L I S T E N I N G P O SITION To find the best listening position, place yourself at a 30 degree angle from each speaker. Doing so means that you will be seated at about the same distance away from the speakers as the actual gap between them. The benefit of this is that the direct radiating sounds from each speaker will cross each other at a point behind you. IF YOUR ROOM… a) doesn’t allow you to get the speakers the required distance from the back and side walls or… b) has highly reflective surfaces (ie.
SPIKES After the initial placement of the speakers it’s now time to screw in the spikes. Because of the weight of the R 909, we recommend that you gently lay it on one side and screw in all four spikes together. Before you do this, however, be sure to place a couple of thick towels or similar underneath the side of the speaker. This will prevent accidental scratching to the surface of the R 909 and, equally importantly, will avoid you putting a rather large dent in your floor.
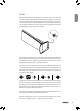
CO N N E C T I N G SINGLE-WIRING For single-wire connections, the terminal jumpers should be attached as shown in the illustration. AMPLIFIER BI-WIRING If you’d like to use a bi-wiring arrangement, make sure you remove all the terminal jumpers before you connect up your loudspeaker cables. AMPLIFIER BI-AMPING In a bi-amped system, make sure you remove the terminal jumpers before connecting up your cables.
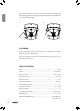
FRON T AN D B ACK FA BR IC COVE R S The front fabric covers have been designed to have minimal influence on the sound quality. However, for critical listening we would advocate that you remove them. The rear fabric covers have no influence on the sound quality. It’s entirely up to you and your aesthetic preference whether you have them on or not. When removing and putting on the front and back covers, however, make sure you do so gently, in order to prevent scratching or marking.
It’s also worth noting that the rear fabric cover is mainly held in place by magnets. When mounting it make sure that you gently push the two fabric cover holders into the corresponding brace holes. 1 2 CLEANING Please use a dust-free cloth to clean the R 909. It is also possible to use a slightly damp cloth for more stubborn marks. Under no circumstances should you use any kind of cleaning agent on, or in close proximity to, these speakers. S P E C I F I C AT I ONS Type ................................
T HE S COP E OF THE WARR ANT Y The warranty period will come into force as from the purchase date stated on the invoice. The warranty will apply for the following period of time: • 7 years In case of warranty inquiries, please contact your dealer. In case of request for service under warranty, please enclose your original receipt. Defects covered by the warranty: Except for the defects stated below, the warranty covers any production and material defects of the product.
www.jamo.