INSTRUCTION BOOK
IMPORTANT SAFETY INSTRUCTIONS Your sewing machine is designed and constructed only for HOUSEHOLD use. Read all Instructions before using this appliance. DANGER – To reduce the risk of electric shock: 1. An appliance should never be left unattended when plugged in. Always unplug this appliance from the electrical outlet immediately after using and before cleaning. 2. Always unplug before relamping. Replace bulb with same type rated 15 Watts. 3. Do not reach for the appliance that has fallen into water.
Do’s and Don’ts 1. Always be aware of the up-and-down movement of the needle and do not turn your attention away from the machine while it is running. 2. When leaving the sewing machine unattended, the main switch of the machine must be switched off or the plug must be removed from the socket-outlet. 3. When servicing the sewing machine, or when removing covers or changing lamps, the machine must be disconnected from the power supply by removing the plug from the socket-outlet. 4.
TABLE OF CONTENTS PREPARATION Names of Parts ................................................... 4 ROLLED HEMMING, PICOT EDGING AND NARROW HEMMING Standard Accessories ........................................ 4 Connecting the Machine to the Power Supply ...... 5 Machine Setting and Thread, Fabric and Controlling Sewing Speed ................................. 5 Thread Tension ................................................ 32 For Your Safety ..................................................
PREPARATION 15 Names of Parts 16 2 17 14 13 1 12 5 11 10 9 8 3 4 7 6 18 20 19 21 22 23 24 25 27 26 1 2 3 4 5 6 7 8 9 10 11 12 13 14 15 16 17 18 19 20 21 22 23 24 25 26 27 28 Left needle thread tension dial Right needle thread tension dial Upper looper thread tension dial Lower looper thread tension dial Side cover Looper cover Handwheel Power switch Machine socket Differential feed dial Stitch length dial Spool stand Spool holder Spool pin Thread guide bar Thread guide Pressure adjusting
Connecting the Machine to the Power Supply 5 3 1 Before connecting the machine to the power supply, make sure the voltage and frequency shown on the machine conform to your electrical power. 4 2 2 1. Turn off the power switch, and connect the machine plug to the machine socket. 2. Connect the power supply plug to your power supply. 3. Turn on the power switch.
How to turn the Handwheel Always turn the handwheel toward you (Counterclockwise). 1 Handwheel 1 Opening and Closing the Side Cover 1 To open: Push the side cover to the left. To close: Push the side cover to the right. 1 Side cover Opening and Closing the Looper Cover To open: A While pushing with the thumb to the right as far as it will go, pull the looper cover toward you. B A 1 To close: B Lift the looper cover and push it against the machine.
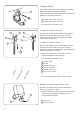
The Position of Thread Guide Bar 1 1. Pull the thread guide bar up as far as it will go. 2. Turn the thread guide bar so that the thread guides are right above the spool pins. 2 1 2 3 4 3 Thread guide bar Thread guide Stoppers Spool pin 4 * Make sure to lock the thread guide of guide pole in the correct position with the two stoppers. 1 2 1 Attaching the Spool Holder Cap and Net (Optional) 3 1. When you use a small thread spool, pull out the spool holder from the spool pin.
Changing Needle Turn off the power switch and unplug the machine. 1 Raise the needle to its highest position. Then loosen the left or right needle clamp screw for the needle you are going to remove. 1 Needle clamp screw on the left 2 Needle clamp screw on the right 2 * Use HA-1SP #14 Needle or #11.
Removing the Presser Foot 2 3 4 1. Turn off the power switch and unplug the machine. 2. Raise the needle and the presser foot. 1 3. Press the lever located on the back of the foot holder. The presser foot will drop off. 1 2 3 4 Needle Presser foot lifter Foot holder Lever Attaching the Presser Foot 3 2 1. Turn off the power switch and unplug the machine. 2. Place the presser foot so that the pin on the foot lies just under the groove of the foot holder. 3.
Adjustment of Stitch Length 1 To select stitch length, turn the dial. The larger the number, the longer the stitch. 2 The stitch length can be adjusted from 1 to 4 mm. Position “R” is for rolled and narrow hemmings. 1 Stitch length dial 2 Setting mark Adjustment of Differential Feed Ratio The differential feed ratio can be altered by turning the dial. 1 The number on the dial indicates the ratio between the main and the sub feed motion. 1.0 indicates the neutral position.
To Deactivate the Upper Knife 1. Turn off the power switch and unplug the machine. 2. Open both the looper cover and side cover. 3. Turn the upper knife release knob toward you while pushing it to the right, then guide the hole on the upper knife to the pin to lock the upper knife in the down position. 1 4. Close the looper cover and side cover. 2 1 Upper knife release knob 2 Stopper pin 3 Upper Knife 3 To Activate the Upper Knife 1. Turn off the power switch and unplug the machine. 2.
Adjustment of Cutting Width 1 When cutting width is too narrow or too wide against seam width, adjust it as follows. (B) 1. Turn off the power switch and unplug the machine. (A) 2. Open the looper cover and side cover. 3. Set the upper knife to down position 2 4. Turn the cutting width adjusting dial to get desired position of lower knife. 4 2 3 2 2 1 Cutting width adjusting dial 2 Lower knife 3 Standard setting * The cutting width of this model can be adjusted approximately 3.0 to 5.
Adjustment of Needle Plate Setting Knob (Changing to Standard Serging or Rolled Hemming) 1 1. Turn off the power switch and unplug the machine. 2. Open the looper cover and side cover. 3. Deactivate the upper knife. 4. Push the cutting width adjusting dial to the right as far as it will go, then, move the needle plate setting knob to the guide line of S (for Standard Serging) or R (for Rolled Hemming). Release the cutting width adjusting dial to the left gently. 2 3 5.
Threading the Machine 5 2 3 1 4 The left illustration shows the completed threading conditions of four threads. 1 2 3 4 5 6 7 6 Lower looper thread Upper looper thread Right needle thread Left needle thread Thread guide Thread guide plate Threading chart The machine is pre-threaded to make threading easier. Tie the end of a new thread to one of the pre-set threads, and pull it to draw the new thread through the machine, following the steps below.
• Threading the Lower Looper 1 Open the looper cover and side cover. Place the spool of thread on the right side spool pin. * The points to thread for lower looper are marked in green. * A convenient threading chart is placed on the machine body inside the looper cover. 2 3 5 11 4 10 9 6 8 7 1.
4. Insert the thread between tension discs from the right. Then pull both sides of the thread firmly to insert it between tension discs. 5. Pass the thread through lower looper thread guide (1). 4 Lower looper thread tension dial 5 Lower looper thread guide (1) 5 4 45 (1) * Make sure that the thread is between the tension discs. (1) Thread (2) Tension discs (2) 6. Pass the thread through lower looper thread guide (2). 7. Pass the thread through the looper thread take-up lever (lower). 8.
11. Pull the threader to pass the thread through the hole of lower looper thread guide (5). Remove the thread from the threader, and draw the thread through the hole on the lower looper 10 cm (4˝) or more with a pair of tweezers. * For threading without the looper threader, draw the thread from the right side of lower looper thread guide (5) with a pair of tweezers. * And draw the thread through the hole on the lower looper 10 cm (4˝) or more with a pair of tweezers.
• Threading the Upper Looper Place a spool of thread on the spool pin second from the right. 1 * The points to thread for upper looper are marked in red. * A convenient threading chart is placed on the machine body inside the looper cover. 2 3 4 5 8 9 6 7 1. Draw the thread through the thread guide second from the right from back to front: (A) * If the thread is coming out from the thread guide groove, pass the thread through the thread guide hole again as shown: (B) 1 Thread guide 1 1 (A) (B) 2.
4. Insert the thread between tension discs from the right. Then pull both sides of thread. 5. Pass the thread through upper looper thread guide (1) 4 Upper looper thread tension dial 5 Upper looper thread guide (1) 5 4 4 5 6. Pass the thread through upper looper thread guide (2). 7. Pass the thread through the looper thread take-up lever (upper). 6 7 6 Upper looper thread guide (2) 7 Looper thread take-up lever (upper) 6 7 8. Pass the thread through upper looper thread guide (3). 9 9.
• Threading the Needle on the Right Place the spool of thread on the spool pin second from the left. 1 * The points to thread for needle on the right are marked in blue. * A convenient threading chart is placed on the machine body inside the looper cover. 2 5 3 6 4 7 8 1.
3. Insert the thread between tension discs from the right. Then pull both sides of thread. 3 Right needle thread tension dial 3 3 4. Turn the handwheel toward you to bring the needle bar to its highest position, then pass the thread through the right needle thread guide and the thread take-up lever cover. 5 4 Right needle thread guide 5 Thread take-up lever cover 4 4 5. Pass the thread through the needle thread guide sliding the thread from left to right. 6 6.
• Threading the Needle on the Left Place the spool of thread on the left side spool pin. 1 * The points to thread for needle on the left are marked in orange. * A convenient threading chart is placed on the machine body inside the looper cover. 2 4 3 5 6 7 1. Draw the thread through the thread guide on the left from back to front: (A) 1 * If the thread is coming out from the thread guide groove, pass the thread through the thread guide hole again as shown: (B) 1 Thread guide 1 (B) (A) 2.
3. Insert the thread between tension discs from the right. Then pull both sides of thread. 4. Turn the handwheel toward you to bring the needle bar to its highest position, then pass the thread through the thread take-up lever cover. 3 Left needIe thread tension dial 4 Thread take-up lever cover 3 4 3 4 5 6 7 5. Pass the thread through the needle thread guide sliding the thread from right to left. 6. Pass it through the needle bar thread guide from left to right. 7.
TEST STITCHING Starting Sewing 1. Insert the fabric under the toe of the foot. (It is not necessary to raise the foot.) 2. Turn the handwheel gently toward you a couple of turns and check the thread chain. Then start sewing slowly. The fabric will be automatically fed. Guide the fabric in the desired direction. * For heavyweight fabric, raise the presser foot and insert the fabric in front of the knife. Then lower the foot and start to sew while guiding the fabric. 1 2 Finishing Sewing 1.
Securing Ends To avoid unravelling, it is necessary to leave a thread chain about 5 cm (2´´) long at the beginning and at the end of a seam. To secure the beginning and end of a seam choose one of the following methods. B A At the beginning A. Separate the end of the threads and knot them. B. Thread the chain through a large eyed needle, and weave the chain through the overlock stitches on the fabric. C. Cut the chain at the edge of the fabric.
Thread Tension (4 threads) Correct tension The illustration at left shows sewing results with correct tension settings. However, adjusting the thread tension may be required depending upon the type of fabric and thread being used. 1 2 4 5 3 6 Right side of fabric Right needle thread Left needle thread Upper looper thread Lower looper thread * Set all four thread tension dials at “3”. Then sew, and check the thread tensions.
Looper thread tension is out of balance (1) The illustration shows sewing results when the lower looper thread tension is too tight and/or upper looper thread tension is too loose. 5 1 6 65 10 98 7 98 7 4 65 10 98 7 98 7 3 432 10 65 432 2 Remedy: Loosen lower looper thread tension and/or tighten upper looper thread tension.
Threading the Machine (3 threads) Using the needle on the right only (for regular three-thread serging) Turn off the power switch and unplug the machine. Remove the needle and the thread on the left. Then retighten the needle clamp screw on the left to prevent losing the screw. 2 1 1 Needle on the right 2 Needle clamp screw on the left Using the needle on the left only (for wide three-thread serging) Turn off the power switch and unplug the machine. Remove the needle and the thread on the right.
Thread Tension (3 threads) Correct tension 4 1 The illustration at left shows sewing results with correct tension settings. However, adjusting the thread tension may be required depending on the type of fabric and thread being used. 5 1 2 3 4 5 2 3 * Set all three thread tension dials at “3”. Then sew, and check the tension balance. If the tension balance on the test piece is not satisfactory, you can adjust the thread tension with thread tension dial.
Thread and Needle Chart Type of fabric Type of thread Needle Stitch length Differential feed ratio Organdy, Georgette, Lawn, Crepe de chine, Lining. Cotton: Silk: Synthetic: No. 80 – 100 No. 80 – 100 No. 80 – 100 HA-1 SP No. 11 2.0 – 3.0 0.5 – 1.0 Mediumweight Cotton, Linen, Satin, Ordinary fabric. Cotton: Silk: Synthetic: No. 60 – 100 No. 50 – 100 No. 60 – 100 HA-1 SP No. 11 – 14 2.5 – 3.5 1.0 Heavyweight Tweed, Coating, Denim, Doeskin, Thick fabric. Cotton: Silk: Synthetic: No.
ROLLED HEMMING, PICOT EDGING AND NARROW HEMMING Machine Setting and Thread, Fabric and Range of the Tension Dial The setting of tension dials may vary depending on the type and thickness of fabric and thread being sewn. Narrow Hemming Picot Edging Rolled Hemming Stitch Length (R) (R) (3 ~ 4) Differential Feed Ratio (1.0) (1.0) (1.0) (R) (R) Needle Plate Setting Knob (R) Using the needle on the right: HA-1 SP No.
Thread Tension For rolled hemming and picot edging Correct tension 1 The illustration at left shows sewing results with correct tension settings. Adjusting the thread tension may be required depending on the type of fabric and thread being used. 5 1 2 3 4 5 2 Thread tension adjustment 4 3 Wrong side of fabric Right side of fabric Right needle thread Upper looper thread Lower looper thread 1. Set the tension dial as shown on page 60. 2. Sew and check the tensions. 3.
For Better Results Rolled hemming Pull the end of thread chain to the back lightly in the beginning and end of sewing. 2 1 Fabric 2 Thread chain 1 Picot edging Pull the fabric lightly to the back while sewing. 1 Fabric 1 For narrow hemming Correct tension 1 The illustration at left shows sewing results with correct tension settings. 1 2 3 4 5 5 2 3 4 Wrong side of fabric Right side of fabric Right needle thread Upper looper thread Lower looper thread * Refer to pages 58 for the adjustment.
DECORATIVE OVEREDGING * Refer to pages 24, 25, 29 for thread tension balance adjustment. * For the best results, pull the thread chain to the back lightly at the beginning and end of sewing. 1 1 Overedging Thread and Fabric Thread Fabric Medium to Heavy Fabric Needle threads Synthetic : No. 60~80 Silk : No. 50~80 Upper looper thread Buttonhole twist Light weight wool yarn Lower looper thread Synthetic : No. 60~80 Silk : No. 50~80 Machine Setting 1 Needle plate setting knob HA-1 SP No.
PIN TUCKING * Refer to page 29 (Narrow Hemming) for thread tension balance adjustment. 1 1 Pin tucking Thread and Fabric Thread Fabric Light to Medium Fabric Needle thread on the right Synthetic : No. 60~80 Silk : No. 50~80 Upper looper thread Lower looper thread Synthetic : No. 60~100 Silk : No. 50~100 Machine Setting 1 Remove the needle on the left-hand side 2 Needle plate setting knob 1 HA-1 SP No.11 or No.14 2 Sewing Remove the needle on the left-hand side. Deactivate the upper knife.
CARE OF YOUR MACHINE Replacing the Upper Knife To remove: 1. Turn off the power switch and unplug the machine. 4 2. Open the looper cover and side cover. 2 3. Deactivate the upper knife. 4. Remove the hexagonal bolt, and remove the upper knife. 1 2 3 4 3 1 Upper knife Hexagonal bolt Stopper pin Lower knife To attach: 0.8 ~ 1.5 mm (3/64˝) 1 1. Insert new upper knife into the groove of knife holder and stopper pin, then tighten the hexagonal bolt slightly. 2.
Replacing the Light Bulb 1. Turn off the power switch and unplug the machine. 2. Loosen the face plate set screw, and remove the face plate. 1 Face plate 2 Set screw 2 1 To remove: Push and twist to the left. To attach: 3 Push and twist to the right. Reattach the face plate, and retighten the face plate set screw. 3 Light bulb 4 To remove 5 To attach 5 4 Note: * The machine is designed to use a 15 WATT maximum light bulb. * The light bulb will be HOT. Protect your fingers when you handle it.
Oiling the Machine Apply a few drops of fine quality sewing machine oil to the parts indicated with arrows. It is recommended to apply oil once a week in normal use, once in ten hours in continuous use. * Open the side cover and apply oil. * Open the looper cover and apply oil. Carrying the Machine Put your fingers into the hole on the back side of the machine as illustrated.
Troubleshooting Condition Cause Reference The fabric is not being fed smoothly. 1. The feed dog is packed with lint. 2. The presser foot has been raised. 3. Pressure of the foot is too weak. See page 37. Lower the presser foot. See page 9 The needle breaks. 1. The needle is incorrectly inserted. 2. The needle is bent or blunt. 3. The fabric is forcedly pulled. See page 8. See page 8. Pull the fabric lightly. The thread breaks. 1. 2. 3. 4. See pages 14 ~ 23 and 28. See pages 26 ~ 27 and 29, 32.
OPTIONAL PARTS 1 6 1 Blind stitch foot Use to blind stitch a cuff or a skirt. Taping foot with Use for sewing tape on a shoulder or armpit line to protect from stretching or to decorate. Works well with the taping foot or the cording foot. Cording foot (1) Use to sew decorative cording. Cording foot (2) Use to sew decorative cording. Beading attachment Use for decorating cloth, wide cord decoration, cording, etc. Gathering Use when sewing sleeves, cuffs, collars, etc.
792-800-244 (E) Printed in Taiwan