Instruction Book Manual de instrucciones Manuel d’instructions
IMPORTANT SAFETY INSTRUCTIONS This appliance is not intended for use by persons (including children) with reduced physical, sensory or mental capabilities, or lack of experience and knowledge, unless they have been given supervision or instruction concerning use of the appliance by a person responsible for their safety. Children should be supervised to ensure that they do not play with this sewing machine.
INSTRUCCIONES IMPORTANTES DE SEGURIDAD Esta máquina no fue concebida para ser usada por personas (incluyendo a los niños) con capacidades físicas, sensoriales o mentales reducidas, o bien con falta de experiencia y conocimientos, salvo si están supervisadas o han recibido instrucciones relativas al uso de la máquina por parte de una persona encargada de su seguridad. Los niños deben ser vigilados para asegurarse de que no jueguen con la máquina.
INSTRUCTIONS DE SÉCURITÉ IMPORTANTES Cette machine n'est pas censée être utilisée par des personnes (y compris des enfants) ayant des capacités physiques, sensorielles ou mentales réduites ou un manque d'expérience et de connaissances, sauf si elles sont sous surveillance ou ont été instruites sur l'usage de la machine par une personne responsable de leur sécurité. Les enfants devraient être surveillés pour s'assurer qu'ils ne jouent pas avec la machine.
TABLE OF CONTENTS SECTION I. NAMES OF PARTS Names of Parts ................................................................ Standard Accessories ...................................................... Extension Table and Free Arm Sewing ............................ • To detatch .................................................................... • To attach ...................................................................... • Free arm sewing ..........................................................
INDICE SECCION 1. NOMBRE DE LAS PIEZAS SECCION 4. PUNTADAS UTILES Nombre de las piezas ................................................................. Accesorios estandares ................................................................ Mesa de extensión y confección con brazo libre ........................ • Desmontaje .............................................................................. • Montaje ....................................................................................
TABLE DES MATIÈRES PARTIE 1. IDENTIFICATION DES PIÉCES DE LA MACHINE Nom des pièces .......................................................................... 3 Accessoires standard .................................................................. Plateau extensible et couture en bras libre ................................. • Retirer le plateau ...................................................................... • Remettre le plateau en place ...................................................
SECTION 1.
SECCION 1. NOMBRE DE LAS PARTES PARTIE 1.
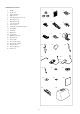
Standard Accessories 1 2 3 4 5 6 7 8 9 10 11 12 13 14 15 16 17 18 19 20 21 22 1 Bobbin Needle set Satin stitch foot F Zipper foot E Automatic buttonhole foot R Overedge foot C Blind hem foot G 1/4” seam foot O Even feed foot Seam ripper / Buttonhole opener Screwdriver Lint brush Quilter bar Foot control Additional spool pin Spool pin felt Spool stand Spool holder (large) Spool holder (small) Instruction book Power supply cord Hard cover 4 7 10 2 3 5 6 8 9 11 12 14 13 or o ou 15 18 21 4 1
Accesorios estandares 1 2 3 4 5 6 7 8 9 10 11 12 13 14 15 16 17 18 19 20 21 22 Accessoires standard Canillas Juego de agujas Prensatelas para puntada decorativa F Prensatelas para cremalleras E Prensatelas para ojals automaticon R Prensatelas de sobrehilado C Prensatelas para puntada invisible G Prensatelas para costura de 1/4” Premsatelas arrastre regular Cortador / Abreojales Destornillador Cepillo de limpieza Acolchador Pedal de control Porta carretes adicional Fieltro para porta carretes Base de carre
Extension Table and Free Arm Sewing • To detach: Pull the extension table to the left. • To attach: Slide the extension table along the free arm, inserting the pin into the hole to attach. q Extension table w Pin e Hole w e q • Free arm sewing: The free arm sewing is useful for stitching sleeves, waistbands, pant legs or any tubular garment, also for darning socks or mending knees, elbows and children’s wear.
Plateau extensible et couture en bras libre Mesa de extensión y confección con brazo libre • Desmontaje: Tire de la mesa de extensión hacia la izquierda. • Montaje: Deslice la mesa de extensión por el brazo libre, insertando el pasador en el agujero para sujetarla. q Mesa de extensión w Pasadore e Agujero • Retirer le plateau: Tirer le plateau vers la gauche. • Remettre le plateau en place Faire glisser le plateau le long du bras libre et faire rentrer la tige dans l’orifice pour le maintenir en place.
SECTION 2. GETTING READY TO SEW q Connecting the Power Supply 1. 2. 3. 4. 5. 6. Turn the power switch OFF. Insert the foot control plug into the machine socket. Insert the machine plug into the machine socket. Insert the power supply plug into the outlet. Turn the power switch ON. The LED display will show “01” (straight stitch) after one second.
SECCIÓN 2. PREPARATIVOS PARA COSER PARTIE 2. SE PREPARER A COUDRE Conexión a la fuente eléctrica Brancher la machine 1. Apague la máquina. 2. Introduzca la clavija del pedal de control en el receptáculo de la máquina. 3. Inserte el conector de la máquina en el receptáculo de la máquina. 4. Inserte la clavija del cordón a la toma eléctrica. 5. Encienda la máquina. 6. En la pantalla aparecerá "01" (puntada recta) después de un segundo.
Function Keys and Buttons e w q q Reverse stitch button While the reverse stitch button is pressed, the machine sews backwards when pattern 01, 02, 10 or 11 ( ) has been selected. The machine will not sew backwards for any other stitch pattern. Instead, the machine will immediately lock the stitch and stop automatically. q w w Auto-lock button The machine will lock the stitch and stop automatically when the Auto-lock button is pressed while sewing pattern 01, 02, 10 or 11 ( ).
Teclas de funciones y botones Touches et boutons fonctionnels q Botón de puntada inversa Al oprimir el botón de puntada inversa, la máquina cose en reversa si ha seleccionado el patrón 01, 02, 10 u 11 ( ). La máquina bloqueará las puntadas de inmediato y se detendrá automáticamente si ha seleccionado otra puntada. q Le bouton de marche arrière Lorsque le bouton de marche arrière est enclenché, la machine coud en sens inverse. Il faut également que le point 01, 02, 10 ou 11 aient été sélectionnés ( ).
r Mode selection key Press this button to enter one of the following modes. r z Pattern selection mode: Press the Up or Down key until the pattern number of the desired stitch appears on the LED display. z x Stitch width adjusting mode: Press the Up key to increase the stitch width or Down key to decrease. NOTE: You can adjust the stitch width while the machine is running. x c Stitch length adjusting mode: Press the Up key to increase the stitch length or Down key to decrease.
r Tecla de selección de modalidad Oprima este botón para acceder a una de las siguientes modalidades. r Touche de sélection du mode Appuyer sur ce bouton pour utiliser un des modes suivants. z Modalidad de selección de patrón: Oprima la tecla Más o Menos hasta que aparezca en la pantalla el número de patrón de la puntada que quiere. z Mode de sélection du point Appuyer sur la touche ou sur la touche jusqu’à ce que le nombre correspondant au point que vous désirez apparaisse sur l’affichage électronique.
Dropping the Feed Dog q The feed dog can be lowered by the drop feed lever for sewing on buttons, manual embroidery etc. Push the drop feed lever to the right to lower the feed dog. Push the lever to the left to raise the feed dog; it will return to the up position when starting the machine. NOTE: The feed dog should be in up position for normal sewing. Turn the handwheel toward you to check if the feed dog comes up after setting the lever in the up position.
Descenso de las garras transportadoras Abaisser la griffe d’entraînement Las garras transportadoras pueden bajarse con la palanca de descenso de garras transportadoras para confeccionar botones, realizar bordado manual, etcétera. Mueva la palanca a la derecha para bajar las garras transportadoras. Mueva la palanca a la izquierda para levantar las garras transportadoras. Las garras se levantarán al iniciar la máquina.
Changing the Presser Foot WARNING: Turn OFF the power switch before changing the foot. Always use the proper foot for the selected pattern. Wrong foot can cause needle to break. q • To release: Raise the needle and presser foot. Press the red button on the back of the foot holder and the foot will drop off. q Red button • To snap on: Place the presser foot so the pin on the foot lies just under the groove of the foot holder. Lower the foot holder to lock the foot in place.
Cambio del prensatelas Changer de pied presseur ATENCIÓN: Apague la máquina antes de cambiar el prensatelas. Siempre utilice el prensatelas apropiado para el patrón seleccionado. El prensatelas incorrecto puede causar que se rompa la aguja. ATTENTION: Éteindre bouton de mise en marche avant de changer le pied presseur. Toujours utiliser le pied recommandé pour le point choisi. Si on utilise un autre pied, l’aiguille risque de se casser. • Desmontaje: Levante la aguja y el prensatelas.
* Check your needles frequently for barbed or blunted points. Snags and runs in knits, fine silks and silk-like fabrics are permanent and are almost always caused by a damaged needle.
* Vérifiez souvent vos aiguilles pour trouver des pointes acérées ou épointées. Les accrocs dans les tricots, la soie et les tissus semblables sont permanents et sont souvent causés par une aiguille endommagée. * Comprobar,con una cierta asiduidad, que la aguja no se encuentra ni desbarvada ni despuntada, ya que los géneros de punto y de seda pueden ser dañados por ella.
Winding the Bobbin q Removing the bobbin Slide the hook cover release button to the right, and remove the hook cover. Lift the bobbin out. q Hook cover release button w Hook cover e Bobbin e w Setting the spool of thread Place the spool of thread on the spool pin with the thread coming off the spool as shown. • For an ordinary spool: Use the large spool holder. q Large spool holder • For a narrow or small spool: Use the small spool holder.
Enrollado de la bobina Remplir la canette Extracción de la bobina Deslice el botón de liberación de la tapa del gancho suavemente hacia la derecha y quite la tapa. Extraiga la bobina. q Botón de liberación de la tapa del gancho w Tapa del gancho e Bobina Retirer la canette Faire glisser le bouton d’ouverture du couvercle vers la droite et retirer le couvercle. Sortir la canette.
Inserting the bobbin z Place the bobbin in the bobbin holder with the thread running counter-clockwise. q End of the thread w Bobbin holder z q w x x Guide the thread into slot A on the front side of the bobbin holder. Draw the thread to the left sliding it between the tension spring blades. e Slot A e c c Continue to draw the thread lightly through the tension blades until it slips into slot B. r Tension blades t Slot B t r v v Draw the thread to the back.
Mettre en place la canette Inserción de la bobina z Coloque la bobina en el soporte de la bobina, con el hilo saliendo en sentido antihorario. q Extremo del hilo w Soporte de la bobina z Placer la canette dans le porte-canettes. Le fil devra se dérouler dans le sens inverse des aiguilles d’une montre. q Bout du fil w Porte-canettes x Guíe el hilo a la muesca A de la parte delantera del soporte de la bobina. Extraiga el hilo hacia la izquierda, pasándolo entre las hojas del tensor.
Threading the Machine w Threading the machine q Spool w Spool holder e Presser foot lifter z c e x b v z Raise the presser foot. Press the Up/Down needle position button to bring the take-up lever to its highest position. Turn the power switch OFF. Draw the end of the thread with your left hand and hook around the upper thread guide while holding the thread at the spool with your right hand. Pass the thread down into the slot.
Enhebrado de la máquina Enfilage de la machine Enhebrado de la máquina q Carrete w Soporte del carrete e Elevador del prensatelas Enfilage de la machine q Bobine w Support de bobine e Releveur de pied presseur z Levante el prensatelas. Oprima del botón de ascenso y descenso de la aguja dos veces para levantar la palanca tirahilo a la posición más alta. Apague la máquina con el interruptor de corriente.
Automatic Needle Threader z z Raise the needle to its highest position. Pull down the needle threader knob as far as it will go. q Needle threader knob w Hook x Turn the knob in the direction of the arrow as shown. Insert hook into the needle eye. Lead the thread around guide and under the hook. e Threader guide c Turn the knob in the direction of the arrow in the illustration, drawing the thread loop through the needle. v Pull the thread through the needle eye.
Enhebrador automático de la aguja Enfilage automatique z Levante la aguja a su posición más alta. Baje la perilla del enhebrador de aguja tanto como pueda. q Perilla del enhebrador de agujas w Gancho x Gire la perilla en dirección de la flecha que se muestra en la ilustración, después inserte el gancho dentro del ojo de la aguja. Enrolle el hilo alrededor de la guía y debajo del gancho.
Balancing Thread Tension Correct tension q Needle thread (Top thread) w Bobbin thread (Bottom thread) e To loosen r To tighten The ideal straight stitch has threads locked between two layers of fabric, as illustrated. If you look at the top and bottom of a seam, notice that there are no gaps. Each stitch is smooth and even. When adjusting the needle thread tension, the higher the number, the tighter the needle thread tension.
Equilibrio de la tensión del hilo Équilibrer la tension du fil de l’aiguille Tensión correcta: q Perilla de tensión del hilo w Marca de ajuste e Hilo de la aguja r Hilo de la bobina t Derecho de la tela y Revés de la tela La puntada recta ideal tiene los hilos bloqueados entre dos capas de tela. En una puntada en zigzag ideal, el hilo de la bobina no aparece en el derecho de la tela, y el hilo de la aguja apenas se nota en el revés de la tela.
SECTION 3. BASIC SEWING q w e Straight Stitch Sewing Machine setting q Pattern: w LED display e Foot: A: Zigzag foot Starting to sew Raise the presser foot and place the fabric on the machine. Lower the needle into the fabric where you want to start. Lower the presser foot and start sewing. NOTE: To fasten the beginning of the seams, sew several reverse stitches by pressing the reverse stitch button, or use pattern #03 (Lock-a-Matic stitch ).
SECCIÉON 3. PARTIE 3. COUTURE DE BASE COSTURA BASICA Puntada recta Configuración de la máquina q Patrón w Pantalla e Prensatelas A: Prensatelas de zigzag Le point droit Réglage de la machine q Point w Affichage électronique e Pied Para comenzar a coser Levante el prensatelas y coloque la tela en la máquina. Baje la aguja hasta la tela en el punto donde desea comenzar a coser. Baje el prensatelas y comience a coser. Commencer à coudre Soulever le pied presseur et placer le tissu sur la machine.
Adjusting the Stitch Length Press the mode selection key to enter stitch length adjusting mode. The LED display shows “2.2” (default setting). Press the Down (–) key to decrease stitch length. Press the Up (+) key to increase stitch length. The stitch length can be varied from 0.0 to 5.0. NOTE: The machine will not sew reverse stitches longer than approximately 2.5 mm. 1.0 2.2 5.
Ajuste de la longitud de puntada Régler la longueur du point Oprima la tecla de selección de modalidad para cambiar a la modalidad de ajuste de longitud de puntada. En la pantalla aparece “2.2” (valor predeterminado). Oprima la tecla Menos (–) para reducir la longitud de puntada. Oprima la tecla Más (+) para aumentar la longitud de puntada. Puede ajustar la longitud de puntada de 0.0 a 5.0. Appuyer sur la touche de sélection du mode et choisir le mode de réglage de la longueur du point. Les chiffres “2.
Using the Seam Guides The seam guides on the needle plate are engraved to help you measure seam allowance. The numbers on the needle plate indicate the distance between the center needle position and the edge of the fabric. The lines are 1/8˝ (0.3 cm) apart, and engraved at 3/8˝, 4/8˝, 5/8˝ and 6/8˝. The lines in millimeters are 5 mm apart, and are engraved at 10 mm, 15 mm and 20 mm.
Cómo usar las líneas guía de costura Utiliser les guides de couture La línea de guía de costura en el plato de la aguja y en la placa cubre gancho, le ayudará a medir el ancho de la costura. El numero en la placa de la aguja indican la distancia desde el centro de la línea marcada de costura.Las líneas son 1/8˝ (0.3 centímetro) aparte, y grabado en 3/8˝, 4/8˝, 5/8˝ y 6/8˝. Las líneas en milímetros son 5 milímetros de separado, y se graban en 10 milímetros, 15 milímetros y 20 milímetros.
Variety of Straight Stitching q q Pattern: Straight stitch w Foot A: Zigzag foot For seaming garments, zipper application and more. Pattern #02 is used for seaming along the edge. w q Pattern: Lock-A-Matic stitch w Foot A: Zigzag foot Seaming with auto reverse stitches at the beginning. Press the reverse stitch button once at the end; the machine will sew the reverse stitches and stop automatically.
Diversas puntadas rectas Différents points droits q Patrón Puntada recta w Prensatelas A: Prensatelas de zigzag Para costuras de prendas, aplicaciones de cremalleras y mucho más. Se utiliza el patrón 02 para confeccionar costuras a lo largo de un borde. q Point Point droit w Pied A: Pied zigzag Pour coudre les vêtements, les fermetures éclair et autres Le réglage N.02 est utilisé pour coudre sur les bords.
Basic Zigzag Stitch q Machine setting q Pattern w LED display e Foot A: Zigzag foot w e Zigzag stitch is one of the most useful and versatile stitches. It is used for overcasting, mending, appliqué also used as a decorative stitch. NOTE: Use an interface when sewing on stretch fabric such as knit, jersey or tricot. Adjusting the Stitch Width z z Press the mode selection key to enter stitch width adjusting mode. The LED display shows the default setting of the selected pattern.
Puntada básica en zigzag Le point zigzag de base Configuración de la máquina q Patrón w Pantalla e Prensatelas A: Prensatelas de zigzag Réglage de la machine q Point w Affichage électronique e Pied La puntada de zigzag es una de las más útiles y versátiles. Se utiliza para sobrehilado, remiendos, aplicaciones y también como puntada decorativa. Le point zigzag est l’un des points les plus utiles et les plus versatiles.
SECTION 4. UTILITY STITCHES q w e Overcasting (Zigzag stitch) Machine setting q Pattern w LED display e Foot A:Zigzag foot or C:Overedge foot CAUTION: Do not set the stitch width less than 5 when using the overedge foot to prevent the needle from hitting the wires on the foot. Place the raw edge of the fabric next to the guide of the foot and start sewing.
SECCION 4. PUNTADAS UTILES PARTIE 4. LES POINTS UTILITAIRES Sobrehilado (Puntada en zigzag) Surjeter (Point zigzag) Configuración de la máquina q Patrón w Pantalla e Prensatelas A: Prensatelas de zigzag o C: Prensatelas de sobrehilado Réglage de la machine q Point w Affichage électronique e Pied A: Pied zigzag ou C: Pied de surjet ATTENTION: Ne pas régler la largeur du point à moins de 5 lorsqu’on utilise le pied de surjet ou l’aiguille risquerait de frapper les fils du pied.
Knit Stitch Machine setting q Pattern w LED display e Foot q w e A: Zigzag foot This stitch is recommended for finishing the edge of knit fabrics. Sew along the fabric edge leaving an extra seam allowance. After you finished sewing, trim seam allowance close to the stitches. Serging Stitch q Machine setting q Pattern w LED display e Foot C: Overedge foot CAUTION: Do not set the stitch width less than 5 when using the overedge foot to prevent the needle from hitting the wires on the foot.
Punta de tejido Le point tricot Configuración de la máquina q Patrón w Pantalla e Prensatelas A: Prensatelas de zigzag Réglage de la machine q Point w Affichage électronique e Pied Se recomienda esta puntada para terminar el borde de telas tejidas. Cosa a lo largo del borde de la tela, dejando un margen adicional. Al terminar de coser, recorte el margen más cerca de las puntadas. L’utilisation de ce point est conseillée pour finir le bord des tissus en tricot.
Automatic Buttonholes There are three different types of buttonholes available.
Ojal automático Boutonnière automatique Hay tres tipos de ojales disponibles. Il existe trois types différents de boutonnières. Ojal cuadrado (06): Se utiliza para telas medianas y gruesas. Les boutonnières carrées (N.06): Utilisées en général pour les tissus moyens ou lourds. Ojal redondo (07): Para telas finas y medianas, como en blusas y prendas infantiles. Les boutonnières à bout rond (N.
z Raise the needle and foot. Place the automatic buttonhole foot with its pin just under the groove of the foot holder. Lower the presser bar to attach the foot. q Groove w Pin z x Pull the button holder open to the back (A), and place the button in it. Push the button holder closed (B) to hold the button. e Button holder x q w A NOTE: If the button is extremely thick, make a test buttonhole.
z Levante la aguja y el prensatelas. Coloque el prensatelas para ojales automáticos con el poste justo debajo de la muesca del soporte del prensatelas. Baje la barra del prensatelas para montar el prensatelas. q Muesca w Poste z Relever l’aiguille et le pied. Placer le pied pour boutonnières automatique de façon à ce que la tige se trouve juste en-dessous de la rainure du support du pied. Rabaisser la barre du pied presseur pour maintenir le pied en place.
b Depress the foot control to sew a buttonhole. The machine will sew a buttonhole in the following order: a Step 1 and 2: Front bartack and left row !2 Starting point s Step 3: Right row d Step 4: Back bartack and locking stitches at the end !3 End point f LED shows each sewing step and a dot will blink when the buttonhole is finished. !4 Dot b a ↓ !2 s ↓ d !3 ↓ f !4 If you try to select another pattern without raising the foot, the LED display shows “UP” to alert you to raise the foot.
b Oprima el pedal de control para coser el ojal. La máquina coserá el ojal en el siguiente orden: a Pasos 1 y 2: Remate delantero y fila izquierda. !2 Punto inicial s Paso 3: Fila derecha. d Paso 4: Remate trasero y puntadas de sujeción en el extremo. !3 Punto final f En la pantalla se indica cada paso de costura y parpadea un ponto al terminar el ojal. !4 Punto b Appuyer sur la commande à pédale et coudre une boutonnière.
Adjusting the buttonhole width and density a Adjusting the buttonhole width Press the mode selection key to enter the stitch width adjusting mode. Press the Down(–) key to decrease buttonhole width. Press the Up (+) key to increase buttonhole width. The buttonhole width can be varied from 2.5 to 7.0. q Narrow buttonhole (2.5 mm wide) w Wide buttonhole (7.0 mm wide) a q s s Adjusting the buttonhole stitch density Press the mode selection key to enter the stitch length adjusting mode.
Ajuste de la anchura y la densidad de ojales a Ajuste de la anchura del ojal Oprima la tecla de selección de modalidad para cambiar a la modalidad de ajuste de anchura de puntada. Oprima la tecla Menos (–) para reducir la anchura del ojal. Oprima la tecla Más (+) para aumentar la anchura del ojal. Puede ajustar la anchura del ojal de 2.5 a 7.0. Ojal angosto (2.5 mm de anchura) Ojal ancho (7.
Round end/Keyhole buttonhole Machine setting q Pattern or w LED display e Foot R: Automatic buttonhole foot q w e The sewing sequence is the same as square buttonhole . Refer to pages 44-48 for sewing instruction. q Starting point w End point w q w q Adjusting the buttonhole width Press the mode selection key to enter the stitch width adjusting mode. Press the Down (–) key to decrease buttonhole width. Press the Up (+) key to increase buttonhole width.
Ojal redondo y de bocallave Boutonnière à bout rond / à oeillet Configuración de la máquina Réglage de la machine q Patrón w Pantalla e Prensatelas q Point w Affichage électronique e Pied o R:Prensatelas para ojales automáticos ou R:Pied pour boutonnières automatique La secuencia de costura es la misma que se sigue para el ojal cuadrado . Consulte las páginas 45-49 para conocer las instrucciones de costura.
Corded buttonhole Machine setting q Pattern w LED display e Foot R: Automatic buttonhole foot q z With the buttonhole foot raised, hook the filler cord on the cord spur on the back of the buttonhole foot. Bring the ends toward you under the foot, and hook the filler cord ends into the forks on the front of the foot to hold them tight. q Spur w Forks e Cord x Lower the needle into the garment where the buttonhole will start and lower the foot. Depress the foot control and sew the buttonhole over the cord.
Ojale acordonado Boutonnière gansée Configuración de la máquina q Patrón w Pantalla e Prensatelas R:Prensatelas para ojales automáticos Réglage de la machine q Point w Affichage électronique e Pied z Levante el prensatelas para ojales, enganche el cordón de relleno en el gancho para cordón localizado en la parte trasera del prensatelas para ojales.
Sewing on Buttons q Machine setting q Pattern w LED display e Foot F: Satin stitch foot r Feed dog Dropped Adjust the Stitch width as necessary. w r z Press the mode selection key to enter stitch width adjusting mode. Adjust the stitch width to match the needle swing with the span of the holes on the button, by pressing the Up (+) or Down (–) key. x Lower the presser foot to hold the button in place. c Turn the handwheel toward you to check if the needle enters both left and right holes on the button.
Confección de botones Coudre les boutons Configuración de la máquina q Patrón w Pantalla e Prensatelas F: Prensatelas para puntadas de raso r Garras transportadoras Abajo Ajústela según se requiera. Réglage de la machine q Point w Affichage électronique e Pied z Oprima la tecla de selección de modalidad para cambiar a la modalidad de ajuste de anchura de puntada.
Darning q Machine setting q Pattern w LED display e Foot R: Automatic buttonhole foot z Pull the button holder fully to the back. x Draw the needle thread to the left through the hole on the foot. c Lower the needle into the fabric at starting point. Lower the foot and depress the foot control. The machine will darn and stop automatically. The LED display will show a blinking dot when the darning is finished. w e z x c e q NOTE: The maximum length and width of the darning are 2 cm and 0.
Zurcido Repriser Configuración de la máquina q Patrón w Pantalla e Prensatelas R: Prensatelas para ojales automáticos Réglage de la machine q Point w Affichage électronique e Pied z Mueva el portabotones totalmente hacia atrás. x Lleve el hilo de la aguja por la izquierda, a través del agujero del prensatelas. c Baje la aguja hasta la tela en el punto donde comenzará a coser. Baje el prensatelas y oprima el pedal de control. La máquina zurcirá y se detendrá automáticamente.
Zipper Sewing Machine setting q Pattern w LED display e Foot q w e e r E: Zipper foot • Attaching the zipper foot To sew on the left side of the zipper, attach the foot holder to the right pin on the zipper foot. To sew on the right side of the zipper, attach the foot holder to the left pin on the zipper foot. q Groove w Pin e To sew left side r To sew right side q w • Fabric preparation Add 3/8” (1cm) to the zipper size. This is the overall opening size.
Aplicación de cremalleras Couture des fermetures éclair Configuración de la máquina q Patrón w Pantalla e Prensatelas E:Prensatelas para cremalleras Réglage de la machine q Point w Affichage électronique e Pied • Colocando el pie para cremalleras Para coser el lado izquierdo de la cremallera, enganche el parte derecho del pasador del prensatelas al enmangue. Para coser el lado derecho de la cremallera, enganche el parte izquierdo del pasador del prensatelas al enmangue.
Zipper Sewing (continued) x x Sew through all layers the entire length of the zipper tape, removing the pins as you go. Stop the machine about 2” (5cm) before the zipper foot reaches the pull tab. Lower the needle slightly into the fabric. Raise the zipper foot and unzip a few inches to clear a path for the stitches. Lower the foot and stitch the remainder of the seam. q Pull tab w 2” (5cm) q w c c Remove the fabric and close the zipper. Take the upper fabric layer and lay it flat on the zipper.
Costura de cremalleras (continuación) x Cosa todas las capas de tela junto al doblez. Pare la Couture des fermetures à glissière (suite) x Piquez à travers toutes les épaisseurs de tissu au ras du máquina 5 cm antes de que el prensatelas llegue al tirador de la cremallera. Baje la aguja para sujetar la tela. Eleve el prensatelas y abraunos centimetros de la cremallera para dejar sitio. Baje el prensatelas y cosa hasta el final. q Tilador w 5 cm (2”) pli.
Blind Hem Stitch q Machine setting q Pattern or w LED display e Foot G: Blind hem foot z Fold hem with the wrong side up forming a 0.4–0.7 cm (3/16-5/16") allowance. q Wrong side of the fabric w 0.4–0.7 cm (3/16-5/16") a On heavy weight fabrics that ravel, the raw edge should be overcast first. s Fold the hem under the fabric as illustrated for fine or medium fabrics.
Puntada de dobladillo invisible L’ourlet invisible Configuración de la máquina Réglage de la machine q Patrón w Pantalla e Prensatelas q Point w Affichage électronique e Pied o G: Prensatelas de dobladillo invisible ou G:Pied pour ourlet invisible z Haga un dobladillo con el reverso de la tela hacia arriba, dejando un margen de 0.4 a 0.7 cm (3/16" a 5/16"). q Revés de la tela w 0.4 a 0.7 cm (3/16" a 5/16") a En telas gruesas que se deshilachan, primero debe sobrehilar el borde no terminado.
SECTION 5. DECORATIVE STITCHES Shell Tucking Machine setting q Pattern w LED display e Foot r Thread tension q w e r F: Satin stitch foot 6–8 Fold the fabric on the bias. Sew along the folded edge so that the needle on the right swing just clear the fold to form tucks. Open the fold and press the tucks to one side. t Bias fold t NOTE: You may need to adjust the needle thread tension to achieve the best result.
PARTE 5. COUTURE ET POINTS DECORATIFS SECCIÓN 5. PUNTADAS DECORATIVAS Alforza tipo concha marina Le point coquille Configuración de la máquina q Patrón w Pantalla e Prensatelas F: Prensatelas para puntadas de raso r Tensión del hilo 6 a 8 Réglage de la machine q Point w Affichage électronique e Pied r Tension du fil Doble la tela en sesgo. Cosa a lo largo del borde doblado de manera que el movimiento a la derecha de la aguja apenas rebase el doblez, formando alforzas.
Appliqué Machine setting q Pattern w LED display e Foot q w e F: Satin stitch foot Baste or glue applique pieces on the fabric. Stitch around the applique making sure the needle falls along the outer edge of the applique. When turning corners, lower the needle down into the outer edge of the appliqué, and raise the presser foot to pivot the fabric.
Aplicación Le point pour appliques Configuración de la máquina q Patrón w Pantalla e Prensatelas F: Prensatelas para puntadas de raso Réglage de la machine q Point w Affichage électronique e Pied Hilvane o pegue las piezas de aplicación a la tela. Cosa alrededor de la aplicación, cerciorándose de que la aguja baje por el borde exterior de la aplicación. Al dar vuelta en las esquinas, baje la aguja a través del borde externo de la aplicación y levante el prensatelas para girar la tela.
Smocking Machine setting q Pattern w LED display e Foot q e F: Satin stitch foot Set the thread tension dial at 1–3, and stitch length at 3–4, sew straight lines 1 cm (3/8") apart across the area to be smocked. Knot the needle and bobbin threads along one edge w. Pull the bobbin threads e and distribute gathers evenly. Sew lines of the decorative pattern between the straight seams. Pull out the gathering stitches.
Fruncido ornamental Le point smocks Configuración de la máquina q Patrón w Pantalla e Prensatelas F: Prensatelas para puntadas de raso Réglage de la machine q Point w Affichage électronique e Pied Ajuste la perilla de tensión de hilo entre 1 y 3, ajuste la perilla de longitud de puntada a 3 o 4 y cosa líneas rectas con una separación de 1 cm (3/8") a todo lo ancho de la zona de fruncido. Anude los hilos de la aguja y la bobina a lo largo de un borde w.
Patchwork piecing Machine setting q Pattern w LED display e Foot q w e q w e O: 1/4” seam foot Place the patchwork pieses right sides together. Sew while guiding the edge of the fabric along the guide on the foot keeping a precise 1/4” seam allowance. q Guide w Right sides of the fabric Quilting Machine setting q Pattern w LED display e Foot r Quilting bar r A: Zigzag foot Loosen the quilting bar screw on the back of the foot holder and insert the quilting bar into the hole.
Costura de piezas en patchwork Couture de pièces de patchwork Configuración de la máquina q Patrón w Pantalla e Prensatelas O: Prensatelas para costura de 1/4” Réglage de la machine q Point w Affichage électronique e Pied Coloque enfentadas las caras derechas de las piezas a parchear. Cosa guiando el borde de la tela por la guía del prensatelas para mantener un margen de costura preciso de 1/4”. q Guía w Caras del derecho de la tela Plasez les tissus enfroit contre endroit.
Stitch in the ditch with even feed foot Machine setting q Pattern w LED display e Foot q Even feed foot The even feed foot is extremely effective when stitching in the ditch on patchwork quilts. To attach: 1. Be sure to turn the power off. Raise the needle and presser foot. 2. Remove the foot holder (see page 16). 3. Attach the even feed foot to the presser bar with the lever on the needle clamp, and secure it with the set screw. q Setscrew w Lever e Presser bar To sew: Sew at low to medium speed.
Puntada de profundidad con el pie prensatelas de arrastre regular Couture de rebord avec le pied à avancée régulière Réglage de la machine q Point w Affichage électronique e Pied Configuración de la máquina q Patrón w Pantalla e Prensatelas Prensatelas arrastre regular Pied à avancée régulière El prensatelas de arrastre regular es muy eficaz para realizar puntadas de profundida en las colchas de tipo patchwork. Le pied à régulière est extrêmement utile pour coudre des rebords sur des centos.
Pin Tucking Machine setting q Pattern w LED display e Foot q w e G: Blind hem foot Fold the fabric with wrong side together. Position the fabric so that the needle pierces 0.1–0.2 cm (1/16") inside of the folded edge, and lower the foot. Turn the guide screw and move the guide next to the folded edge. Sew guiding the folded edge along the guide. Open the fabric and press the tucks to one side.
Pliegues cosidos Les nervures Configuración de la máquina q Patrón w Pantalla e Prensatelas G: Prensatelas de dobladillo invisible Réglage de la machine q Point w Affichage électronique e Pied Doble la tela, uniendo los reversos. Coloque la tela de manera que la aguja perfore a 0.1 a 0.2 cm (1/16") dentro del borde doblado y luego baje el prensatelas. Gire el tornillo de la guía y mueva la guía hasta el borde doblado. Cosa guiando el borde doblado por la guía deslizante.
SECTION 6. CARE OF YOUR MACHINE Adjusting Stretch Stitch Balance The sewing results of the stretch stitch patterns may vary depending upon the sewing conditions, such as sewing speed, type of the fabric, number of layers, etc. Always test sew on a scrap piece of the fabric that you will be using. q Stretch stitch balancing dial w Standard setting mark e Groove Example: (Stitch pattern ) (A)If the pattern is compressed, turn the stretch stitch balancing dial in the direction of “+”.
SECCION 6. CUIDADO DE LA MÁQUINA DE COSER PARTIE 6. ENTRETIEN DE VOTRE MACHINE Ajuste de equilibrio de puntada elástica Régler l’équilibre des points extensibles Los resultados de los patrones de puntadas elásticas pueden variar según las condiciones de la operación de costura, como son la velocidad de costura, el tipo de tela, el número de capas, etcétera. Siempre haga una prueba de costura en un pedazo de la tela que utilizará.
Cleaning Hook Race and Feed Dog WARNING: Raise the presser foot and needle, and then unplug the machine. DO NOT dismantle the machine other than as explained in this section. q z Remove the needle and presser foot. q Screwdriver w Setscrew e Needle plate e z w x Remove the setscrew and needle plate. c Take out the bobbin and bobbin holder. x c v Clean the bobbin holder with the lint brush and soft dry cloth.
Limpieza del canal del gancho de la bobina y las garras transportadoras Nettoyer la coursière et la griffe d'entraînement ATTENTION: Relever le pied presseur et l’aiguille, puis débrancher la machine. NE PAS démonter la machine si ce n’est en suivant les consignes décrites dans cette section. ATENCIÓN: Levante el prensatelas y la aguja y desconecte la máquina. NO desarme la máquina, excepto en la forma descrita en esta sección. z Quite la aguja y el prensatelas.
Problems and Warning Signals When beep sounds and the LED display shows warning signal, follow the guidance below. Visual signal LED Cause and Action The foot control has been disconnected while sewing. Turn OFF the power and connect the foot control. A button is pressed when the machine halts due to the overload. Wait for at least 15 seconds to recover. If thread jamming causes overload, remove the tangled threads.
Problemas y Señales de Advertencia Cuando la máquina emita un sonido y en la pantalla aparezca una señal de advertencia, siga estos paso para resolver el problema. Señal visual Causa y acción Pantalla El pedal de control se desconectó durante la costura. Apague la máquina y conecte el pedal de control. Oprimió un botón cuando la máquina está detenida debido a una sobrecarga. Espera al menos 15 segundos para que la máquina se restablezca.
Problemes et Avertissements Lorsque vous entendez un bip sonore et que des avertissements apparaissent sur l’affichage électronique, suivez les indications ci-dessous: Avertissements visuels: Cause et action Ecran La commande à pédale a été débranchée pendant la couture. Éteindre la machine re-brancher la commande à pédale. Une touche est maintenue enclenchée alors que la machine s’arrête de coudre, pour cause de surcharge. Attendre au moins 15 secondes avant de réparer.
Troubleshooting Condition Cause Reference 1. The needle thread is not threaded properly. 2. The needle thread tension is too tight. 3. The needle is bent or blunt. 4. The needle is incorrectly inserted. 5. The needle thread and the bobbin thread are not set under the presser foot when start sewing. 6. The threads were not drawn to the rear after sewing. 7. The thread is either too heavy or too fine for the needle. See page 24 See page 28 See page 16 See page 16 1.
Identificación y resolución de problemas Problema Causa El hilo de la aguja se rompe. 1. El hilo de la aguja no está enhebrado correctamente. 2. La tensión del hilo de la aguja es muy alta. 3. La aguja está doblada o desafilada. 4. La aguja está insertada incorrectamente. 5. Los hilos de la aguja y la carnilla no están bien colocados debajo del prensatelas al empezar a coser. 6. La tela no es llevada hacia atrás al terminar de coser. 7. El hilo es demasiado grueso o demasiado fino para la aguja.
En cas de problème Problème Le fil de l’aiguille se casse. Causa 1. Le fil de l’aiguille n’est pas penfilé correctement. 2. La tension du fil d’aiguille est trop forte. 3. L’aiguille est torde ou émoussée. 4. L’aiguille est maí installée. 5. Le fil el’aiguille et celui de la canette ne sont pas passés correctement sous le pied presseur au debut de la couture. 6. Le tisssu n’est pas tire vers l’arrière à la fin de la couture. 7. Le fil est trop épais ou trop fin pour l’aiguille.
843-801-361 (E/S/F) Printed in Taiwan