
Operation Manual
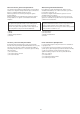


16
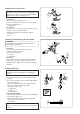
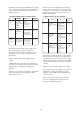
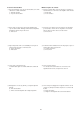
Changing Needles
WARNING:
Turn OFF the power switch before changing the
needle.
z Loosen the needle clamp screw and pull out the
needle.
x Insert a new needle into the needle clamp with the
flat side facing back.
Push the needle up against the stopper pin and
tighten the needle clamp screw firmly.
q Needle clamp screw
w Stopper pin
e Flat side
r Power switch
c To check the needle:
Place the flat side of the needle onto something flat
(needle plate, glass etc).
The clearance between the needle and the flat
surface should be consistent.
t Clearance
WARNING:
Never use a bent or blunt needle, which can cause it
to break.
q
w
e
r
z
x
t
c
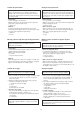
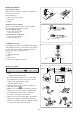
Detaching and Attaching the Foot Holder
WARNING:
Turn OFF the power switch before detaching or
attaching the foot holder.
• To detach:
Raise the presser bar and turn the setscrew
counterclockwise to remove it.
Remove the foot holder.
q Setscrew
w Foot holder
• To attach:
Align the hole in the foot holder with the threaded
hole on the presser bar and insert the setscrew
through the hole. Tighten the setscrew by turning it
clockwise.
q
w
e
q
w
q
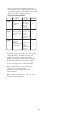
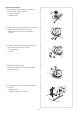
Changing the Presser Foot
WARNING:
Turn OFF the power switch before changing the foot.
Always use the proper foot for the selected pattern.
Wrong foot can cause needle to break.
• To release:
Raise the needle and presser foot.
Press the red button on the back of the foot holder
and the foot will drop off.
q Red button
• To snap on:
Place the presser foot so the pin on the foot lies just
under the groove of the foot holder.
Lower the foot holder to lock the foot in place.
w Groove
e Pin