Table of Contents Sewing Application ........................................... 102 Correcting Distorted Stitch Patterns .............. 117 GETTING READY TO SEW.......................... 2 Name of Parts ...................................................... 2 Standard Accessories and Storage ...................... 4 Detachable Extension Table ................................. 6 Connecting the Power Supply .............................. 7 Machine Operating Buttons ..................................
GETTING READY TO SEW Name of Parts 1 2 3 4 5 6 24 7 8 23 22 9 21 10 11 20 12 19 27 29 26 28 25 1 2 3 4 5 6 7 8 9 10 11 12 13 14 15 18 17 16 15 14 13 30 16 17 18 19 20 21 22 23 24 25 26 27 28 29 30 Top Cover Spool Pin Spool Holder (Large) Foot Storage Compartment Bobbin Thread Cutter Bobbin Winder Spindle Bobbin Winder Stopper Visual Touch Screen Speed Control Lever Auto Needle Threader Button Up/Down Needle Button Knee Lifter Socket Auto-Lock Button Reverse Button Start/Stop Button
1 2 14 3 13 4 18 5 6 12 17 7 8 15 16 1 2 3 4 5 6 7 8 9 10 11 12 13 14 15 11 10 Carrying Handle Thread Take-Up Lever Presser Foot Lifter Buttonhole Lever Needle Clamp Screw Free Arm Drop Feed Lever Presser Foot and Holder Carriage (For Embroidery) Power Switch Machine Socket Card Eject Button PC Card Slot Handwheel Connector Cover 9 16 RS-232C Connector 17 USB Connector 18 PC Design Card (Optional item) 3
2 1 Standard Accessories and Storage 3 1 Embroidery Hoop (A) (With Template) 2 Embroidery Hoop (B) (With Template) 4 3 Foot Control 4 Knee Lifter 5 Template Sheets (for Built-in Designs) 6 Power Supply Cord 5 6 7 Hard Cover (Carrying Case) 7 8 Automatic Buttonhole Foot R 14 8 9 9 Satin Stitch Foot F 10 Embroidery Foot P 10 11 Zigzag Foot A (comes attached to the machine) 12 Blind Hem Foot G 13 Overedge Foot C 14 Foot Holder (comes attached to the machine) 13 11 12 4
1 2 1 1/4˝ Seam Foot O 2 Cording Foot H 3 4 5 3 Rolled Hem Foot D 4 Zipper Foot E 6 5 Overcasting Foot M 6 Button Sewing Foot T 8 7 7 Walking Foot 8 Screwdriver 9 9 Set of Needles 10 10 Quilting Bar for Walking Foot 11 Scissors 11 13 12 12 Spool Pin Felt 13 Lint Brush 14 14 Additional Spool Pin 16 15 15 Seam Ripper 16 Spool Holder (Small) 18 17 17 Bobbins 18 Button Shank Plate 19 Cloth Guide 20 19 20 Basting/Darning Foot P-2 21 Quilting Bar 21 22 Instruction Book 22 23 Instruct
Detachable Extension Table 1 For Free Arm sewing To remove, lift out the Extension Table toward you as illustrated. 1 Extension Table Free Arm sewing can be used for: - stitching sleeves, waistbands, pants legs or any tubular garment area. - darning socks or mending knees, elbows or children’s wear. 2 For Flat-bed sewing Position the Tabs on the Base Tab Holes and push down gently.
Connecting the Power Supply The Memory Craft 10001 is equipped with an auto voltage system, which automatically adjusts the equipment to any local power supply voltage between 100 and 240V, 50/ 60Hz. 1 3 5 2 6 4 Turn off the Power Switch, insert the Foot Control Plug and Machine Plug into the machine, then Power Supply Plug into the wall outlet in this order. Turn on the Power Switch.
Machine Operating Buttons 1 Start/Stop Button Press this button to start or stop the machine. This button can be used either in Ordinary Sewing Mode or Embroidery Mode. In Ordinary Sewing Mode, the machine starts running slowly for the first few stitches, it then runs at the speed set by the Speed Control Lever. 6 NOTE: • The Start/Stop Button cannot be used when the foot control is connected to the machine.
Controlling Sewing Speed Speed Control Lever You can limit the sewing speed by the Speed Control Lever according to your sewing needs. To increase sewing speed, slide the lever to the right. To decrease sewing speed, slide the lever to the left. Foot Control Sewing speed can be varied by pressing on the Foot Control. The harder you press the Foot Control, the faster the machine runs. NOTE: • The machine runs at the maximum speed set by the Speed Control Lever when the foot control is being fully depressed.
Winding the Bobbin 1 Removing the bobbin Slide the Hook Cover Plate Release Button to the right, and remove the Hook Cover Plate. Lift out the Bobbin from the Bobbin Holder. 2 1 Hook Cover Plate Release Button 2 Hook Cover Plate 3 Bobbin 3 Setting the spool of thread Lift up the Spool Pin. Place the spool of thread on the Spool Pin with the thread coming off the spool as shown. Attach the Large Spool Holder, and press it firmly against the spool of thread.
Threading for Bobbin Winding 2 3 1 4 Hold the upper thread with both hands and place it downward into the Slit. Guide the thread around the Thread Guide following the dashed blue line as shown in the diagram. 1 Slit 2 Thread Guide Thread through the hole in the Bobbin from the inside to the outside. Put the Bobbin on the Bobbin Winder Spindle, and push it to the right. 3 Bobbin 4 Bobbin Winder Spindle The Visual Touch Screen shows “Bobbin Winding”.
Inserting the bobbin Place the Bobbin in the Bobbin Holder with the Thread running off in the counterclockwise direction. 1 Thread 1 Guide the thread into Front Notch on the front of the Bobbin Holder. Draw the thread to the left, sliding it between the tension spring blades.
Continue to draw the thread lightly until the thread slips into Side Notch. 1 Side Notch 1 Pull out about 10 cm (4˝) of thread to the rear. 2 Refer to the Threading Chart shown on the Hook Cover Plate. Reattach the Hook Cover Plate.
Threading the Machine 2 Raise the Presser Foot Lifter. Press the Up/Down Needle Button to raise the needle to its highest position. 4 Hold the upper thread with both hands as shown and place it downward into the Slit. 3 5 6 1 Draw the thread around the Thread Guide following the solid yellow line as shown in the diagram. 1 Slit 2 Thread Guide Then draw the thread down around the Check Spring Holder. Firmly draw the thread up to the Take-up Lever and down into its eye from the right to the left.
1 Using the Automatic Needle Threader 1 Hold the end of the needle thread gently. NOTE: • Make sure to raise the needle by pressing the Up/Down Needle Button. 2 2 Press the Auto Needle Threader Button. The threader lowers automatically and the hook comes out through the needle eye from behind it. 3 3 Pull the thread down around the Thread Guide, then pass the thread from the right and under the Hook as shown.
5 5 Press the Auto Threader Button again. The threader goes up automatically and pulls the thread out through the needle eye. Pull the loop of thread to the back. NOTES: • The Automatic Needle Threader works well on the needles Nos.11-14, sewing threads Nos.60-120 and Janome embroidery threads. • Thick threads, Nos. 20 and 30, cannot be used. CAUTION: • To use the Automatic Needle Threader properly, always make sure to pay attention the following instructions.
Drawing Up the Bobbin Thread Raise the Presser Foot. Hold the needle thread with your fingers and press the Up/Down Needle Button twice to pick up the bobbin thread. Draw up the needle thread to bring up a loop of the bobbin thread. Slide 10 cm (4˝) of both threads to the back under the Presser Foot.
Changing Needles 1 Raise the needle by pressing the Up/Down Needle Button and lower the Presser Foot. Turn off the Power Switch. 3 Loosen the Needle Clamp Screw by turning it counterclockwise. Remove the Needle from the Needle Clamp. 1 Needle Clamp Screw 2 Needle 3 Needle Clamp 2 Insert a new needle into the Needle Clamp with the Flat Side of the Needle to the rear. 3 When inserting the Needle into the Needle Clamp, push it up as far as it will go and tighten the Needle Clamp Screw firmly.
Selecting a needle For general sewing, use needle size 11 or 14. A fine thread and needle should be used for sewing lightweight fabrics, so the fabric will not be marred. Heavy fabrics require a needle large enough to pierce the fabric without fraying the needle thread. In the needle case you will find one size 14, three blue tipped needles and one twin needle. Use a blue tipped needle to eliminate skipped stitches when sewing knits and synthetic fabrics.
Raising the Presser Foot The Presser Foot Lifter raises and lowers the Presser Foot. You can raise the Presser Foot higher than the normal up position exerting more pressure when lifting the Presser Foot Lifter. This allows for easy removal of the Presser Foot and helps you to place thick fabrics under it. 1 1 Presser Foot Lifter Knee Lifter 3 2 The Knee Lifter is extremely helpful when making patchworks, quilting etc, since it allows you to handle the fabric while your knee controls the presser foot.
Removing and Attaching the Presser Foot Press the Up/Down Needle Button to raise the needle to its highest position and raise the Presser Foot Lifter. 1 2 Press the Red Button on the back of the foot holder. The Presser Foot will drop off. Attaching the presser foot Place the selected Presser Foot so that the pin on the foot lies just under the Groove of the Foot Holder. Lower the Presser Foot Lifter to lock the foot into place.
Various Presser Feet and Their Uses 1 1 Zigzag Foot A: This is the most versatile foot. It can be used for various stitches including straight stitches and zigzag stitches. It is designed to achieve firm and neat seam results. 2 2 Overedge Foot C: This foot is exclusively for overedging. The brush on the foot effectively prevents skipped stitches on the raw edge of fabrics. 3 3 Rolled Hem Foot D: This special foot is for sewing a rolled hem.
8 8 Overcasting Foot M: This foot is specially designed to simulate professional style overlocking. The wires on the foot effectively prevent the fabric edge from puckering or rolling. 9 9 Button Sewing Foot T: This foot is exclusively used for attaching a button. It holds a button securely in place and allows fine adjustment of button position. 10 1/4˝ Seam Foot O: 10 This foot is useful for patchwork quilt. The guide on the foot maintains an exact 1/4˝ (0.7 cm) seam allowance.
Pressure Dial 1 The Pressure Dial should be set at “3” for regular sewing. Reduce the pressure to “2” for applique, cut work, drawn work, basting and embroidery. Set the pressure to “1” when sewing chiffon, lace, organdy and other fine fabrics. Velour and knits with a lot of stretch may also require a “1” setting. 2 Turn the Pressure Dial and set the desired number at the Setting Mark.
MACHINE SETTINGS Strai g ht Stitch When you turn on the power switch, the Visual Touch Screen shows the opening “Welcome” window, then Ordinary Sewing Mode will appear after a few seconds, and the machine is set at straight stitch sewing. Auto A 1 2 3 4 5 SET Key - 4 Mode selections 6 7 8 9 10 11 12 13 14 15 When you press the SET key, the following four mode keys will be displayed and you can adjust settings within each mode.
Common Setting Mode In this mode you can set the following machine functions, which are applicable to both Ordinary Sewing and Embroidery. 1 2 1 Screen Contrast The Visual Touch Screen contrast can be adjusted. Press the key, to sharpen the screen color contrast. Press the key, to fade the screen color contrast. 3 4 2 Sound Control The buzzer volume can be adjusted. The volume level can be set from 0 to 10 and the default setting is 5. Press the key, to increase the buzzer volume.
inch mm inch/mm 8 9 Resume Mode On Off 10 Key Position Adjustment Format Built-in Yes 11 12 13 ATA PC Card Yes Reset All to Defalts Yes Register Common Set Ordinary Sewing Yes Embroidery (A) Key Position Adjustment PRESS MARK(+). 8 Inch / Millimeter You can set your machine’s measuring unit to either “inch” or “millimeter” depending upon your preference. The default measuring unit setting is “millimeter”. Press inch or mm key to select the unit you preferred.
1 Ordinary Sewing Mode Setting Auto Tension In this mode you can set the following sewing functions: Auto 2 Remaining Bobbin Thread 2 3 Feed Dog 4 Free Arm Length 5 Register Common Set Ordinary Sewing 7 E Embroidery 6 1 Auto Tension The Auto Thread Tension level can be adjusted. Tension level can be set from – 5 to + 5. Changes are made in increments of 1 and the default setting is 0 (Auto). Press the key, to set the tension level higher. Press the key, to set the tension level lower.
Professional Mode Setting Professional Mode On Off Fine Adjust: Length On Off Fine Adjust: Width On Off Color Control On Off Register 3 Color Control You can change screen background color as well as key color with these color-setting keys. E On Off 1 Fine Adjust: Length On Off 2 Fine Adjust: Width On Off Color Control Pattern Key Color: • Press the key to select the pattern selection key color. Press the keys to select the color tone.
Language Selection Language Selection 7 1 2 8 3 9 4 10 5 6 Register Common Set Ordinary Sewing E 8 You can select one of the following 10 languages by pressing the desired language key. 1 2 3 4 5 6 7 8 9 10 English French Spanish Italian Dutch German Portuguese Swedish Russian Finnish 7 Register Key Press this key to register the settings and return to the previous screen.
Mode Selection Keys Strai g ht Stitch Auto 1 Ordinary Sewing Mode Key Press this key to enter the Ordinary Sewing Mode. The following six categories are available in this mode: • Utility Stitches • Buttonhole Stitches • Satin Stitches • Decorative Stitches • Monogramming • Sewing Application A 1 2 3 4 5 6 7 8 9 10 11 12 13 14 15 2 Embroidery Mode Key Press this key to enter the Embroidery Mode.
ORDINARY SEWING Strai g ht Stitch When you press Ordinary Sewing Mode key, the Utility Stitch Window opens. Auto A 1 2 3 4 5 6 7 8 9 10 11 12 13 14 15 In the Ordinary Sewing Mode, there are 6 categories of sewing to choose from. 1 Utility stitches: You can select 16 types of utility stitches. 2 Buttonhole stitches: You can select 11 types of buttonholes, button sewing, darning, tacking and eyelet.
Utility Stitches Straight stitches Strai g ht Stitch Auto The following 7 stitches are available to choose from; A 1 2 6 7 11 12 3 8 13 1 4 5 9 10 14 4 3 2 1 2 6 7 3 5 4 5 15 6 1 2 3 4 5 6 7 16 Adjust A Z 7 Straight Stitch with center needle position Straight Stitch with left needle position Lock-a-Matic Stitch Locking Stitch Triple Stretch Stitch Stretch Stitch Basting Stitch To sew Raise the Presser Foot and position the fabric next to a seam guideline on the needle plat
Securing seam For fastening the ends of seams, press the Reverse Button and sew several reverse stitches. The machine sews reverse stitches as long as you press and hold the Reverse Button. When sewing with the Lock-a-Matic stitch and Locking Stitch, press the Reverse Button once, the machine will sew several reverse or locking stitches and stop automatically. Raise the Presser Foot. Remove the fabric, draw it to the back. Cut the thread by using the thread cutter.
Needle plate guidelines The seam guidelines on the Needle Plate and Hook Cover Plate help you to measure seam allowance. The number indicates the distance between the center needle position and the seam allowance line. Number Indicated 15 20 4/8 5/8 6/8 Distance in Centimeters 1.5 2.0 1.3 1.6 1.9 – – Distance in Inch 1/2˝ 5/8˝ 3/4˝ To sew from the edge of thick fabric The Black Button on the zigzag foot locks the foot in the horizontal position.
Manual adjustment of straight stitches Strai g ht Stitch Auto A 1 2 3 4 5 6 7 8 9 10 11 12 13 14 15 16 Adjust A Z Press the Adjust key. Adjust The adjusting window displays the and keys for Needle Drop Position, Stitch Length and Thread Tension adjustment. 3.5 2.20 4.2 Default 4 Cancel 5 Press the or key to change settings, then press the OK key to register the settings.
Changing needle drop position 3.5 0.0 1.0 7.0 Needle drop position is adjusted with the and keys. When you press the key, the needle moves to the right. When you press the key, the needle moves to the left. Changing stitch length 5.0 37 Press the length. key to decrease the stitch Press the length.
Lock-a-Matic Stitch Auto Use this stitch to secure the beginning and the end of a seam with backstitching. A 1 2 3 4 5 6 7 8 9 10 11 12 13 14 15 Press Pattern 3 on the Visual Touch Screen. 16 Adjust A Z 3 When you reach the end of the seam, press the Reverse Button once. The machine will sew four reverse stitches, four forward stitches, then stop sewing automatically.
Locking Stitch 4 This unique stitch is used where an invisible locking stitch is needed. Press Pattern 4 on the Visual Touch Screen. Lower the needle close to the front edge of the fabric. The machine will sew several locking stitches in place and continue sewing forward. When you press the Reverse Button at the end of the seam, the machine will sew several locking stitches in place, then stop sewing automatically.
Basting/Darning Foot P-2 1 2 3 To attach: Loosen the thumbscrew and remove the Foot Holder. Attach the Basting/Darning Foot P-2 to the presser bar putting the Pin on the Needle Clamp Screw. Tighten the thumbscrew firmly with the screwdriver. 1 Basting/Darning Foot P-2 2 Pin 3 Needle Clamp Screw Basting Stitch The Basting Stitch is used to hold fabric layers together during fitting. Use a fine needle so as not to leave permanent needle marks on fabrics. Press Pattern 7 on the Visual Touch Screen.
Changing thread tension Balanced needle thread tension: 4 1 In straight stitching, the Needle Thread and Bobbin Thread cross in the middle of the fabric. 3 1 2 3 4 2 3.5 2.20 4.2 Needle Thread Bobbin Thread Right Side of the Fabric Wrong Side of the Fabric Default Cancel OK 1 When the needle thread tension is too tight; Press the key to decrease the thread tension. Press OK key to register the setting.
Zipper sewing Strai g ht Stitch Auto A 1 2 3 4 5 6 7 8 9 10 11 12 13 14 15 16 Adjust A Z To snap on Zipper Foot E Fit the Pin on Zipper Foot E to the Groove on the Foot Holder. 1 Pin 2 Groove 2 1 3 3 To sew the right side of the zipper, attach Zipper Foot E with the Pin on the left-hand side. 4 4 To sew the left side of the zipper, attach Zipper Foot E with the Pin on the right-hand side.
Fabric preparation 1 1 Add 1 cm (3/8˝) to the Zipper Size. This is the overall Opening Size. 1 1 cm (3/8˝) 2 Zipper Size 3 Opening Size 2 3 1 2 Place the Right Sides of the Fabric to gether and sew to the End of the Opening with a 2 cm (13/16˝) Seam Allowance. 2 7 Reverse Stitch to lock the seams. 5 Manually increase the stitch length to 5.0 and baste the Zipper Opening with the thread tension loosened.
4 4 Attach Zipper Foot E with the pin on the right hand side. Lower the foot onto the top side at the bottom of the zipper so that the needle pierces the fabric next to the fold and the zipper tape. Sew along the zipper guiding the Zipper Teeth along the bottom edge of the foot. 10 10 Zipper Teeth 5 Sew through all layers next to the fold. Stop 5 cm (2˝) before Zipper Foot E reaches the Slider on the zipper tape. 5 Lower the needle slightly into the fabric. Raise the foot and open the zipper.
7 Move Zipper Foot E to the left pin. 7 Backstitch across the End of Opening to 0.7 – 1 cm (3/8˝). Stitch through the garment and zipper tape, guiding the zipper teeth along the bottom edge on the foot. 17 18 Stop about 5 cm (2˝) from the top of the zipper. 19 8 17 End of Opening 18 0.7 – 1 cm (3/8˝) 19 Basting Stitches 8 Lower the needle into the fabric, raise the foot, remove the Basting Stitches and open the zipper. Lower the foot and stitch the remainder of the seam making sure the fold is even.
Cloth Guide 1 To use the Cloth Guide, activate the Professional Mode in the Ordinary Sewing Setting Mode. (See page 47.) Attaching the Cloth Guide 3 Insert the Pins on the Cloth Guide into the Carriage Holes. 1 Pins 2 Cloth Guide 3 Carriage Holes 2 Setting the Cloth Guide position Strai g ht Stitch Auto Cloth A Press Guide key and the cloth guide position window opens. NOTE: Guide • The Cloth key will appear when the Professional Mode is ON (see page x).
Cloth Guide Position window will appear. Cloth Guide position 15 mm Press the or the key to move the Cloth Guide to the desired position. OK Cancel Default NOTES: • The distance of the Cloth Guide edge from the center needle position is shown in millimeter or inch. 6 5 4 • You may set the Cloth Guide Position from –2 mm to 40 mm (–1/8˝ to 1 1/2˝). • From -2 mm to10 mm, you may change the setting by 1 mm and from 10 mm to 40 mm, you may change the setting by 5 mm each time you press the or the key.
Zigzag sewing Zigzag Stitch Auto A 1 2 3 4 5 6 7 8 9 10 11 12 13 14 15 Simple zigzag stitch is widely used for overcasting, applique etc. 16 Adjust A Z To change zigzag stitch width & length Press the Adjust key. When you press the Adjust key, the adjusting window shows the preset values for Stitch Width, Stitch Length and Thread Tension and their and keys used for making adjustments.
2.0 Changing stitch width 7.0 Press the Width. key to decrease the Stitch Press the Width. key to increase the Stitch 1 Stitch Width 1 1.0 Changing stitch length 5.0 2 Press the Length. key to decrease the Stitch Press the Length. key to increase the Stitch 2 Stitch Length After adjusting the settings press 49 OK key.
Overcasting Overcasting Auto Select Pattern 10 and attach the Overedge Foot C. C 1 2 3 4 5 6 7 8 9 10 11 12 13 14 15 16 Adjust A Z Place the fabric edge next to the Guide of the foot and then sew. 1 Guide CAUTION: • When you use Overedge Foot C or Overcasting Foot M, you must set the zigzag width at 5.0 to or wider to prevent the needle from hitting the Foot Wires.
Overedge stitch 12 This stitch is ideal for finishing edges of fabrics that tend to fray such as linens and gabardines. Two rows of zigzag stitches are simultaneously sewn over the edge of the fabric to prevent raveling. Press Pattern 12 on the Visual Touch Screen. Use Overedge Foot C to keep the fabric edge flat. The wires on the foot effectively prevent the edge from puckering or rolling up. 1 Place the edge of the fabric next to the Black Guide on the foot and sew.
Variety of overcasting stitches Pattern 9: Multiple Zigzag Stitch (Tricot Stitch) This stitch is used to finish a raw edge of synthetics and other stretch fabrics that tend to pucker. Sew along the fabric edge leaving an enough seam allowance. After sewing, trim off the seam allowance closer to the stitches. 1 9 1 Zigzag Foot A 2 Pattern 10: Overcasting Stitch This stitch can be used to simultaneously seam and overcast in one step. Use this stitch when you do not need to press seams open flat.
Blind hem Blind Hem Auto Select Pattern 14 for woven fabrics or Pattern 15 for elastic fabrics. Attach Blind Hem Foot G. G 1 2 3 4 5 6 7 8 9 10 11 12 13 14 15 NOTES: • The stitch width of Patterns 14 and 15 can not be changed, but the needle drop position will change. • You may change the stitch width by selecting Blind Hem in the Sewing Application. 16 Adjust A Z How to fold the fabric Fold the fabric to make a hem as shown. 1 0.4 - 0.
Changing needle drop position Press the Adjust Adjust key. The adjusting window will appear. 2.00 0.6 3.4 Press the right. key to move the needle to the Default Press the left. key to move the needle to the Cancel Press OK key, to register any changes made to the settings.
Shell tuck Shell Tuck Auto Select Pattern 16. F Attach the Satin Stitch Foot F. 1 2 3 4 5 6 7 8 9 10 11 12 13 14 15 16 Adjust A Z Fold the fabric in bias. Sew along the fold so that the needle on the right swing just clear the folded edge to form tucks. NOTE: • You do not need to tighten thread tension, since the machine is set at tighter tension automatically.
Buttonholes Variety of buttonholes Sensor BH Auto R Pull down BH Lever 18 19 20 21 22 23 24 25 26 27 28 29 30 31 SEN 17 AUT 1 Sensor (Square) BH 1 This square buttonhole is widely used on medium to heavy weight fabrics. The buttonhole size is automatically determined by placing a button in the foot.
7 Tailored BH 7 This buttonhole is used for thick buttons and heavy fabrics. The bartack and rounded end have been reinforced so that this tailored-looking buttonhole is very durable. 23 8 Stretch BH 8 This buttonhole can be used on stretch fabrics. It can also be used as a decorative buttonhole. 24 9 Knit BH 9 This buttonhole is suitable for knit fabrics. It can also be used as a decorative buttonhole. 25 10 Antique BH 10 This buttonhole looks like the heirloom stitch.
Sensor buttonholes Sensor BH Auto NOTES: • Buttonholes 17 and 19 to 27 are sensor buttonholes. R Pull down BH Lever 18 19 20 21 22 23 24 25 26 27 28 29 30 31 SEN 17 AUT • The size of a buttonhole is automatically set by placing a button in the rear of Automatic Buttonhole Foot R. • The button holder of the foot takes a button size of 0.5 cm (3/16”) to 2.5 cm (1˝) in diameter. • It is sometimes necessary to change buttonhole size to match certain heavy or specific materials and threads.
3 3 Pull the Buttonhole Lever downward as far as it will go. 1 Buttonhole Lever 1 Pull down BH Lever. 4 Insert the corner of the fabric under the foot. Press the Up/Down Needle Button twice. 4 Remove the fabric to the left to draw both threads under the foot. Place the garment under the foot, and lower the needle at the Starting Point t of the Mark. Then lower the Automatic Buttonhole Foot R.
5 Sensor BH 5 Press the Start/Stop Button to sew the buttonhole. The buttonhole will be automatically sewn in a single step. Auto R Now sewing. Step 1 Step 3 Step 2 Step 1: The machine will sew the front bartack and the left row first. Then it goes back to the starting point with straight stitch. Step 2: The machine will sew the right row. Step 3: The machine will sew the back bartack, and the machine will stop automatically.
Changing buttonhole width Adjust Press the Adjust key, the adjusting window opens. Press the key to increase the buttonhole width. Press the key to decrease the buttonhole width. Default 5.0 0.45 3.4 Press the OK key to register the settings. Cancel NOTE: • The default setting is 5.0. OK Changing buttonhole stitch density Press the key to make the buttonhole stitch density coarser. Default 5.0 0.45 3.4 Press the key to make the buttonhole stitch density denser.
Corded buttonhole Sensor BH Auto To sew the corded buttonhole, follow the same procedure as Sensor Buttonhole; refer to the instructions on pages 58 to 60. R Pull down BH Lever 18 19 20 21 22 23 24 25 26 27 28 29 30 31 SEN 17 AUT With Automatic Buttonhole Foot R raised, hook the filler cord on the Spur at the back of the buttonhole foot. 1 2 Bring the ends of cord toward you under the buttonhole foot clearing the front end.
63
Welted buttonhole (Bound buttonhole) Auto Welted BH R Welted Buttonhole is made by stitching a strip or patch of fabric to the buttonhole. Pull down BH Lever 18 19 20 21 22 23 24 25 26 27 28 29 30 31 SEN 17 AUT Welted Buttonhole is particularly suited to tailored garments, but are not recommended for sheer or delicate fabrics where the patch might show through or add bulk. Adjust A Z 1 1 Baste a patch to the garment fabric with the right sides together.
3 3 Cut the buttonhole opening as illustrated then pull the patch out through the slit to the other side. 2 3 1 4 4 3 1 Wrong Side of Patch 2 Right Side of Garment Fabric 3 Right Side of Patch 4 Pull out the patch until the right side of the patch is showing. Use an iron to press both corner ends until they are squared off. 3 Right Side of Patch 4 Wrong Side of Garment Fabric 5 Fold back each side of the patch to form buttonhole lips.
7 7 Baste the both edges of the seam with needle and thread as shown. 2 2 Right Side of Garment Fabric 8 8 Fold over the length of the garment fabric, sew back and forth beside the original seam to secure flaps of the patch. 1 4 1 Wrong Side of Patch 4 Wrong Side of Garment Fabric 4 9 9 Fold over the end of fabric and sew back and forth three times over the triangular end.
11 11 Place the Facing on the wrong side of the Garment Fabric. Mark the 4 corners with pins as shown. 5 6 12 5 Facing 6 Garment Fabric 5 12 Turn all the layers over and cut the buttonhole opening on the facing in the same way as step 3. 6 Four marker pins show you the corner points on the facing. Fold back each flaps between the facing and patch. 5 Facing 6 Garment Fabric 13 13 Stitch around the opening with a needle and thread as shown.
Automatic buttonhole Auto Auto BH Select Pattern 18. R Pull Button Holder firmly. 18 19 20 21 22 23 24 25 26 27 28 29 30 31 SEN 17 AUT Adjust A Z Attach the Automatic Buttonhole Foot R. Pull the Button Holder all the way out. Mark the buttonhole position on the fabric. Insert the fabric under the foot. Press the Up/Down Needle Button twice. Remove the fabric to the left to draw the needle thread through the Hole of the foot.
Step1 Sew to Length required, then press " Sew up the left side stopping at the end of the Buttonhole Mark. Press the Reverse Button. Auto R 3 Buttonhole Mark 4 Reverse Button ". 4 3 Depress the Foot Control. The machine will automatically tack and sew down the right side of the buttonhole. Auto Step2 R Sew up to start position, then press " ". Stop the machine when you are directly opposite the Starting Point. Press the Reverse Button. 5 Starting Point 5 Step3 Machine stops when BH is completed.
Darning Darning Auto SEN 17 AUT 22 18 23 27 28 19 24 29 Memory Craft 10001 automatically darns rips and holes. Large and small holes can be mended quickly and easily with this unique stitch. R Sew to length required, then press" " 21 20 25 Automatic Buttonhole Foot R is used to hold the fabric securely in place while darning. 26 30 For extra support, or to strengthen the darn, pin or baste a backing fabric such as organdy under the hole. 31 Adjust A Z Select Pattern 29.
To sew a shorter darning To sew a darning a length of less than 2 cm (3/4˝), first stop the machine after sewing the Required Length, then press the Reverse Button. The Required Length has now been determined. 2 Now restart the machine and continue sewing until the machine stops automatically. 1 Required Length 2 Reverse Button 1 ↓ To sew the same size darning Restart for the same size. Different size 5.0 1 Simply restart the machine to sew another darning in the same size.
Tacking Auto Tacking Sew to length required, then press" " 18 19 20 21 22 23 24 25 26 27 28 29 30 31 SEN 17 AUT Tacking is used to reinforce pockets, crotches and belt carriers where extra strength is needed. F Select Pattern 30 and attach the Satin Stitch Foot F. The machine will sew a tacking of 1.5 cm (9/16˝) long automatically. 1 1.5 cm (9/16˝) NOTE: • Press the Adjust key to manually change the stitch length and stitch width. 1 To sew a shorter tack When you sew less than 1.
Eyelet Auto Eyelet The Eyelet is used for belt holes etc. F 18 19 20 21 22 23 24 25 26 27 28 29 30 31 SEN 17 AUT Press Pattern 31 on the Visual Touch Screen. Adjust Attach the Satin Stitch Foot F. Depress the Foot Control to sew. The machine will stop automatically when completed. Open the eyelet with an awl, punch or pointed scissors. Adjusting the shape of an Eyelet By pressing the Adjust key, the Manual Adjusting screen will appear. Press the or the key to adjust.
Satin Stitches Cording Press Satin Stitch Key in the Ordinary Sewing Mode to open the Satin Stitch Window. Auto F 1/2 32 33 34 35 36 37 38 39 40 41 42 43 44 Function Keys: 1 Needle Up/Down Key: Press the Needle Up/Down key to set the needle position up or down when stopping the machine. Adjust e 2 Adjust Key: Press the Adjust key to open the Adjusting window. A Z 3 Zigzag Width: Press the Zigzag Width or keys to change the stitch widths.
11 13 16 15 12 Adjust Adjust M key to program 10 Program Key: Press pattern combination. When you press this key the following function keys will be displayed. A Z 14 11 Cursor Keys: Press the keys to move the cursor to the right or left. Press the key to memorize the selected pattern. The pattern image on the screen will turn red when it is memorized. You can select a pattern to delete, select a position to insert another pattern.
One cycle pattern sewing Decorative Auto Select your desired pattern. F Start the machine to sew. 1/2 32 33 34 35 36 37 38 39 40 41 42 43 44 Press the Auto-Lock Button in the middle of the pattern, the machine will sew to end of the pattern and lock the stitches, then stop automatically.
Elongation sewing Decorative Auto Example: Pattern 36 F Select Pattern 36. 1/2 32 33 34 35 36 37 38 39 40 41 42 43 44 Press the Adjust key. Press Elongation or desired pattern length. key to set the NOTE: • Elongation ratio is indicated in the multiples of the original pattern length. Press OK key. The setting is registered and the screen returns to the previous window. Adjust Start to sew.
Cording Cording Auto Use the Cording Foot H to sew over one strand of cording to create a pretty swirled design on a jacket or vest. Sew over three strands of cording for border trims. Pearl cotton, knitting yarn, embroidery floss, lace thread, fine wool or lily yarn can be used for cording. H 1/2 32 33 34 35 36 37 38 39 40 41 42 43 44 Select Pattern 33, for sewing three strands of cording. Adjust A Z Mark the design on the right side of the fabric.
Decorative Stitches Straight Stitch In the Decorative Stitch Mode, some utility stitches, such as straight stitches, zigzag stitch, overedge stitch are included as programmable patterns. Auto A 1/14 58 59 2 60 3 63 6 3 2 64 65 69 70 The number beside the pattern image on the straight stitch key denotes stitch counts of a programmable unit. 62 61 67 66 Press Mode.
Sewing a series of decorative stitch Hemstitch Auto Example 1: Border stitch with Pattern 97. A 4/14 97 98 99 100 101 102 103 104 105 106 107 108 109 Press the key till page 4 of 14 opens. Select Pattern 97 (Hemstitch). Sew a line of the Pattern 97 along the fabric edge. Press the Auto-Lock Button in the middle of sewing the last pattern in the line, the machine will lock the stitches and stop automatically when finished. Repeat the same steps to sew along other sides.
Hemstitch Example 2: Square with Pattern 96 (Hemstitch) Auto F Draw a square in the center of the fabric with tailor’s chalk. 3/14 84 89 85 86 87 88 90 91 92 93 Press the key till page 3 of 14 opens. Select Pattern 96 and sew along the line. Press the Auto-lock Button in the middle of sewing the last pattern in the line. 94 95 96 The machine will stop automatically. Sew each side one by one to form a square.
Programming pattern combination Program Key When you press the key, function keys for programming will appear. You can program combination of patterns from Satin Stitch and Decorative Stitch windows. NOTE: • When you press the key again, the program will be cancelled and the initial screen will reappear. Example: One cycle sewing with a lock stitch at the end of a pattern Auto Locking Stitch F Select the Satin Stitch Mode. 1/2 32 33 34 35 Press the key. 36 Select Pattern 36.
Programming pattern combination Auto Decorative Example: Programming Pattern 36 and Pattern 40. F 1/2 32 33 34 35 Select Pattern 36. 36 Press 37 38 39 40 key. Select Pattern 40. 41 The pattern is automatically memorized. 42 43 M Start to sew. The machine will sew the pattern combination repeatedly. 44 Note: • If you press the Auto-Lock Button in the middle of a programmed pattern the machine will stop automatically after the current pattern is completed.
Programming pattern combination with mirror image Auto Decorative F Example: Programming Pattern 43 and its mirror image. 1/2 32 33 34 35 36 37 38 39 40 41 Press Select Pattern 43. Press the 42 43 key. 44 key. Select Pattern 43 again. The mirror image of Pattern 43 appears on the screen. M Start to sew. The machine will sew the pattern combination repeatedly.
Programming french knot Auto Straight Stitch Example: Pattern 70, Pattern 58, Pattern 70 and Pattern 59. F 1/14 58 2 59 60 3 6 Press 62 61 key. 3 2 Select Pattern 70 (French Knot). 63 64 65 69 70 67 66 Select Pattern 58. Two counts of straight stitch will be memorized. 6 68 Select Pattern 70. Select Pattern 59. Three counts of straight stitch will be memorized. Start to sew. The machine will sew the pattern combination repeatedly.
Combination of satin stitch and decorative stitch Auto Decorative F Example: Combination of satin stitch Pattern 36 and decorative stitch Pattern 97. 1/2 32 33 34 35 36 Select Satin Stitch Mode. 37 38 39 40 41 Press the 42 43 M key. Select Pattern 36.
Select the Decorative Stitch Mode. Hemstitch Auto Press the key till page 4 of 14 opens. F Select Pattern 97. 4/14 97 98 99 102 103 104 107 108 109 M 100 Start to sew. The machine will sew the pattern combination repeatedly. 101 NOTE: • After sewing the desired length of programmed patterns, press the Auto-Lock Button. 106 105 The machine will sew to the end of the current pattern and stop sewing automatically.
Individual pattern adjustment Auto Decorative You can adjust the zigzag width, stitch length, elongation ratio and thread tension of each patterns in a combination individually. F 1/2 32 33 34 37 38 39 42 43 44 35 36 40 Example: Change the elongation ratio of Pattern 36 when Patterns 36, 39 and 43 are programmed. 41 Press the key so the cursor will go to the pattern you are going to change.
Editing programmed patterns Decorative Auto Example: When Patterns 36, 39 and 43 are memorized F 1/2 Decorative Deleting Pattern 39: Press the key to move the cursor under Pattern 39 you would like to delete. Auto F 1/2 Decorative Press Auto key. Pattern 39 is deleted. F 1/2 Decorative Inserting Pattern 40 before Pattern 39: Auto Press the key to move the cursor under the Pattern 39 you would like to replace. F 1/2 Decorative Select Pattern 40.
Saving and opening a file Hemstitch Auto Saving a file F The programmed pattern can be saved as a file in the Built-in Memory or ATA PC card. There are 4 folders in the built-in memory and 12 folders in the ATA PC card for saving the files. 4/14 97 98 99 100 101 102 103 104 105 106 107 108 109 NOTES: • Up to 100 files can be saved in each folder, but total number of the files is limited by the available memory size. • The memory size of free space is displayed on the screen.
Strai g ht Stitch Opening the saved file Auto A 1 2 3 4 5 6 7 8 9 10 11 12 13 14 15 1 When you press the Open File Key, the folder list will be displayed. 2 Press the folder icon you wish to open. A document icon in the folder indicates that the folder contains the saved files. 3 The file name and stitch image will be displayed on the file icon. 16 Adjust 2 4 Press the file icon to select the desired file to open.
Twin Needle Sewing Decorative Auto F NOTES: • When you sew patterns with the twin needle, test the stitches first before you try. 1/2 32 33 34 35 36 • Use Zigzag Foot A or Satin Stitch Foot F for Twin Needle Sewing. 37 38 39 42 43 44 40 41 • Turn off the switch before changing the needle. 1 Select the pattern and press the Twin Needle key.
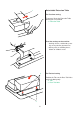
Threading the machine for twin needle Insert an additional spool pin, and put felt and a spool on it. Draw both threads from the spools and pass them through the points from 1 to 6 1 2 Make sure that the two strings of thread from the spools will not get tangled. NOTES: • Make sure each of the threads wind off from the spools as shown. 4 • Threading from 1 to 6 is the same as for single needle. Slide one of the threads through the needle bar thread guide on the left, and the other one on the right.
Monogramming Block You can combine letters and symbols for monogramming. Auto F Monogramming mode keys A B C D E F G H I J K L M N O P Q R S T U V W X 1 Font Key: When you press this key, the font selection window opens. The following 3 fonts and symbols are available. 2 Block 3 Script Y Z 4 Broadway M 0 9 A Z A L A S Font a 1 7 Font Block 2 A Press the desired icon key to select the font or symbol.
9 A 9 Upper/Lower Case Key You can select the Upper or Lower Case Letters by pressing A a key. a Block Auto F a b c d e f g h i j k l m n o p q r s t u v w x y z 0 9 A Z A Font L A M S a 10 Letter Size Key By pressing the L S key, the size of the letter will change approximately 2/3 of the full size letter. If you press it twice, the letter will go back to the original size.
Block Letter key You can select the alphabet (26 letters) and European accented letters as well. To select the letter, press the corresponding key. Auto F A B C D E F G H I J K L M N O P Q R S T U V W X Y Z M 0 9 A Z A L A S Font a A Z A European accented letters A You can select the European accented letters, such as Umlaut, by pressing the A key. Block To select the European accented letter, press the corresponding key.
Number/Symbol key 0 9 A Z 0 9 A Z 0 9 When you press the A Z key, the number and symbols will appear. The key will change to 0A Z9 . Block Auto To select the number or symbol, press the corresponding key. F 0 1 2 3 4 5 6 7 8 9 & _ $ @ . , ? ? ! Press the 0A Z9 key to return to the letter selection window.
Programming a monogram Block Auto F Example: Programming “R&B” in block type. R Press the A B C D E F G H I J K L M N O P Q R S T Y Z U M V W 0 9 A Z A L A S key and select block type letter. Select Upper Case. Select Large Size. Press “R”, the cursor shifts to the right and “R” is automatically memorized. X Font a Press the 0 9 A Z key. Press the L key and select Small Size. S Press “&”, the cursor shifts to the right and “&” is automatically memorized.
Block Editing a monogram Auto F For this example, we will edit the monogram of “ABC”. ABC Deleting a letter (character) Press the key and shift the cursor under the letter “B”. Block Press the Auto key. F ABC Block “B” is deleted. Auto F AC Block Inserting a letter (character) Auto F Press the key to shift the position of the cursor under the letter “B”. ABC Block Select letter “D”. Auto F ABC Block The letter “D” is inserted between “A” and “B”.
Saving and opening a file Block Auto F Saving a file ABC A B C D E F G H I J K L M N O P Q R S T U V W X Y Z 0 9 A Z A Font L A M S 1 Press the Save File Key. NOTE: • The procedure of saving a file is the same as that of the programmed pattern. (See page 90.) a A Z 2 Press the icon key of the desired folder.
Strai g ht Stitch Opening a saved file Auto A 1 Press the Open File Key. 1 2 3 4 5 6 7 8 9 10 11 12 13 14 15 NOTE: • The procedure of opening a file is the same as that of the programmed pattern. (See page 91.) 16 Adjust A Z Open File Bult-in Memory Free Space:584KB OrdF1 OrdF2 OrdF3 2 Press the icon key of the desired folder. 3 Press the icon key of the desired file and the screen will show the stitch pattern of the saved file.
Sewing Application Seaming Overedge The Sewing Application is a unique feature that provides you with on-screen guidance for 12 useful sewing applications. Blind Hem Rolled Hem Zipper Gathering Basting Button Tacking Applique Patchwork Quilting When you press the Sewing Application key, you will be able to choose the right stitch and its appropriate setting of your sewing application. The machine automatically set up for the selected project.
Seaming Straight Stitch Auto When you press the Seaming key, the Seaming window will appear. In the Seaming window, the straight stitch of center needle position with the stitch length 2.2 mm (3/32˝) will be automatically selected.
Overcasting Overedge stitches Auto c Woven A Knit 2 1 Woven Heavy 1 1 C B D When you press the Overedge key, the Overedge window will appear. The standard stitch for Overedge, which is the overedge stitch for the woven fabric, will be chosen and automatically be set. In Overedge window you may select from the following: A: Overcasting Stitch for medium to heavy weight woven fabrics. This stitch is used for seaming two layers and finishing the raw edges at the same time.
Blind Hem Blind Hem Auto When you press the Blind Hem key, the Blind Hem window will appear. The standard pattern for Blind Hem, which is the Woven Blind Hem, will be set automatically. G Woven Knit B A In the Blind Hemstitch window you may select the following: A: Blind Hem Stitch for Woven Fabrics B: Blind Hem Stitch for Knit Fabrics 0.6 1 2.2 2 For your convenience, the needle position adjusting keys are displayed on the screen.
Rolled hem Straight Stitch Auto When you press the Rolled Hem key the Rolled Hem window will appear. The standard pattern, which is the Straight Stitch, will be chosen and automatically be set. D Straight Stitch Zigzag Stitch A B In the Rolled Hem mode you may select the following: A: Rolled Hem with Straight Stitch B: Rolled Hem with Zigzag Stitch Adjust A Z To sew Fold the edge of the fabric twice, 6 cm (2 3/8˝) in length and 0.3 cm (1/8˝) in width. 1 6 cm (2 3/8˝) 2 0.
Zipper sewing Straight Stitch Auto When you press the Zipper Sewing key, the steps for zipper sewing will appear. E Sew left side For the first step, the screen advises you to attach the Zipper Foot with the pin on the right side to sew the left side of the zipper. Sew right side When you finish sewing the left side, press the Sew Right Side key. The screen display advises you to move the Zipper Foot with the left side pin to the foot holder.
Gathering Straight Stitch Auto When you press the Gathering key, the setting for gathering will appear. The machine will set to the straight stitch for gathering. A Gathering Adjust A Z To sew Sew 2 parallel lines with distance of 0.5-0.7 cm (3/8˝-1/4˝). Knot the needle and bobbin threads at one end. Pull the bobbin threads simultaneously from one end of the fabric to distribute gathers evenly until fabric being gathered to the desired width.
Basting Basting Auto When you press the Basting key, the setting for basting will appear. The machine will be set to Basting Stitch and the Feed Dog will automatically drop. Remove the foot holder and attach the Basting/Darning Foot P-2. P2 Basting Adjust A Z 1 2 To sew Hold the fabric taut and depress the Foot Control or press the Start/Stop Button. The machine will take one stitch and stop automatically. Slide the fabric to the back for the next stitch.
Button sewing Button Sewing Auto When you press the Button Sewing key, the Button Sewing window will show. The standard setting for Regular Button Sewing will be chosen and set automatically. T A Shank Regular B The Feed Dog will be automatically dropped. In the Button Sewing Mode, you may select the following; A: The Regular Button Sewing B: Button Sewing with a Shank 3.5 For your convenience, stitch width keys are displayed on the screen. Press the key to widen the width.
Tacking Stabdard length 1 cm is sewn automatically. Auto Tacking Auto F Manual A B When you press the Tacking key, the Tacking window will appear. The standard tacking length of 1 cm (1/4˝) will be automatically set. In the Tacking Mode, you may select the following: A: Automatic Tacking B: Manual Tacking Automatic tacking 1 The machine will sew a tack 1 cm (1/4˝) long and stop automatically. Press the Adjust key if you wish to change the stitch width and length.
Applique sewing Applique Applique Auto F When you press the Applique key, the Applique window will appear. The standard applique sewing will be chosen and automatically set. Blanket Stitch A B In the Applique Mode, you may select the following. A: Applique Stitch B: Blanket Stitch C: Zigzag Stitch Zigzag Stitch C Adjust A Z Attach the Satin Stitch Foot F. Place the Applique on the fabric and baste it in place.
Straight Stitch Patchwork When you press the Patchwork key, the Patchwork window will appear. The straight stitch of the center needle position will automatically be selected. Auto O A Lock-aMatic Straight Stitch Locking Stitch C In the patchwork mode, you may select the following. A: Straight Stitch B 1.80 B: Lock-a-Matic Stitch C: Locking Stitch You can change the stitch length by pressing or key. NOTE: • When pressing the Default key, the stitch width also returns to default setting.
(A) To sew Place the fabrics with right sides together. Attach the 1/4˝ Seam Foot O and sew from starting point (A) to the ending point (B). (B) Guide the edge of the fabric along the Guide on the foot to keep a precise seam allowance. 1 Guide 1 Same size Different size Stop the machine at the ending point (B) and the prompt window appears. OK Press the OK key to sew the same length. Press Cancel key to sew a different length or to select other patterns.
Quilting Straight Stitch Straight Stitch Lock-aMatic Auto Clasp Stitch C In the Quilting Mode, you may select the following. F A: B: C: D: E: F: Locking Stitch A New Sculpture B When you press the Quilting key, the Quilting window will appear. The Straight Stitch of the center needle position will automatically be selected. Free Quilting D E Straight Stitch Lock-a-Matic Stitch Locking Stitch New Sculpture Stitch Clasp Stitch Free Quilting Use the Walking Foot for sewing patchwork quilt.
Clasp stitch Clasp Stitch You can close the thick quilting fabrics by using the Clasp Stitch. Attach the Satin Stitch Foot F. The machine will automatically stop after sewing one cycle of the stitch. Free quilting Free Quilting Remove the foot holder. Attach the Basting/ Darning Foot P-2 to the Presser Bar putting the Pin on the Needle Clamp Screw. Tighten the Thumbscrew firmly with the screwdriver.
Correcting Distorted Stitch Patterns 1 3 2 The sewing results of the stretch stitch patterns may vary depending upon the sewing conditions, such as sewing speed, type of the fabric, number of layers etc. Always make test sewing on a scrap piece of the fabric that you wish to use. If decorative stitch patterns, letters, numbers or the manual buttonhole stitch are distorted, correct it with the Feed Balancing Dial. NOTES: • In normal sewing, set the Feed Balancing Dial to the neutral position, i.e.
EMBROIDERY Preparing for Embroidery Embroidery hoops 1 1 Embroidery Hoop A (Standard Hoop): This is the standard size hoop, with an 12.6 cm (5˝) by 11 cm (4 3/8˝) embroidery area for standard size embroidery designs. 2 2 Embroidery Hoop B (Big Hoop): This is the large-size hoop, with 20 cm (8˝) by 14 cm (5 1/2˝) embroidery area for sewing large-size designs and combined designs.
Templates 2 A When positioning the fabric into the hoop, use the template to align the centerlines on the fabric with the center of the hoop. 1 First mark the centerlines on the fabric and place the fabric on the outer hoop. STARTING POINT FOR MONOGRAMMING STARTING POINT FOR MEMORY CARDS ( FROM K-101 ) Place the inner hoop and template over the fabric and adjust the fabric placement.
Stabilizer To obtain the best quality embroidery, it is important to use stabilizers. Types of stabilizer Tear-away stabilizer is made from a fiber that will tear easily. Use tear-away stabilizers for stable woven fabrics. After stitching, tear away the stabilizer so that the small portion left in the back of the stitching will not affect the wear. Iron-on stabilizer is an adhesive type stabilizer for knits and all kinds of unstable fabrics. Fuse it to the wrong side of the fabrics with an iron.
Setting the fabric in an embroidery hoop 1 1 Mark the Centerlines on the right side of the fabric with tailor’s chalk. 1 Centerlines 1 2 Loosen the Hoop Tightening Screw. 2 3 4 4 2 Hoop Tightening Screw 3 3 Lay the Inner Hoop e and the Template over the fabric with a Stabilizer attached, matching centerlines. 3 Inner Hoop 4 Template 5 Stabilizer 5 6 4 Set the Inner Hoop e into the Outer Hoop so the fabric and the template will not move.
Attaching the embroidery hoop to the machine 1 Turn the Attaching Knob so it is parallel with the hoop, and set it on the Carriage. Attach the hoop by fitting the Pins into the Carriage Holes, and turn the Attaching Knob clockwise to secure the hoop. 2 1 Attaching Knob 2 Pins 3 Carriage Holes 3 CAUTION: • Always provide sufficient clearance for the embroidery carriage behind your machine before embroidery sewing. • Never try to move the carriage by hand or touch the carriage while it is moving.
Attaching embroidery foot P Raise the foot, then loosen the Thumbscrew and remove the Foot Holder to the rear. 1 Attach Embroidery Foot P to the presser bar from behind. Tighten the Thumbscrew securely with the screwdriver. 1 Thumbscrew 2 Foot Holder 3 Embroidery Foot P 2 3 Thread Holder To prevent the needle thread from becoming tangled, place the thread end on the Thread Holder. 2 Pass the needle thread through the Hole on Embroidery Foot P and draw it up to the thread holder.
Machine Settings When you turn on the power switch, the Visual Touch Screen shows the opening “Welcome” window, and then Ordinary Sewing Mode will appear after a few seconds. Built-in:Designs Folder Hoop Size A(F):126X110mm 1 3 2 4 2 5 6 7 8 9 10 11 12 13 14 A Z Press the Embroidery Mode key to enter the Embroidery Mode.
Embroidery Mode Settings Auto Tension Auto 1 Remaining Bobbin Thread 2 2 On Off Grid Line Grid Size 10 mm 3 4 On Off Center Line 5 6 7 Common Set Ordinary Sewing Register 8 Embroidery To adjust a setting within Embroidery Setting Mode, press the Embroidery Mode Setting key. 1 Auto Tension The Auto Thread Tension level should be adjusted when using other threads than the Janome Embroidery thread. The tension level can be adjusted within the range of -5 to +5.
Professional mode settings Professional Mode Set Maximum speed setting 600 spm on off + 9 10 Back Ground Color Control 11 16 Thread selection Janome RobisonAnton Madeira Mettler Register You can choose the desired color for the background and keys. 10 Background Color Press the key to open the Background Color setting window and you can change the screen background color to your preference.
Thread selection Professional Mode Set Maximum speed setting 600 spm on off There are four popular brands of embroidery thread to choose from. Press the key of the thread you wish to use. The color code of the selected brand will be shown on the color/part key along with the name of the color. + Color Control Back Ground NOTE: • The Auto Thread Tension level should be adjusted when using other threads than the Janome Embroidery thread.
Built-in Embroidery Designs The built-in embroidery designs are displayed on the Visual Touch Screen when you select the Professional Style Embroidery Mode. Built-in:Designs Folder Hoop Size A(F):126X110mm 1 4 3 2 The following 5 categories are available in the Professional Style Embroidery Mode. 2 5 6 7 8 1 Built-in Designs There are 47 built-in designs to choose from.
Pattern Selection Window Built-in:Designs Folder Hoop Size A(F):126X110mm 1 2 2 3 4 6 7 8 Press the Embroidery Mode key to open the Embroidery window and press an Built-in Design key. 2 5 10 9 13 11 Memory Craft 10001 provides 47 ready to sew embroidery designs. 12 There are 5 pages in the Built-in Pattern Selection window. Press the key to view the next page of pattern selections.
Ready to Sew Embroidery screen Auto 2 When you select an embroidery design, the Visual Touch Screen will show the design’s parts and their sequence numbers, the thread color code, the presser foot to use, sewing time, number of colors needed, the embroidery’s actual measurements and the proper hoop to use. When you press the Start/ Stop Button, the machine will automatically start sewing.
Ready to Sew 2 6 Trace/ Carriage return key Auto Pressing this key causes the hoop to move and trace the outline of the selected pattern without stitching. 3 Colors 8 min P Size 75x75mm A(F):126x110mm Orchid Pink 240 239 Sunflower NOTE: • After starting the machine, the Trace key disappears and the Carriage Return key will appear instead. • Before turning the power off, always be sure to press the Carriage Return key to return the carriage to its stored position.
Stitch Back/Forward keys 14 Ready to Sew 2 8 min P Size Auto 3 Colors 15 75x75mm 16 A(F):126x110mm Orchid Pink 3 2 1 240 17 Green Dust 239 Sunflower 264 The Stitch Back/Forward function is very useful when thread runs out or breaks during embroidery sewing. When embroidery sewing has started, the screen will indicate the current stitch counts. The Jog keys will disappear and the Stitch Back/Forward keys will be indicated on the screen.
Starting to sew embroidery Lower the presser foot, press the Start/Stop Button and sew 5 to 6 stitches. Press the Start/Stop Button again to stop the machine. Raise the presser foot, cut off the Loose Thread close to the starting point and lower the presser foot. 1 Loose Thread Press the Start/Stop Button to start sewing again and the machine will stop sewing automatically. 1 Sewing results 2 The embroidery stitch pattern is sewn as shown against the Centerlines on the Fabric.
Monogram Embroidery Gothic Press Embroidery Mode key and press the Monogram key. AB The Monogram selection screen will appear and Gothic upper case alphabet font will automatically be selected. A(F) A B C D E F G H I J K L M N O P Q R S T U V W X Y Z AB AB 0 9 A Z A LM S A A Z 1 Font a Monogram selection screen 1 After you press an Alphabet key, the letter is memorized and the cursor moves to the right.
Letter key Gothic AB You can select the alphabet (26 letters) and European accented letters as well. A(F) A B C D E F G H I J K L M N O P Q R S T U V W X Y Z AB AB 0 9 A Z A LM S A To select the letter, press the corresponding key. Font a A Z OK Edit A European accented letter A You can select the European accented letters, such as Umlaut, by pressing the A key . Cheltenam To select European accented letter, press the corresponding key.
Number/Symbol key 0 9 A Z 0 9 A Z Gothic 0 9 When you press the A Z key, the number and symbols will appear. To select the number or symbol, press the corresponding key. Press the 0A Z9 key to return to the letter selection window. AB A(F) 0 1 2 3 4 5 6 7 8 9 & _ $ @ .
2 1 AB AB 0 9 A Z A LM S A A Z 7 Font a OK 3 Edit 6 5 1 Delete key Characters can be deleted when they are underlined by the cursor. Move the cursor under the letter, number or symbol you want to delete and press the key. 2 Cursor keys Slide the cursor to the right or left by pressing either of the keys. To add letters/ numbers/symbols (character) into a monogram, move the cursor under a character.
Programming a monogram Gothic AB Press the Embroidery Mode key and press the Monogram key. A(F) A B C D E F G H I J K L M N O P Q R S T U V W X Y Z 1. Press 2. Select “R”, the cursor shifts to the right and “R” is automatically memorized. AB 0 9 A Z A LM S A a R&B key and select Medium 0 9 A Z Font 4. Press OK 5. Press “&”, the cursor shifts to the right and “&” is automatically memorized. Edit 6. Press the A Z key to return to the alphabet screen. key.
Placement of monogramming Normal mode In the Normal Mode, the monogram is left justified and will start sewing from the left end of the embroidery area. Professional Mode 5 min P Size R&B 1 Colors You can select one of the 3 placements of monogram: Left Justify, Center Justify and Right Justify. 67x19mm A(F):126x110mm R&B ABC ABC ABC 1 2 3 Color Change Jog ST 4 1 Left Justify Press the key to start sewing from the Left End Reference Line on the template.
2 Letters 2- Letters monogram Press the Embroidery Mode key and press the Monogram key. AB A(F) A B C D E F G H I J K L M N O P Q R S T U V W X Y Z AB AB A Z 1 2 Letters 0 9 A Z A LM S A Font a OK Edit Example: 2-Letters with a crest 1. Select 2-Letters and press the Crest key. 2. Select the letter “A”. AB A(F) 2 2 Letters 3. Select the letter “B”. AB 4. Press the OK key and the screen will change to the Embroidery screen. 5.
Combining Border Patterns and Letters Border AB Duck You can combine Border patterns with letters and numbers. A(F) Press the Embroidery Mode key and press the Monogram key. For this example, we will combine the pattern of a duck and the word “Duck”. AB AB A Z 1 Border 0 9 A Z A LM S A Font a OK Edit 1. Select the Border patterns and press the key to select the duck pattern. AB A(F) 2 Border D 3 Border Duck 4 Border Duck 2. Select Gothic type font and Large Size.
Gothic Monogramming in arc You can make a monogram in upper or lower arc. AB SMILE A(F) A B C D E F G H I J K L M N O P Q R S T U V W X Y Z NOTE: • The Professional mode must be activated to make a monogram in arc. 1. Enter the characters and press the OK key. AB AB 0 9 A Z A LM S A Font a A Z Edit Ready to Sew SMILE OK 2 Auto 2. The Embroidery screen will appear. Press the Edit key to enter the editing mode.
A 4. Press the downward arrow key to make an upper arc. BC A(F):126x110mm Size Copy A B C 4, 5 SMILE A BC Cancel OK Color OK A Cancel Edit Z A(F):126x110mm Size Copy ILE SM A BC 5. Each time you press the arrow key, the arc will be deeper. Pressing the arrow key in the opposite direction makes the arc shallower. NOTE: • The curvature will change when pressing the downward or upward arrow key is pressed, but the arc length will remain the same. Color OK A Cancel 6.
PC Card (Optional Item) In addition to the built-in embroidery designs, there are many attractive designs available from the optional PC Design Card. The Memory Craft 10001 is compatible with the ATA PC Card, which can be used to save the ordinary and embroidery stitch files. 1 Inserting the PC Card Insert the PC Card into the slot with the Front Side of Card facing to you. Push the card until it clicks, then the Eject Button will pop out.
Selecting the Designs from PC Design Card Designs PC Card No. 1001 Hoop Size A(F):126X110mm 1 After inserting a Janome PC Design Card into your machine, you can view and select its designs in the Embroidery Mode. 4 3 2 2 Press the Embroidery Mode key to enter the Embroidery Mode. Example: PC Design Card No. 1001 Big Floral Collection Press the PC Card key. The Patterns 1 to 4 will be displayed in the first page. Use Embroidery Hoop A for these patterns.
When pressing the key, the Patterns 5 to 14 will be displayed in the second page. PC Card No. 1001 Hoop Size B:140X200mm Use Embroidery Hoop B for these patterns. 5 6 7 8 9 10 11 12 13 14 A Z Edit When pressing the key again, the Patterns 15-20 will be displayed in the third page. PC Card No. 1001 Hoop Size B:140X200mm 15 16 19 20 A Z 17 Use Embroidery Hoop B for these patterns.
Ready to Sew 2 Embroidery screen Auto When you select a PC Design Card embroidery pattern, the screen will change to the Embroidery screen. 5Colors 9 min P Size 51x70mm A(F):126x110mm 2 1 243 Royal Purple Pink 201 3 Powder 229 Purple By pressing the Start/Stop Button the machine will automatically start sewing.
Card Reader 10000 You can download embroidery designs from MC9000’s Memory Card Library via Card Reader 10000 to your Memory Craft 10001 and sew. NOTE: • The Card Reader 10000 is sold separately. Connecting Card Reader 10000 Insert the RS-232C Cable into the RS-232C Connector of the machine. 2 Insert the two plugs into the Card Reader 10000. 3 1 RS-232C Cable 2 RS-232C Connector 3 Card Reader 10000 1 Insert a Memory Card r from the MC9000 Card Library into the Card Reader 10000.
Pattern selection screen Built-in:Designs Folder Hoop Size A(F):126X110mm 1 2 3 4 After the connection has been made with Card Reader 10000 and your machine, press the Embroidery Mode key. 6 7 8 Press the Card Reader key. 2 5 The Pattern Selection key will appear. 9 10 13 14 11 12 A Z 1 Embroidery Mode Key 2 Card Reader Key 3 Pattern Selection Key NOTE: • You can select, edit and sew the downloaded designs in the same way as the built-in embroidery patterns.
Edit Mode Ready to Sew 2 In the Edit Mode, you can edit and combine designs to create your original embroidery. Press the Embroidery Mode key and Edit key to open the Edit Mode window. Auto 3 Colors 8 min P Size 75x75mm A(F):126x110mm 1 Orchid Pink 240 239 Sunflower Pattern Selection Windows in the Edit Mode 3 2 Green Dust You can open the Built-in designs, Monogram, PC Design Card designs and Memory Card designs windows in the Edit Mode.
Selecting a pattern on the edit screen The green frame surrounds the pattern when it is selected. To select another pattern, press on the image of the desired pattern on the Edit screen. B:140x200mm Size Copy B C A You can edit the selected pattern on the Edit screen to move, rotate, resize, flip etc. Color OK A Cancel Edit Z Moving a selected design To move the embroidery pattern on the Edit screen, press and drag the pattern to a desired location with your fingertip.
Cancel key 3 B:140x200mm Size When you press the key, any changes that have been made to the selected pattern will be cancelled. 2 Cancel Key Copy NOTE: • When there is more than one pattern on the Edit screen, any changes to the pattern cannot be cancelled after another pattern has been selected. A BC Selecting the hoop size Color OK A Cancel 2 There are three hoop size selections: Edit Z In the Edit window, you need to select the appropriate size of the embroidery hoop by pressing the key.
Resizing a selected pattern Normal mode: B:140x200mm Size Copy 4 By pressing the key, you may enlarge and reduce the size of the embroidery pattern in three sizes (large, medium and small). Each time you press the key r , the size will change to large, small or medium in order. The default setting is medium. Professional mode: A BC When you press the key, the Size Adjusting window will appear.
Duplicating a selected design Select the design you wish to duplicate. Press the Copy key and the selected design will be duplicated. 1 Copy Key B:140x200mm Size Copy 1 A BC Color OK A Z Cancel Edit 154 NOTE: • If you press the Copy key when the pattern is located in the center, the duplicated pattern will completely overlap the original. Move the duplicated pattern to separate it from the original.
Flipping a selected design When you press the keys, you may embroider a mirror image of the pattern. B:140x200mm Copy Press the to right. key to flip patterns from left Press the key to flip from top to bottom.
Rotating a selected design Professional Normal mode: Each time you press the key, the embroidery pattern will rotate 90° clockwise. B:140x200mm Size Copy 1 Rotation Key Professional mode: 7 Press the key, and the Rotation window will appear. 1 Press the rotation. A BC Color key to change the direction of The key functions are as follows: OK A Cancel Each time you press the key, the embroidery pattern will rotate 45°. Edit Z Each time you press the dery pattern will rotate 1°.
Changing the fabric and thread colors You can change the background color of the Edit screen to simulate the fabric color that you are intending to use. The thread color of each part of the selected pattern can also be changed to your preference. B:140x200mm Copy Size Fabric color change B C A Press the window. key to open the color change 1 Color Key Select the desired color with the Color OK A and the desired color tone with the 1 Cancel Edit Z keys keys.
Thread color change In this window you are able to change the assigned thread color of the selected part of the pattern. Thread Color 22 11 1 240 Orchid Pink 239 Sunflower 3 Green Dust Select the pattern and press the key to open the thread color change window. Select the part you wish to change thread color by pressing the Color/Part key. 264 1 Color/Part Key Orchid Pink (240) 3 Select the desired color with the and the desired color tone with the keys keys.
Example 1: Built-in:Designs Folder Hoop Size A(F):126X110mm 2 3 4 6 7 8 9 10 11 12 13 14 1 Press the Edit key. Select Built-in Pattern 5. 2 5 A Z Pattern Combination for Big Hoop B Edit Press the key to reduce the pattern size. Press the Layout keys to move the pattern down and to the left.
Press the Built-in Design key to return to the Pattern Selection Window and select Built-in Pattern 5 again. Press the B:140x200mm Press the Layout keys to move the pattern to the bottom right. Copy B C A Size key. Color OK A Cancel Edit Z Select Pattern 5 again. Press the Press the Layout keys to move the pattern to the top left of the screen. B:140x200mm Size key. Copy Select Pattern 5 again. B Color A Z key.
Ready to Sew 2 28 min P Size The patterns in the Edit screen are combined and will be shown in the preview window as one design. Auto 12 Colors 140x150mm The Color/Part key of the combined design will also be shown. B:140x200mm 239 Orchid 240 Sunflower Pink 5 6 239 Sunflower 3 2 1 Green Dust 264 Green Dust 264 4 Orchid Pink 240 7 Orchid Pink 240 Jog ST A Z Edit Press the Start/Stop Button to start embroidering.
Example 2: Built-in:Designs Folder Hoop Size B:140X200mm 25 26 27 Border Designs Using the Template Patterns NOTE: • Patterns 25, 26, 27 and 28 are used as the template for border designs. 28 Select Built-in Pattern 25. A Z Edit Press the Edit key.
Open the built-in design window and select Pattern 1. Built-in:Designs Folder Hoop Size A(F):126X110mm 2 3 4 6 7 8 9 10 11 12 13 14 1 2 5 A Z Edit The screen returns to the Edit Mode window and Pattern 1 will be displayed on the Edit screen. B:140x200mm Size Copy A BC Color OK A Z Cancel Edit 163 With the Layout keys, move Pattern 1 on to the outline of Pattern 25.
Press the copy key to duplicate the pattern and lay it along the outline of Pattern 25. Repeat the above step to form a heart-shape with a series of Pattern 1. B:140x200mm Copy B C A Size Color OK A Cancel Edit Z Press the NOTE: • When combining the monogram with any pattern that has a black section at the beginning or end of the pattern, the mono gram will be a part of the black section since the default color for monogram is black.
Ready to Sew 2 9 min P Size The patterns in the Edit screen are combined and will be shown in the preview window as one design. Auto 2 Colors 130x123mm The Color/Part key of the new combined design will also be shown. B:140x200mm Black Skip the first part (Pattern 25) to sew the border design only. 2 1 002 Salmon 233 Pink Jog ST A Z Edit Sewing results The embroidery stitch pattern is sewn as shown against the centerlines on the fabric.
Saving and Opening a File Gothic Saving a file AB ABC The original design created in the Editing Mode can be saved as a file in the Built-in Memory or ATA PC card. There are 3 folders in the built-in memory and 12 folders in the ATA PC card for saving the files. A(F) A B C D E F G H I J K L M N O P Q R S T U V W X Y Z AB AB 1 0 9 A Z A LM S A NOTES: • Up to 100 files can be saved in each folder, but total number of the files is limited by the available memory size.
Opening the saved file Built-in:Designs Folder Hoop Size A(F):126X110mm 1 2 3 4 6 7 8 1 When you press the Open File Key, the folder list will be displayed. 2 5 9 10 13 14 11 2 Press the folder icon you wish to open. A document icon in the folder indicates that the folder contains the saved files. 12 3 The file name and stitch image will be displayed on the file icon. A Z 4 Press the file icon to select the desired file to open.
PC-Link Mode Connecting the Memory Craft 10001 to a PC To connect the machine to a PC, you need the Janome exclusive USB or RS-232C cable (both sold separately). Use the USB cable if your PC is Windows 98/ 2000/Me/XP base. Use the RS-232C cable if your PC is Windows 95 or NT base. Please refer to the Hook-up Diagrams on pages 170 and 171 for proper connection of your PC.
When the data is being sent, the screen will display as shown. NOTE: • You can select the location to store the designs either in the internal memory of the sewing machine or the ATA PC Card. (Do not eject the card.) (Do not turn off the power.) After all the designs have been sent, the designs will be shown in the Pattern Selection window. PC-Link:EmbF2 Folder Hoop Size A(F): 126 X 110mm PATTERN1 PATTERN2 PATTERN3 You can select, edit and sew the designs in the same way as the built-in designs.
Hoo-up diagrams Windows 98 / Me / 2000 /XP (USB) USB Cable (12Mb/s) Type "B" Connector Type "A" Connector USB Cable (12Mb/s) Type "B" Connector Type "A" Connector 170
Windows NT (RS-232C) RS-232C Janome Special Cable RS-232C Janome Special Cable Windows 98 / 2000 / Me / XP / NT are registred trademarks of Microsoft Corporation.
CARE OF YOUR MACHINE Replacing a Light Bulb WARNING: • Turn the power switch off and disconnect the power supply plug from the outlet before replacing the bulb. • Be careful not to touch the bulb while it is hot. Wait until the lamp has cooled down before touching it. The Memory Craft 10001 is equipped with dual sewing lights. One is located behind the Face Plate and the other is on the underside of the sewing arm. 1 2 To replace the light bulb behind the Face Plate: 3 5 4 Open the Face Plate.
Cleaning the Hook Race and Feed Dog 1 2 Press the Up/Down Needle Button to raise the needle, then unplug the sewing machine. NOTE: • Do not dismantle the machine other than what is explained on this page. 1 2 3 1. Remove the Set Screw on the left hand side of the needle plate with the screwdriver supplied with the machine. Remove the Needle Plate. 2. Take out the bobbin. Lift up the Bobbin Holder and remove it. 3. Clean the Bobbin Holder with a Lint Brush. 4.
Troubleshooting Problem The machine is noisy. The needle thread breaks. The bobbin thread breaks. The needle breaks. Visual Touch Screen is not clear. PC Card does not work. Skipped stitches Cause Reference 1. Threads have been caught in the hook mechanism. 2. The feed dog is packed with lint. See page 173. 1. 2. 3. 4. 5. 6. See page 14. See page 41. See page 18. See page 18. See page 19. See page 123. The needle thread is not threaded properly. The needle thread tension is too tight.
Cause Problem Seam puckering 1. The needle tension is too tight. 2. The needle thread or the bobbin thread is not threaded correctly. 3. The needle is too heavy for the fabric being sewn. 4. The stitch length is too long for the fabric. 5. The presser foot pressure is not adjusted correctly * When sewing extremely lightweight materials place interface underneath the fabric.. 6. The fabric is not pulled tightly enough on the embroidery hoop. Reference See page 41. See pages 13, 14. See page 19.
Problem Reference Cause 1. The correct presser foot is not used. 2. The needle thread tension is too light. 3. The stitch length is not suitable for the fabric being sewn. 4. Feed balancing dial is not properly set. 5. Interfacing is not used for sewing stretch and very fine fabrics. 6. The embroidery hoop Attaching Knob is loose. 7. The carriage is bumping into something around the machine. 8. The fabric is not pulled tightly enough on the embroidery hoop. 9.
177
STITCH CHART ORDINARY SEWING 01 02 03 04 05 06 07 08 09 10 11 12 Block 13 14 15 16 17 18 19 20 21 22 23 24 25 26 27 28 29 30 31 Sensor Auto 32 33 34 35 36 37 38 39 40 41 42 43 44 L.S 45 46 47 48 49 50 51 52 53 54 55 56 57 L.S Script 58 59 60 61 62 63 64 65 66 67 68 69 70 2 3 6 2 3 6 L.S 71 72 73 74 75 76 77 78 79 80 81 82 83 L.S 84 85 86 87 88 89 90 91 92 93 94 95 96 L.S 97 98 99 100 101 102 103 104 105 106 107 108 109 L.S 110 111 112 113 114 115 116 117 118 119 120 121 122 L.
DESIGNS CHART 1 2 3 4 5 6 7 8 9 10 13 14 15 16 11 29 30 31 32 12 33 19 20 17 18 21 22 34 35 36 37 38 39 40 41 42 23 24 46 25 43 26 27 28 3-letters / 2-letters Program border 179 47 44 45
Gothic Bauhaus Script Galant Cheltenham Typist Hollowblock 180