IMPORTANT SAFETY INSTRUCTIONS When using an electrical appliance, basic safety precautions should always be followed, including the following: Read all instructions before using this appliance. DANGER – To reduce the risk of electric shock: 1. An appliance should never be left unattended when plugged in. Always unplug this sewing machine from the electric outlet immediately after using and before cleaning. 2. Always unplug before replacing a sewing machine bulb.
TABLE OF CONTENTS NAME OF PARTS Name of parts ................................................................. 3 Standard Accessories ..................................................... 4 Extension Table ............................................................... 5 Detaching the table ......................................................... 5 Attaching the table .......................................................... 5 Help button .................................................................
TABLE OF CONTENTS PROGRAMMING PATTERNS Pattern combination 1 ................................................... 65 Pattern combination 2 ................................................... 66 Combination for a mirror image ..................................... 67 Pattern elongation ......................................................... 68 Programming a pattern combination with an elongated pattern ........................................................................... 68 Extender stitches ..........
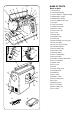
!1 u i !0 o NAME OF PARTS y Name of parts t q Function keys w Liquid crystal display e Screen sharpness adjustment dial r Bobbin winder stopper t Bobbin winder spindle y Hole for additional spool pin u Spool pin i Large spool holder o Thread tension dial !0 Reference chart !1 Foot pressure dial !2 Face cover !3 Thread cutter !4 Needle threader !5 Needle plate !6 Extension table (Accessory box) !7 Hook cover plate !8 Hook cover release button !9 Feed balancing dial @0 Speed control slider @1 Knee lif
Standard Accessories q w q Assorted needles w L: Quilting bar e G: Blind hem foot r F: Satin stitch foot t D: Hemmer foot y C: Overedge foot u E: Zipper foot i A: Zigzag foot (attached to the machine) These accessories can be stored in the compartment under the top cover.
Extension Table The extension table provides an extra surface for sewing bulky materials, and can be removed for free-arm sewing. Detaching the table Pull the table away from the machine as illustrated. Free-arm sewing can be used for: Stitching sleeves, waistbands, pant legs or any tubular garment area, darning socks as well as mending knees, elbows or children’s wear. Attaching the table Push the extension table until it snaps into the machine.
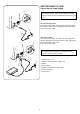
GETTING READY TO SEW Connecting the Power Supply r CAUTION Always turn the power switch off and unplug the sewing machine from the electrical outlet when the machine is not in use. w To use start/stop button Turn off the power switch, then insert the machine plug into the machine and the power supply plug into the wall outlet. Turn on the power switch.
Speed control slider Sewing speed can be varied according to your sewing needs with the speed control slider. q To increase sewing speed, slide it to the right. w To decrease sewing speed, slide it to the left. w q Foot control Sewing speed is varied by the foot control. The harder you press down on the foot control, the faster the machine runs. The machine runs at the maximum speed set by the speed control slider when the foot control is fully depressed.
FUNCTION BUTTONS r e START STOP w q q Start/stop button (A) q Press this button to start or stop the machine. The machine starts running slowly for the first few stitches, it then runs at the speed set by the speed control slider. START STOP NOTE: • Start/stop button cannot be used when the foot control is connected to the machine. • If you start the machine with the presser foot up, the LCD screen will advise you to lower the foot. Lower the foot then restart the machine.
y ui o t !0 !1 !2 !3 t t Screen brightness adjustment dial Use this dial to adjust the brightness of the liquid crystal display. If the screen is not clear, adjust the screen brightness with this dial. y Mode key (see page 11) y When the power switch is turned on, the direct pattern selection (mode 1) is set automatically. Press the mode key to change the mode. u u Monogramming key (see page 11) Press this key to change the monogram font.
!5 !6 !4 !7 !8 !4 Stitch width adjustment key (see page 28, 29, 34) Press “+” or “–” to change the stitch width. !5 Stitch length adjustment key (see page 28, 29, 34) Press “+” or “–” to change the stitch length. 1 2 3 4 5 6 7 8 9 !6 Function touchpad (see page 12) • Direct pattern selection You can select the stitch patterns from q to o directly in mode 1 (direct pattern selection mode).
Mode selection When you switch on the machine, the direct select mode (mode 1) is activated. Press the mode key to change the mode. z y u z Mode 1 Screen indication You can select 10 of the most commonly used patterns directly by pressing the pattern keys. The LCD screen shows the following information: q w e r t q Pattern number and image of the selected stitch. w Recommended setting for needle thread tension. e Recommended presser foot. r Stitch width or needle drop position. t Stitch length.
Pattern Selection z Mode 1 z 1 2 3 4 5 6 7 8 9 Pattern selection and screen indication You can select the stitch patterns below directly by pressing the pattern keys. 0 x Mode 2, 3 and Monogramming To select a pattern, enter the 2-digit number of the desired stitch pattern with the number keys. x 1 2 3 4 5 6 7 8 9 q The LCD screen will show the pattern number, stitch image then the main display for the selected pattern.
CUSTOMIZING MACHINE SETTINGS You can customize the machine settings to your preference. Turn on the power switch w while pressing the memory key q. The machine setting window will appear. q Memory key w Power switch e Machine setting window q w e Resumption setting z The last pattern sewn before turning the power off will be recalled when the power is turned on again. x 1 z Press the key to select Nomal/Resumption setting mode. x Press the edit or help key to select either Normal or Resumption setting.
To drop or raise the feed dog q Drop feed dog lever w To drop the feed dog e To raise the feed dog The drop feed dog lever is located underneath the free arm bed on the back side of the machine. q • To drop the feed dog, push the lever in the direction of the arrow w, as illustrated. w • To raise the feed dog, push the lever in the direction of the arrow e, as illustrated, and turn the handwheel toward you. The feed dog must be up for normal sewing.
Changing the presser foot q Snap-on button (red button) w Groove e Pin CAUTION: Turn off the power switch before changing the foot. Always use the proper foot for the selected pattern. The wrong foot can cause the needle to break. q e • To remove Raise the needle to its highest position by turning the handwheel counterclockwise. Raise the presser foot, and press the red button q on the back of the foot holder.
Changing the needle q Needle clamp screw w Needle clamp z x CAUTION Always make sure to turn the power switch off and disconnect the machine from power supply before changing the needle. q w c z Turn off the power switch. Raise the needle to its highest position by turning the handwheel counterclockwise, and lowering the presser foot. Loosen the needle clamp screw q by turning it counterclockwise. Remove the needle from the needle clamp w.
Thread and Needle Chart WEIGHT FABRIC TYPE of NEEDLE NEEDLE SIZE Very Light Chiffon, Georgette, Fine Lace, Organdy Net, Tulle Universal Ball Point 9 (65) 9 (65) Light Batiste, Voile, Lawn, Pure Silk, Crepe de Chine, Sheer Crepe, Chambray, Handkerchief Linen, Gingham, Challis, Percale, Wool Crepe, Peau de Soie, Taffeta, Satin, Silk Surah, Satin-backed Crepe, Qiana Blue Tipped Needle Universal 11 (75) 11 (75) 12 (80) Single Knits, Jersey, Swimwear, and Tricot Blue Tipped Needle Ball Point 11 (75
Bobbin Winding q • Removing the bobbin q Hook cover plate release button w Hook cover plate e Bobbin Slide the hook cover plate release button q to the right, and remove the cover plate w. w e Lift out the bobbin e from the bobbin holder. w q • Setting the spool of thread q Spool pin w Large spool holder e Small spool holder r Spool stand Lift up the spool pin q. Place a spool of thread on the spool pin with the thread coming off the spool as shown.
Bobbin Winding e x NOTE: Set the speed control slider at its fastest position for bobbin winding. c q w q Upper thread guide (A) w Upper thread guide (B) e Bobbin winding tension disk r Bobbin winder spindle t Bobbin winder stopper r z z Draw the thread from the spool. x Guide the thread around the upper thread guide (A) q, upper thread guide (B) w and bobbin winding tension disk e. c Insert the thread through the hole in the bobbin, threading from the inside to the outside.
Inserting the bobbin z Place the bobbin in the bobbin holder with the thread running off counterclockwise. q Thread w Bobbin holder z q w x Guide the thread into notch (A) on the front of the bobbin holder. x (A) c c Draw the thread to the left, sliding it between the tension spring blades. v v Continue to draw the thread lightly until the thread slips into side notch (B). (B) b e b Pull out about 10 cm (4˝) of thread to the rear. Refer to the threading chart shown on the hook cover plate.
Threading the machine c z Raise the presser foot lifter. x Turn the power switch on. Press the up/down needle position button twice to raise the needle. The threading light will light up. q Threading light b NOTE: If you want to use the handwheel to raise the needle, make sure the threading light is on when threading. Otherwise the machine will not be threaded properly. q z n v m x , c w e c Draw the thread around the upper thread guide (A) w and the upper thread guide (B) e.
Built-in needle threader NOTE: The needle threader can be used with a #11 to #16 needle, or a #11 Blue needle. Thread size 50 to 90 is recommended. z z Raise the presser foot. Raise the needle to its highest position. Push down the needle threader knob q as far as it will go. The hook comes out through the needle eye from behind. q Knob w Hook q w x x Draw the thread around the guide and under the hook w. w c c Release the knob slowly while holding the thread end with your hand.
Drawing up bobbin thread z z Raise the presser foot. Hold the needle thread lightly with your left hand. x x Press the up/down needle position button q twice to lower and raise the needle to pick up the bobbin thread e. q Up/down needle position button w Needle thread e Bobbin thread START STOP q w e c c Pull both threads 4˝ to 6˝ (10 to 15 cm) under and behind the presser foot.
Balancing thread tension • Auto-thread tension When the thread tension dial is set at AUTO for automatic thread tension, the green light will be on. For general sewing, set the tension dial at AUTO, which covers a wide range of sewing conditions. z x z Align the AUTO mark of the thread tension dial with the indication line. x The green light is on. c Dispaly screen shows “AUTO”. c • Balanced thread tension For straight stitch sewing, both needle and bobbin threads will join at the middle of the fabric.
BASIC STITCHES (MODE 1) q w 1 e Straight stitch 2 Machine settings q Pattern: w Presser foot: e Thread tension: 1 or 2 (mode 1) Zigzag foot A AUTO To sew Raise the presser foot and position the fabric next to a seam guide line on the needle plate. Lower the needle to the point where you wish to start. Pull the needle and bobbin threads toward the rear. Lower the presser foot. Depress the foot control to start sewing. Gently guide the fabric along the seam guide line letting the fabric feed naturally.
Using the seam guides on the needle plate q Needle drop position w Edge of fabric e Needle plate guide lines q w The seam guides on the needle plate are engraved to help you measure seam width. The number on the needle plate indicates the distance between the center needle position and the edge of the fabric. The lines are 1/8˝ (0.3 cm) apart, and engraved at 3/8˝, 4/8˝, 5/8˝ and 6/8˝. The lines in millimeters are 5 mm apart, and are engraved at 10 mm, 15 mm and 20 mm.
Help button Pressing this button will show alternative applications of the selected pattern when patterns 0, 1, 8, 9 (mode 1) or 11, 12, 13, 14, 15, 27, 32 (mode 2) have been selected. Example: When pattern 1 has been selected. Each time you press the help key, the LCD screen will show as follows: z The zigzag foot and quilting bar for quilting will be shown. z x x The rolled hem foot for a rolled hem will be shown. c c The zipper foot for zipper sewing will be shown.
Adjusting the needle drop position The needle drop position can be altered by pressing the stitch width adjustment button. 3.5 0.0 Press the right side of the button (+ sign) to move the needle bar to the right. 7.0 Press the left side of the button (– sign) to move the needle bar to the left. Adjusting the stitch length The stitch length can be altered by pressing the stitch length adjustment button. The stitch length indication will change as the button is pressed. 1.0 5.
To customize the preset values for the stitch length and width The stitch patterns in the direct mode (mode 1), and for buttonholes, eyelets, darnning, bartacks and basting have their own original settings for the stitch length and stitch width. These original settings are called preset values. You can modify and save these preset value so that you do not have to change the setting each time you turn the power switch on.
Basting q w Machine settings q Pattern: 7 (mode 1) w Presser foot: Darning foot P e Thread tension: 1-3 e 7 * Feed dog: Dropped The basting stitch is used to hold fabric layers together during fitting. Attaching the darning foot P Loosen the thumbscrew and remove the foot holder. Attach the darning foot P to the presser bar putting the pin on the needle clamp screw. Tighten the thumbscrew firmly with the screwdriver. w q Thumbscrew w Pin e Needle clamp screw e q To sew: Lower the feed dog.
Lock-a-Matic stitch q w e Machine settings q Pattern: 3 (mode 1) w Presser foot: Zigzag foot A e Thread tension: AUTO 3 Use it to reinforce areas such as crotch and armhole seams, as well as when constructing items such as backpacks for extra strength. When you reach the end of the seam, press the reverse stitch button once. The machine will sew four reverse stitches, four forward stitches, and then stop sewing automatically.
q w Locking stitch e Machine settings q Pattern: 4 (mode 1) w Presser foot: Zigzag foot A e Thread tension: AUTO 4 This unique stitch is used where an invisible locking stitch is needed. Lower the needle close to the front edge of the fabric. The machine will sew several locking stitches in place and continue sewing forward. When you press the reverse stitch button at the end of the seam, the machine will sew several locking stitches in place, then stop sewing automatically.
q w Decorative stitch e Machine settings q Pattern: 56 (mode 2) w Presser foot: Satin stitch foot F e Thread tension: AUTO * Stitch pattern 58 (mode 2) can also be used. Use this stitch for quilting or decorative stitching. 56 q w French knot e Machine settings q Pattern: 54 (mode 2) w Presser foot: Satin stitch foot e Thread tension: 5–8 54 Programming French knots Example: Combination of patterns 54 and 50 z Select stitch pattern 54 (mode 2). z 5 4 x Press the memory key.
q w 8 Zigzag stitch e Machine settings q Pattern: w Presser foot: e Thread tension: 8 (mode 1) Zigzag foot A AUTO Zigzag stitch is used for various sewing needs including overcasting. It can be used on most woven fabrics. A dense zigzag stitch can also be used for appliqué. Adjusting the stitch width 2.0 7.0 Press the right side of the button (+ sign) to increase the stitch width. Press the left side of the button (– sign) to decrease the stitch width.
q Types of Overcasting Stitches w e 8 Overcasting with zigzag stitch Machine settings q Pattern: w Presser foot: e Thread tension: 8 (mode 1) Overedge foot C AUTO Place the fabric edge next to the guide of the foot and then sew. q Edge of Fabrics w Guide e Wires on Foot e CAUTION: When you use the overedge foot C, you must set the zigzag width at 5.0 or wider to prevent the needle from hitting the wires on the foot.
q Knit stitch w e 11 Machine settings q Pattern: w Presser foot: e Thread tension: 11 (mode 2) Zigzag foot A AUTO This stitch is recommended for sewing such fabrics as synthetic knits and stretch velour, as it provides the greatest amount of elasticity and strength. Sew along the fabric edge leaving an adequate seam allowance. After sewing, trim the seam allowance close to the stitches.
q Button sewing w Machine settings q Pattern: 27 (mode 2) w Presser foot: Button sewing foot T e Thread tension: AUTO * Lower the feed dog (see page 14) e Attaching the button sewing foot T Insert the rear pin on the foot into the groove of the foot holder. Gently lower the presser foot lifter while holding the foot with your fingers. w q q Rear pin w Groove of the foot holder.
Variations of Buttonholes Square Buttonhole 17 This square buttonhole is widely used on medium to heavy weight fabrics. The buttonhole size is automatically determined by placing a button in the foot. Round-end Buttonhole This buttonhole is used on fine to medium weight fabrics especially for blouses and children’s clothes. 18 Fine Fabric Buttonhole This buttonhole is rounded at both ends and is used on fine, delicate fabrics such as fine silk.
q Square buttonhole w Machine settings q Pattern: 17 (Mode 2) w Presser foot: Automatic buttonhole foot R e Thread tension: 1–5 e 17 NOTE: The size of the buttonhole is automatically set by placing a button in the rear of automatic buttonhole foot R. The button holder of the foot takes a button size of 0.5 cm (3/16˝) to 2.5 cm (1˝) in diameter. It is sometimes necessary to change buttonhole size to match certain heavy or specific fabrics and threads.
c Pull the buttonhole lever down as far as it will go. q Buttonhole lever c q NOTE: If you start sewing without pulling down the buttonhole lever, the LCD screen will show a warning and the machine will stop after a few stitches. Pull the buttonhole lever down and restart the machine. v Insert the corner of the fabric under the foot. Press the up/down needle button twice. Remove the fabric to the left to draw the needle thread through the hole of the foot.
b b Start the machine to sew the buttonhole. The buttonhole will be automatically sewn. n n When buttonhole sewing is finished, push the buttonhole lever upward as far as it will go. m o m Remove the fabric and place a pin just below the bartack at each end to prevent accidentally cutting stitches. Cut the opening with the seam ripper.
Double layer buttonhole To make a solid and sturdy buttonhole, sew another layer of buttonhole over the previous stitches. After the buttonhole is finished, simply start the machine again. Do not raise the foot or buttonhole lever.
Adjusting buttonhole width Press the stitch width adjustment key and the adjustment window opens. Press on “+“ to increase the buttonhole width. Press on “–“ to decrease the buttonhole width. q Stitch width adjustment key w Narrower buttonhole e Wider buttonhole q w e Adjusting stitch density Press the stitch length adjustment key, the adjustment window opens. Press on “+” to make the buttonhole stitch coarser. Press on “–“ to make the buttonhole stitch denser.
q Round-end buttonholes (#18) w e 18 Machine settings q Pattern: 18 (mode 2) w Presser foot: Automatic buttonhole foot R e Thread tension: AUTO * The sewing procedue is same as buttonhole #17 (see pages 39 to 41).
q Knit buttonhole (#24) w Machine settings q Pattern: 24 (mode 2) w Presser foot: Automatic buttonhole foot R e Thread tension: AUTO 24 e z Sew the left row. z x Sew the front bartack. x c Sew the rear bartack and right row. The machine will automatically stop when buttonhole sewing is finished. c NOTE: If the last few stitches of the right row extend beyond the bartack, make the stitch length shorter to correct it.
Welted buttonhole q w Machine settings q Pattern: 26 (mode 2) w Presser foot: Automatic buttonhole foot R e Thread tension: AUTO 26 e A welted buttonhole is made by stitching a strip or patch of fabric to the buttonhole. Welted buttonholes are particularly suited to tailored garments, but are not recommended for sheer or delicate fabrics where the patch might show through or add bulk. q w z Baste a patch to the garment fabric with the right sides together.
b Fold back each side of the patch to form buttonhole lips. q Wrong side of patch w Right side of garment fabric e Right side of patch e b q w n Press both folds with an iron. e Right side of patch r Wrong side of garment fabric n e r m Baste both edges of the seam with a needle and thread as shown. w Right side of garment fabric m w , Fold over the length of the garment fabric, sew back and forth beside the original seam to secure flaps of the patch.
⁄1 ⁄1 The patch should be cut 1 to 1.5 cm (7/16˝ – 10/16˝) away from the hole. The corners should be cut rounded off as shown. e Right side of patch r Wrong side of garment fabric r e ⁄2 t ⁄2 Place the facing on the wrong side of the garment fabric. Mark the 4 corners with pins as shown. t Facing y Garment fabric y t ⁄3 Turn all the layers over and cut the buttonhole opening on the facing in the same way as step c. Four marker pins show you the corner points on the facing.
q w Eyelet e Machine settings q Pattern: w Presser foot: e Thread tension: 30 30 (mode 2) Satin stitch foot F AUTO The eyelet is used for belt holes etc. To sew Depress the foot control to sew. The machine will sew an eyelet and stop automatically when completed. Open the eyelet with an awl, punch or pointed scissors. Adjusting the shape of an eyelet Correct the shape of the eyelet as follows: If the eyelet gap opens, press “–“ on the stitch length adjustment button.
q w Zipper sewing e Machine settings q Pattern: w Presser foot: e Thread tension: 1 To sew on the left side of the zipper, attach the foot holder to the right pin on the zipper foot. To sew on the right side of the zipper, attach the foot holder to the left pin on the zipper foot. q Groove w Pin e To sew left side r To sew right side r e 1 (Mode 1) Zipper foot E AUTO q w z t i u w y Fabric preparation z Add 1 cm (3/8˝) to the zipper size. This is the overall opening size.
To sew c Fold back the left seam allowance. Turn the right seam allowance under to form a 0.2 to 0.3 cm (1/8˝) fold. Place the zipper teeth next to the fold and pin it in place. Set the stitch length and thread tension back to the original setting. q Lower fabric w 0.2 to 0.3 cm (1/8˝) fold e End of the opening r Opening size c q e w r v v Attach zipper foot E with the pin on the right hand side.
n Close the zipper q and spread the fabric open flat with the right side facing up. Baste the opened fabric and zipper tape e together. q Zipper w Basting stitches e Zipper tape r Wrong side of fabric t Right side of fabric n q r w t e m Re-attach the zipper foot E with the left pin. Backstitch across the end of opening to 0.7 – 1 cm (3/8˝). Stitch through the garment and zipper tape, guiding the zipper teeth along the bottom edge on the foot. Stop about 5 cm (2˝) from the top of the zipper.
q Darning w Machine settings q Pattern: w Presser foot: e Thread tension: 28 e 28 (mode 2) Automatic buttonhole foot R AUTO z Pull the button holder to the rear as far as it will go. q Button holder x Place the garment under the foot. Press the up/down needle position button twice. Remove the fabric to the left to draw both threads under the foot and place the fabric back under the foot. c Lower the needle at the starting point, then lower the foot.
To sew a shorter darning To sew a darning shorter than 2 cm (3/4˝), first stop the machine after sewing the required length, then press the reverse button. The required length has been determined. q Restart the machine and continue sewing until the machine stops automatically. q Required length w Starting point e Reverse stitch button w To sew the same size darning Simply restart the machine to sew another darning at the same size.
q Tacking e w Machine settings q Pattern: w Thread tension: e Presser foot: 29 29 (mode 2) Satin stitch foot F 3–6 Tacking is used to reinforce pockets, crotches and belt carriers where extra strength is needed. To sew Depress the foot control until the machine stops automatically. The machine will sew a tacking 1.5 cm (9/16˝) long automatically. q 1.5 cm (9/16 ˝) q e To sew a shorter tack To sew a tack shorter than 1.
q Blind hem e w Machine settings q Pattern: 14 (mode 2) w Presser foot: Blind hem foot G e Thread tension: AUTO 14 Select pattern 14 for woven fabrics or pattern 15 for elastic fabrics. NOTE: The stitch width of the patterns 14 and 15 cannot be changed, but the needle drop position will move. q How to fold the fabric Fold the fabric to make a hem as shown. q Heavy fabric w Fine to medium fabric e 0.4–0.
q e w DECORATIVE STITCHES Pintucking Machine settings q Pattern: 2 (mode 1) w Presser foot: Blind hem foot G e Thread tension: AUTO 2 Fold a fabric with the right side together. Place the folded fabric under the blind hem foot. Align the edge of the fold with the guide on the foot, and lower the foot. Sew while guiding the edge of the fold along the guide. Open the fabric and press the tuck to one side.
Shell tuck q e w Machine settings q Pattern: w Presser foot: e Thread tension: 16 16 (mode 2) Satin stitch foot F 6–8 Use a light weight fabric (tricot, for example). Fold the fabric as shown and stitch on the fold. Allow the needle to just clear the folded edge to create a shelled edge. You may need to increase the needle thread tension slightly. If you sew rows of shell stitches, space the rows at least 5/8˝ (1.5 cm) apart.
q w Smocking e Machine settings q Pattern: w Presser foot: e Thread tension: 87 87 (mode 2) Satin stitch foot F AUTO Smocking is a delicate decorative treatment used on children’s clothes or women’s blouses. Choose a soft and lightweight fabric such as batiste, gingham or challis. Cut the fabric three times wider than the projected width. Set stitch length at “4” and sew rows of straight stitches 3/8˝ (1.0 cm) apart across the area to be smocked. Knot the threads along one edge.
q w Scallop (A) e Machine settings q Pattern: w Presser foot: e Thread tension: 75 75 (mode 2) Zigzag foot A AUTO Fold the fabric with right sides together. Sew scallops 3/ 8˝ (1 cm) from folded edge. Trim close to stitching leaving 1/8˝ (0.3 cm) seam allowance. Clip seams as shown or trim with pinking shears. Turn the scallops out to right side and press.
q Patchwork e w Machine settings q Pattern: w Presser foot: e Thread tension: 77 77, 78 (mode 2) or 88–91 (mode 3) Satin stitch foot F AUTO Sew the fabrics right sides together with straight stitch 01. Press seam allowance open. Sew pattern stitch 77 on right side of garment centering over the seam line.
q e w Rolled hem Machine settings q Pattern: w Presser foot: e Thread tension: 1 1 (mode 1) Hemmer foot D AUTO To sew: Fold the edge of the fabric twice, 6 cm (2 3/8˝) in length and 0.3 cm (1/8˝) in width. Trim the corner 0.5 cm (3/16˝) by 0.8 cm (1/4˝) for easier insertion of the hem into the foot. 0.5 cm 0.8 cm Position the fabric aligning the edge of hem with the guide on the foot. Lower the foot and sew 1–2 cm (1/2˝ – 1˝) while pulling both threads to the back.
q w Cross stitch e Machine settings q Pattern: w Presser foot: e Thread tension: 60 60 to 70 (mode 3) Satin foot F AUTO You’ll love the beautiful designs you can make with this craft stitch pattern, and in half the time it would take if embroidered by hand. Cross stitches can be effectively combined with other craft patterns to produce attractive samplers and for other sewing projects. A plain close weave such as linen or wool flannel makes the best background fabric.
Twin needle sewing q Machine settings q Pattern: 26 (example) w Presser foot: Satin stitch foot F e Thread tension: AUTO e w 26 q NOTES: * When you sew patterns with the twin needle, press the twin needle button and test the stitches first before you begin to sew. * Use the zigzag foot A or satin stitch foot F for twin needle sewing. * Turn off the machine before changing the needle. * Use #60 or finer threads for twin needle sewing. w Use the additional spool pin and spool stand.
q Pattern combination 1 w Example: Programming patterns 33 and 35 Machine settings q Presser foot: Satin stitch foot w Thread tension: AUTO z Selet pattern 33 (mode 2). z 3 3 x Press the memory key. q Mode w Pattern number e The number of programmed patterns x q w e c Select the pattern 35 (mode 2). c 3 5 v Press the memory key. Start to sew. If you press the auto-lock button while sewing a pattern, the machine will stop automatically after the current pattern is completed.
Pattern combination 2 q w Example: Programming patterns 33, 35 and 39 Machine settings q Presser foot: Satin stitch foot w Thread tension: AUTO z Select pattern 33 in mode 2. z 3 3 x Press the memory key. x c Select pattern 35. c 3 5 v v Press the memory key. b b Select pattern 98 in mode 3 (locking stitch). * The machine cannot memorize any stitch patterns after the locking stitch has been memorized. 9 8 n Press the memory key. Start sewing.
q Combinations for a mirror image w Example: Programming pattern 41 and its mirror image Machine settings q Presser foot: Satin stitch foot F w Thread tension: AUTO z Select pattern 41 in mode 2. z 1 4 x Press the memory key. c Press the turnover memory key. x v Start sewing. c Sewing a pattern combination from the beginning z If you have to stop sewing a pattern combination and wish to sew it over again, press the memory button to sew the pattern combination from the beginning.
q w Pattern Elongation e Machine settings q Stitch pattern w Presser foot: e Thread tension: 33 33 (mode 2) Satin stitch foot F AUTO Patterns number 31–47 (mode 2) can be elongated. 31 32 33 34 35 36 37 38 39 40 41 42 43 44 45 46 47 Example: Pattern 33 Select pattern 33 (mode 2). X1 X2 X3 X4 Press the elongation key to change the elongation ratio. Elongation ratio is indicated in multiples of the original pattern length. X5 Start to sew.
q w 2 Extender stitches e Machine settings q Stitch pattern 51 51 (mode 2) 2 * The stitches 49 w Presser foot: e Thread tension: The number of the extender stitches 3 50 3 1 can also be used. 53 52 Zigzag foot A or Satin stitch foot F AUTO The extender stitch is used to insert straight stitches between stitch patterns. Example: Inserting 2 counts of the straight stitch after pattern 41 z 4 1 z Select pattern 41(mode 2). x x Press the memory key.
q w Free-motion quilting e Machine Settings q Pattern: w Presser foot: e Thread tension: Feed dog: 1 1 (mode 1) Darning foot P Auto Dropped Attach the darning/embroidery foot P (refer to page 30 for how to attach it). Baste or pin the quilt layers. Draw a quilt design on the top fabric with a washable marker. Move the quilt layers slowly and evenly while stitching on the marked design.
Editing program Uniform stitch adjustment (Modes 2 and 3 only) The stitch width and length of the programmed stitch patterns can be uniformly altered. Example 1: To alter the stitch width of the programmed pattern 27 and its mirror image in mode 3. q e z Shift the cursor to the right of the last programmed pattern q. w x Press the stitch width adjustment button to alter the stitch width w.
Combining satin and decorative stitches Example: combination of patterns 41 and 27 z z Press the stitch width adjustment key. x x The stitch width will be applied to all memorized patterns. c Start sewing. * You cannot adjust the stitch length setting when you combine satin stitches and decorative stitches.
Custom stitch adjustment (Mode 2 and 3 only) The stitch width and length can be individually altered for each pattern in the programmed combination. Example: To alter the stitch width and length of a single pattern in the combination z Press the edit key to shift the cursor under the pattern you wish to alter. z x x Press the stitch width adjustment key to reduce the width to “5.0”. * The stitch length of the pictorial patterns will proportionally change by pressing the stitch width adjustment key.
Programming a monogram (1) Example: To program “Sun” in Block font. z z Press the monogramming key to select Block font. x x Select the uppercase letter “S” (pattern 29). 2 9 c c Press the memory key. The uppercase letter “S” will be memorized. v v Select the lowercase letter “u” (pattern 57). 5 7 b b Press the memory key. n n Select the lowercase letter “n” (pattern 50). 5 0 m m Press the memory key. * Use a Janome blue needle when sewing monograms.
Programming a monogram (2) z Example: To program “A_B” in the Script font. (with a space between letters) z Press the monogramming key to select the Script font. x x Press the memory key. The uppercase letter “A” will be memorized. c Select the space ( ) (pattern 67). c 6 7 v Press the memory key. v b Select the letter “B” (pattern 12). b 1 2 n Press the memory key.
Reducing the size of a monogram Press the turnover memory key. The selected letter will be decreased to 2/3 of its original size. z z Press the monogramming key. Select Broadway style x x Press the memory key. c 6 c Select “&” (pattern 64). 4 v Press turnover memory key. The selected letter will be decreased to its 2/3 size. v b b Select upper case letter “B” (pattern 12). 1 2 n Press the memory key.
Viewing a long text z The LCD screen only shows 8 characters of a monogram at a time. If the entire text is not displayed, press the edit key or help key to scroll the text. x x Pressing the edit key shifts the cursor and scrolls the text to the left. q ○ ○ ○ z c Pressing the help key shifts the cursor and scrolls the text to the right. c NOTE: Arrows under a charratcter indicate that there are remaining characters in that direction.
Inserting a letter (character) Example: To insert a space between “B” and “C” in “ABCD” z z Press the edit key to shift the cursor under letter ”C”. x Select the space ( ) pattern 67. x 6 7 c Press the memory button and a space will be inserted before letter “C”. c NOTE: The program can be edited when the LED signal lights up. Duplicating a pattern z z Press stitch patterns 41 and 43. x x Press the edit key to shift the cursor under stitch pattern 41.
To store and call stitch pattern combinations It is possible to retain a pattern combination for future use even if the machine is turned off. Simply save the pattern combination in one of the five memory addresses. A combination of up to 50 patterns can be saved in each memory address. NOTE: Stock/call function is not available in mode 1. z To stock memory z Program the desired pattern combination. x x Press the stock/call key. c Press the memory key to store the stitch pattern combination.
Recalling a stored combination Select mode 2, 3 or monogramming. z z Press the stock/call key to select the desired memory address.. x x Press the turnover memory key to recall the stored combination. Deleting a stored combination z z Press the stock/call key to select the desired memory address. x x Press the clear key to delete the stored combination.
Correcting distorted stitch patterns The sewing results of the stretch patterns may vary depending upon the sewing conditions, such as sewing speed, type of the fabric, number of layers etc. Always test sew on a scrap piece of the fabric that you wish to use. If stretch patterns, letters or numbers are distorted, correct it with the feed balancing dial.
CARE AND MAINTENANCE Cleaning the hook race and feed dog z q WARNING: Turn the power switch off and unplug the machine before cleaning. e NOTE: Do not dismantle the machine in any way other than what is explained in this section. z Remove the needle and presser foot. Remove the setscrews and remove the needle plate. w x x Take out the bobbin. Lift up the bobbin holder and remove it. r c c Clean the bobbin holder with a lint brush and soft dry cloth.
Replacing the light bulb WARNING: Turn the power off before replacing the light bulb. The bulb could be HOT, wait until it has cooled down before touching it. To remove: Remove the cap q. Remove the setscrew w. Remove the face cover e. Pull out the bulb t from the lamp socket r. To replace: Insert a new bulb into the opening of the socket. Attach the faceplate with the setscrew and cap. q Cap w Setscrew e Face cover r Lamp socket t Light bulb q w e Replace the bulb with the same type, rated 12 V, 5 W.
Warning Messages If a buzzer sounds and the LCD screen shows one of these messages, follow the guidance below. Message Problem/Cause Try this • The machine is started with the presser foot up. • The machine will stop if the presser foot is raised while sewing. Lower the presser foot and restart the machine. • The machine will stop after several stitches if the buttonhole is sewn without lowering the buttonhole lever. Lower the buttonhole lever and restart the machine.
Message Try this The foot control is disconnected while sewing. Turn OFF the power and connect the foot control. • The start/stop button is pressed after the foot control has been connected. Disconnect the foot control and restart the machine. • Power switch is turned on while depressing the foot control. Release the foot control. • The machine is started soon after it has halted due to overloading. • Bobbin winder spindle locks during bobbin winding. Wait for at least 15 seconds to restart.
Troubleshooting Condition Cause Reference 1. The needle thread is not threaded properly. 2. The needle thread tension is too tight. 3. The needle is bent or blunt. 4. The needle is incorrectly inserted. 5. The needle thread and the bobbin thread are not set under the presser foot when starting sewing. 6. The threads are not drawn to the rear after sewing. 7. The thread is either too heavy or too fine for the needle. See page 21 See page 24 See page 16 See page 16 1.