
User Manual


- 59 -
3.6 External output methods
This product is equipped with functions for printing the screen to a special printer (option) and a
function for saving scan data to a CF memory. The following explains how to use the functions:
3.6.1 Printer output
(1) Setting of an output destination
Press the 4 SET key on the scan screen, and set printer (I) to the ouput setting on the
parameter setting screen.
(2) Installation of the printer
Set up the printer so that the IrDA optical receiver faces the IrDA optical receiver on the front of
this product at a distance of between 50 and 500 mm. Note that if there is an obstacle
between this product and printer or the printer is not installed at an angle of ±15 degrees,
the printer is unable to operate.
(3) Printing
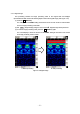
Pressing the 13 OUTPUT key enables printing to the printer. Data in the range from 0 m (0
s) up to the currently displayed screen contents will be printed. During output to the printer, "Date,
Data No." as well as the message "Under printing" will be displayed on the LCD screen.
• The printer has a software DIP switch which allows to select one of communication modes:
BHT-IR, Serial, and IrDA. It is set to Serial at the factory shipment. Therefore change the
setting from Serial to IrDA before starting to use. Otherwise the printer at the setting Serial
does not work with the NJJ-105. For the procedure to change the setting, refer to the attached
document Note: Operation of Handy Search NJJ-105 Option Printer DPU-S445. (The
setting of DIP switch is kept after turning off the printer.)
• The printer DPU-S445 is a dedicated printer only to the NJJ-105. Don’t use the printer for
other products (NJJ-95 series). If this printer is applied to other products, the software DIP
switch setting is changed, then after that the printer doesn’t work for the NJJ-105. If this
situation happened, change the DIP switch setting to IrDA in accordance with the document
Note: Operation of Handy Search NJJ-105 Option Printer DPU-S445.
Notes