MOTION-ACTIVATED LED Security Light User Manual www.jascoproducts.
Thank you for purchasing the GE LED Security Light with Motion Activation control. This economical, energy efficient LED light has been designed to allow easy installation, flexible mounting options and provide exceptional light output with minimum power consumption. Please read all the Instructions carefully. Keep them for future reference.
Questions? Problems? Missing Parts? If you have any questions regarding the installation or operation of the product, Before returning to Retailer, please contact Technical Support at 1-800-654-8483,option 4. WARNING: Turn power off at circuit breaker or fuse box. Do Not rely on a wall switch alone to turn off power. Consult a local licensed electrician or electrical contractor if you are not sure about the installation.
INSTALLATION Select an existing light fixture, either wall or eave mount for replacement. Note: The fixture must be connected to 120v, 60Hz power source. MOUNTING PREPARATION FOR THE LED LIGHT FIXTURE Note: For maximum flexibility, the LED Security Light can be mounted on a wall (vertical) or under the eave (horizontal).
Locate the adjustment knob and lock nut on the LED fixture. Loosen both and position LED light housings into the approximate position prior to mounting. For wall mount, the LED light housings should be positioned above the motion sensor. For under eave mount, position cover housing horizontally so that LED light housings are facing outward, away from the wall and motion sensor is positioned in front of LED light housings.
4. Locate black, white and ground wires coming from LED light fixture. Strip wires 3/8” (9.5mm) if not previously stripped. Hold BLACK house wire and BLACK fixture wire together with ends even. Align any frayed strands or conductors. Push wires into wire nut and screw ClockWise until two twists are visible in the wires. Repeat above procedure for both the WHITE house wire and the WHITE fixture wire. Repeat above procedure for both the GREEN or BARE COPPER house wire and the BARE COPPER fixture wire.
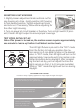
ADJUSTING LIGHT HOUSINGS Adjustment Knob 1. Slightly loosen adjustment knob and lock nut for one housing at a time. Gently position LED housing to final desired position. Tighten adjustment knob and lock nut. If necessary, follow same adjusting for the other Light Housing. 2. Turn on power at circuit breaker or fuse box. Turn on light switch (if present). Check LED light output to ensure proper coverage.
MOTION SENSOR POSITION SET-UP Note: The motion detection range has been set to a maximum sensitivity, up to 60ft. This is the optimum, reliable distance. At longer distances, there is a greater tendency for ‘false activations’. Maximum sensitivity distance will vary based on outside conditions (temperature, weather), mounting location and detection angle. 1. Ensure power is turned on to the LED Light fixture. 2.
Important Note: (1) Do not point motion sensor toward bright lights or reflective surfaces as this will affect accuracy of the motion sensor. (2) Avoid areas with heavy traffic or pet areas as this may trigger lights consistently. (3) Avoid pointing sensor directly towards severe temperature surfaces such as heating vents, air conditioners, driveway or asphalt surfaces, large light-colored objects that reflect heat, or other light sources.
DUSK/DAWN LIGHT LEVEL ACTIVATION SETTING Time The LED light fixture has an adjustable light level activation setting labeled ‘Dark’. This adjustment allows you to determineTEST when the LED lights will turn on based upon the darkness level outside. In some situations, depending upon on where the fixture is located, you may wish to have the LED lights turn on sooner (example-the LED light fixture is positioned in a shaded area). Or you may wish MAX to have the LED lights turn on when it is darker outside.
LED LIGHT-ON TIME SETTING Dark Dark Time Time The LED light fixture has an adjustable time setting that determines the length of time the LED lights will TEST TEST remain on after motion is detected. You can adjust the light-on time from 1 minute to 10 minutes. Adjust the ‘Time’ setting from ‘Test’ position from 1 to10 minutes as desired. Note: In the ‘TEST’ setting, MAX MAX MAX MAX the lights will turn on for 5 seconds after motion is approx. 1 mm approx.
FCC Statement This device complies with Part 15 of the FCC rules. Operation is subject to the following two conditions: (1) this device may not cause harmful interference, and (2) this device must accept any interference received, including interference that may cause undesired operation. FCC Note: The manufacturer is not responsible for any radio or TV interference caused by unauthorized modifications to the equipment. Such modifications could void the user’s authority to operate the equipment.