For correct usage please read these instructions carefully and keep in a safe place for future reference! CONTENTS Safety Precautions .................................................. 1 Package Contents .................................................. 2 Description of Parts ................................................ 3 Loading Slides ........................................................ 4 Loading Negatives .................................................. 5 General Operations .................
1. Safety Precautions Please read these notes carefully before initial use. General Notes: Do not place the device on an unstable surface. If it falls it may cause personal injury. Follow the safety and operating instructions for the other devices to be connected to your film scanner. Do not overload your PC with USB connections.
Ambient Conditions: Set the scanner up so that the ventilation openings are not obstructed. For example do not place it on a bed, sofa, carpet, or similar surfaces. Do not place the device close to heat sources such as radiators or ovens. And do not subject the device to high temperatures or severe temperature fluctuations. Protect it against solar radiation. Avoid severe stress, vibration and strong impact. Do not drop or shake the device. It can also be damaged by strong pressure on the LCD display.
Start of Operation: To ensure proper operation please read all the operating instructions and the notes on safety carefully! Power Connection: Connect the device using the supplied USB cable and the power adapter. Insert the plug of the power adapter into a power outlet. USB Connection: Use the USB cable to connect the device to your PC. Battery Operation: Insert 4 alkaline batteries (Type AAA) into the device.
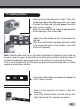
2. Package Contents Film Scanner USB Cable Negative Film Holder Positive Slide Holder AC/DC Adapter User’s Manual Cleaning Brush NOTE: You can use the provided brush to clean the backlight panel. Place the film scanner on the side and insert the end of the brush into the door on the right side. Clean the backlight panel placed in the film scanner.
3.
4. Loading Slides Hold up the slide toward the light. Face the trademark side of the slide away from you. Look through the slide and it should appear normally (not a mirror image). Now turn the slide so the image is upside down while looking at the same side. Open the slide holder at the marked spot on the top. With the slide holder laid open place the slide into recessed area in the holder- the slide should fit perfectly. Note: Handle slides with care.
5. Loading Negatives Hold up the negative toward the light. As you look through the negative you should be able to read the small negative numbers normally (not a mirror image). Now turn the negative so the image is upside down while looking at the same side. Open the negative holder at the marked spot on the top. With the negative holder laid open place the negative into holder so the notches line up with the notches on the holder. Note: Handle negatives with care.
6. General Operations Quick Start 1. Put Slide/Negative onto the Slide/Negative Holder. 2. Insert the Slide/Negative Holder into the slot on the right of the film scanner. 3. Apply the power to the film scanner by three ways: (1) USB: Connect the film scanner to PC with USB cable. (2) 4 x AAA alkaline batteries: Put alkaline batteries into the device (The film scanner can work for about 90 minutes). (3) 5V adapter: Connect the adapter to the device with USB cable. 4.
Home: No Memory Card No memory card indicator If there is no memory card been inserted to device, a warning icon will be shown on screen when enter main menu. 1. Capture Capture After welcome page, above menu will remain for 5 seconds. User can press LEFT/RIGHT button for desired menu, or system will auto enter Capture mode if there is no action during this 5 seconds period. 1.
Mirror Press LEFT/MIRROR button to change image left to right Flip Press RIGHT/FLIP button to upside down image 1.
Once enter capture mode, there will be an indicator on left top corner to indicate it is in live view mode. When the film holder is inserted into the slot, the image always shows the positive image according to preview defined film type (after power on, the film type is default to negative film). Reconfirm the film position through the display before press SCAN button.
Once press SCAN button in live view, the edit menu will be appeared. When user press ENTER button, the current image will be saved to internal memory or memory card when there is a memory card inserted, the display will return to live view again. 1.5 Capture: Save Save Once user press SCAN button, preview (live view) image will be selected and shown on the TFT which will take between 1~2 second with 2 icons shown on the left side of the screen.
1.7 Capture: Home ENTER Select Home icon with LEFT/RIGHT button, then press ENTER button or press SCAN button anytime to back to main menu. 1.8 Exit from Edit Mode Back to Capture Mode (Live View) Next image in Film Holder Once user press ENTER button for save or cancel option, the display will return to capture mode/live view. Then user can move the film holder to next target film to capture.
1.9 Memory Full Once internal memory or memory card is full, a memory full icon will be shown on screen when press SCAN button. User has to download the images to PC or replace another memory card for continue capture. Memory full indicator 2. Playback Playback Press LEFT/RIGHT button to playback mode when power on the device or access the main menu by Home icon/SCAN button anytime. Press ENTER button to confirm the selection.
2.1 Playback: Auto Slide Show Slide show mode Once user enter playback mode (default to slide show), TFT will auto display all images stored in internal memory or memory card with 2 seconds interval from previous captured image. User can also stop the slide show by press ENTER button (Only the images captured by the film scanner are available in playback mode). 2.
2.3 Playback: Slide Show Single Picture Edit Mode User can interrupt (stop) slide show mode to stand alone playback mode (single picture playback) by press ENTER button. (Pause slide show) Then user is able to scroll each picture by LEFT/RIGHT button. Once user select the picture stored in internal memory or memory card which intended to be modified, press ENTER button again to bring out the edit mode for modification.
2.4 Playback: Rotate/Save ENTER If user wants to rotate +90 degrees by ENTER button, the image will be rotated +90 degrees and cursor will remain at Save. Press ENTER button again to save modified result and next picture will be shown. For continuously rotate +90 degrees, move cursor to rotate again and press ENTER button. (Same for Rotate -90 function). 2.
2.6 Playback: Delete ENTER Select delete icon with LEFT/RIGHT button then press ENTER button, that will delete the present selected picture and next picture will be shown. Cursor will remain at Exit icon. If user intend to process continuously delete, just move cursor to delete icon again and press ENTER button to confirm. 2.7 Playback: Home ENTER Select Home icon with LEFT/RIGHT button, then press ENTER button or press SCAN button anytime to back to main menu.
2.8 Playback: No Picture ENTER If there is no picture when enter playback mode, a No picture symbol will show on screen. 3. Film Type Film Type Change film type definition by enter Film Type menu when power on the device or access the main menu by Home icon/SCAN button anytime. Press LEFT/RIGHT button for Film Type and press ENTER button to confirm.
3.1 Film Type: Select Film Type Negatives Film: Select Negatives film when load color negative film in holder Slides: Select Slides when load slide in holder B&W: Select B&W when load B&W negative film in holder User can press LEFT/RIGHT button to select film type, then press ENTER button to confirm. 4. Resolution Change resolution definition by enter resolution menu when power on the device or access the main menu by Home icon/SCAN button anytime.
5. Language Change language definition by enter language menu when power on the device or access the main menu by Home icon/SCAN button anytime. Press LEFT/RIGHT button for language and press ENTER button to confirm. 5.1 Select Language User can press LEFT/RIGHT button to select language, then press ENTER button to confirm and back to main menu.
6. USB Mode After finishing capture, please take out the memory card from the film scanner to download the stored images from memory card. When the device is connected with USB cable to PC, please press SCAN button to main menu, then press LEFT/RIGHT button to select USB mode, then press ENTER button to confirm, the film scanner will become a mass storage device and user can review or edit images on PC. 6.
7. Technical Specifications Lens F/3.6, f=4.83mm Sensor 5.1 Megapixel CMOS Sensor LCD 2.4 inch (6.1 cm) LTPS LCD Display External Memory SD/MMC Card Exposure Auto Color Balance Auto Scan High Resolution 10MP (3648x2736) Interpolation Resolution Data Conversion 12 bits Per Color Channel Scan Method Single Pass Light Source Backlight (3 White LED) Power Powered from USB / 4 x AAA Alkaline Batteries / 5V Adapter Interface USB 2.0 Dimension 86.5 x 87.5 x 104.5 mm Weight Approx.
Declaration of Conformity: It is confirmed that this product complies with the protective requirements stipulated in EU guidelines. Dia-/Film-Scanner FS170 + Power Adapter → EMV 2004/108/EG The EU conformity declaration for this product is available under www.jay-tech.de Intended Use: Dia-/Film-Scanner FS170 is suitable for private indoor use. The device is used for the digitization of slides and negatives to internal memory, and SD memory card, or a PC via a USB connection.
Service Procedures: If you have reason for complaint, or your device is defective, please contact your dealer or the service division of JAY-tech GmbH to make arrangements for service procedures. Service Hours: Phone No.: Email: Monday – Thursday from 8:00 am to 5:00 pm Friday from 8:00 am to 2:00 pm. 02161-5758950 info@jay-tech.de Please do not send your scanner to our address unless requested to do so by our service team. All costs and the risk of loss are the responsibility of the sender.