
Owner's Manual

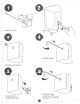
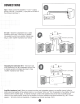
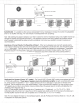


Table Of Contents

INSTALLATION
Installing
with
the
/nvisiBa/1
TM
Mounting
System
·
The
lnvisiBalf"
is
a
unique
method
of
mounting
a
loudspeaker.
Patents
are
pending
worldwide
on
this
design.
The
lnvisiBalf"
is
designed
to
be
unobtrusive,
offer
theft
deterrence,
and
simplify
the
installers
job.
NOTE:
Your
Installation
of
this
Commercial
Sound
Solution
must
be
done
in
conformity
with
local
building
codes.
Please
consult
with
a
licensed
contractor
or
professional
engineer
on
any
Installation
in
which
the
loudspeakers
are
mounted
on
a
ceiling
or
wall.
JBL
Professional
is
not
responsible
for
damages
resulting
from
the
negligent
installation
of
any
bracket
or
speaker.
1.
Install
the
lnvisiBalf"
mount
on
the
wall
using
the
screws
as
shown
in
Fig.
1.
Again,
be
very
certain
lhat
the
type
of
anchor
is
appropriate
for
the
wall
material,
and
that
the
wall
material
will
support
the
speaker.
2.
Stick
a
wide
tipped,
slotted
screwdriver
in
the
slot
of
the
plastic
lnvisiBalf"
knock-out
plug
and
push
downward,
thereby
breaking
the
plug
out
of
the
back
of
the
speaker
as
shown
in
Fig.
2.
Be
sure
the
ball
will
fit
in
the
hole
by
scraping
away
any
res1duat
plastic
around
the
hole.
3.
Grab
the
logo
badge
on
the
speaker
grill
with
your
fingernails
and
pull
it
straight
out
as
shown
in
Fig
. 3.
4.
Insert
the
supplied
hex
key
into
the
hole
exposed
by
the
logo
badge.
Lightly
push
and
slowly
rotate
the
hex
key
until
you
feel
the
key
fall
into
place.
Loosen
the
lnvisiBalf"
clamp
as
shown
in
Fig.
4.
5.
Mount
the
speaker
on
the
/nvisiBalf"
as
shown
in
Fig.
5.
6.
Tighten
the
clamp
just
enough
to
hold
the
speaker
while
you
pos~ion
it
in
lhe
desired
orientation
as
shown
in
Fig.
6.
When
the
speaker
is
pointing
just
the
way
you
want
it,
tighten
it
firmly
and
replace
the
logo
badge.
CAUTION:
DO
NOT
OVERTIGHTEN.
La
methode
de
montage
d'un
haut-
parleur
avec
lnvisibalf"
est
unique
en
son
genre.
Les
brevets
sont
en
instance
pour
le
monde
entier
a
propos
de
ce
produ~.
L'lnvisJbalf"
est
con9u
pour
eire
disc
ret,
permet
d'ev~er
les
vols
et
simplnie
Ia
tache
des
installateurs.
REMARQUE:
L'lnstallation
de
cette
Commercial
Sound
Solution'M
(Solution
acoustlque
commerciale)
doit
etre
reallsee
seton
tes
regtes
locates
sur
Ia
construction.
Prenez
contact
avec
un
entrepreneur
ou
un
ingenieur
pour
une
Installation
aux
plafonds
ou
aux
murs.
JBL
Professionnal
n'est
pas
Responsable
des
dommages
eventuels
dus
a
un
montage
Defectueux
de
consoles
ou
de
haut-parleurs.
1 .
Vissez
le
montage
lnvisibalf"
au
mur
selon
le
dessin
de
Ia
figure
1.
Encore
une
lois,
assurez-vous
que
le
type
d'ancrage
correspond
au
materiau
composant
le
mur
et
que
ce
mateciau
est
en
mesure
de
supporter
le
haut-
parteur.
2.
Enfoncez
un
toumevis
a
large
em
bout
pour
ecrous
a
fente
dans
l'ouverture
d'obturation
en
plastique
lnvisibalf"
et
poussez
vers
le
bas,
cassant
ainsi
l'opercule
al'arriine
du
haut-parteur
selon
le
dessin
de
Ia
figure
2.
Assurez-vous
que
Ia
bille
correspond
au
trou
en
eliminant
les
restes
de
plastique
sur
son
pourtour.
3. A
I'
aide
de
vas
angles.
tirez
sur
le
logo
de
Ia
grille
du
haut-parteur
et
sortez-le
de
son
emplacement
selon
le
dessin
de
Ia
figure
3.
4.
lnserez
Ia
cle
a
huit
pans
foumie
dans
l'ouverture
du
logo.
Poussez
doucement
et
fa~es
toumer
Ia
cle
et
assurez-vous
de
son
bon
posrtionnement.
Desserrez
Ia
pince
lnvisibalf"
selon
le
dessin
de
Ia
figure4.
5.
Montez
le
haut-parteur
sur
1'/nvisibalf"
selon
le
dessin
de
Ia
figure
5.
6.
Serrez
Ia
pince
suffisamment
pour
maintenir
le
haut-parteur
pendant
que
vous
le
positionnez
dans
Ia
direc1ion
desiree
selon
le
dessin
de
Ia
figure
6.
Ouand
le
haut-parteur
regarde
dans
Ia
direc1ion
voulue.
serrez-la
fermement
et
remettez
le
logo
en
place.
AITENTION:
NE
PAS
TROP
SERRER.
EtlnvisiBalf"
es
un
metoda
unico
para
colocar
un
altavoz.
Esta
pendiente
Ia
concesion
de
patentes
de
este
diseno
en
todo
el
mundo
. EllnvisiBalf"
esta
diseiiado
para
ser
discrete,
olrecer
protecci6n
contra
robo
y
simplrricar
el
trabajo
del
instalador.
NOTA:
La
instalaci6n
de
esta
Soluci6n
Comerclal
de
Sonido'M
debe
de
hacerse
en
conformidad
con
los
reglamentos
de
construcci6n
locales.
Consulte
con
un
contratista
autorizado
o
lngeniero
profe~ional
sobre
cualquier
instalacl6n
en
Ia
cual
los
alta
voces
sean
colocados
en
el
!echo
o
en
una
pared,
JBL
Professional
no
se
responsablliza
por
daiios
que
surjan
como
resultado
de
Ia
instalacl6n
negtigente
de
cualquier
soporte
o
altavoz.
1.
Atomille
el
soporte
lnvisiBalf"
a
Ia
pared
tal
como
se
representa
en
Ia
Fig.
t.
Nuevamente
le
recordamos
que
se
asegure
que
el
tipo
de
soporte
ancla
sea
apropiado
para
el
material
del
que
consiste
Ia
pared,
y
que
el
material
de
Ia
pared
sea
capaz
de
soportar
el
peso
del
altavoz.
2.
lntroduzca
un
destomillador
de
punta
ancha
ranurada
en
Ia
ranura
del
destapadero
plaslico
dellnvisiBalf"
y
empuje
hacia
abajo
para
romper
el
destapadero
hacia
Ia
parte
trasera
del
allavoz,
tal
como
se
representa
en
Ia
Fig.
2.
Asegurese
que
Ia
bola
entre
en
el
agujero
.
removiendo
cuatquier
residua
plastico
que
quede
en
el
borde
de
este.
3.
Agarre
Ia
insignia
dellogot
i
po
en
Ia
parrilla
del
altavoz
con
las
unas
y
tire
directamente
hacia
afuera
como
se
representa
en
Ia
Fig.
3.
4.
lnserte
Ia
llave
hexagonal
dentro
del
agujero
expuesto
al
remover
Ia
insignia
dellogotipo.
Empuje
suavemente
y
gire
Ia
llave
hexagooal
lentamente
hasta
que
sienta
que
Ia
!lave
caiga
en
su
s~io.
AlloJe
Ia
abrazadera
dellnvisiBalf"
tal
como
se
representa
en
Ia
Fig
.
4.
5.
Instate
el
altavoz
en
etlnvisiBalf"
tal
como
se
representa
en
Ia
Fig.
5.
6.
Apriete
Ia
abrazadera
solo
lo
suficiente
para
sostener
el
a~avoz
mientras
to
posiciona
en
Ia
orientaci6n
deseada
tal
como
se
representa
en
Ia
Fig.
6.
Cuando
el
altavoz
este
posicionado
tal
como
Usted
lo
quiere.
ajuste
Ia
abrazadera
firmemente
y
vuelva
a
colocar
Ia
insign
ia
dellogotipo
en
Ia
parrilla.
PRECAUCION
:
NOAPAETAR
DEMASIADO
.
8
Bei
lnvisiBalf"-
hande~
es
sich
urn
eine
einzigartige
Methode
der
Lautsprechermontage;
die
Patentanmeldungen
hiertur
sind
we~eit
ertolgt.
lnvisiBalf"
wurde
unter
dem
Aspekt
konstruiert,
unauffiillig
zu
sein,
vom
Diebstahl
abzuhalten
und
die
Arbe~
des
Monteurs
zu
erleichtem.
ANMERKUNG:
Die
Montage
dleser
Commercial
Sound
Solution
TM
muB
gemaB
den
art
lichen
Bauvorschriften
durchgefuhrt
werden.
Bttte
lassen
Sie
sich
bei
allen
Montagen,
bei
denen
Lautsprecher
an
einer
Decke
oder
einer
Wand
montiert
werden,
von
einem
zugelassenen
Bauunternehmer
oder
einem
lngenieur
beraten.
JBL
haftet
nicht
fur
Sch~den,
die
a
us
der
fahrliisslg
durchgefuhrten
Montage
einer
Halterung
oder
eines
Lautsprechers
herruhren.
1.
Schrauben
Sie
die
/nvisiBatr•-
Halterung
wie
in
Abb.
t
gezeigt
an
der
Wand
an
.
Wir
machen
nochmals
darauf
aufmerksam,
da8
Sie
sich
vergewissem
mOssen,
da8
die
veiWendeten
Schrauben
bzw.
DObel
fOr
das
Wandmaterial
geeignet
sind
und
da8
das
Wandmaterial
den
Lautsprecher
tragen
kann.
2.
Fuhren
Sie
einen
Schraubendreher
mit
breiter
Sp~ze
in
den
Schlitz
der
aus
Kunststoff
bestehenden
lnvisiBalf"
Buchse
und
drOcken
Sie
nach
unten,
wobei
Sie
dadurch
die
Abdeckung
aus
der
ROckwand
des
Lautsprechers,
wie
in
Abb
. 2
gezeigt
,
herausbrechen.
Vergewissem
Sie
sich.
da8
die
Kugel
in
das
Loch
pant,
indem
Sie
den
restli:hen
Kunststoff
rund
urn
das
Loch
wegkratzen.
3.
Ergreifen
Sie
mit
den
Fingemageln
die
Logomarke
auf
dem
Lautsprechergitter
und
ziehen
S1e
diese,
wie
in
Abb.
3
gezeigt,
gerade
heraus.
4.
Fuhren
Sie
den
beiliegenden
lnbusschiOssel
in
das
durch
die
Entlemung
der
Logomarke
sichtbar
gewordene
Loch.
Drucken
Sie
den
lnbusschlusselleicht
an
und
drehen
Sie
diesen,
bis
Sie
fuhlen
,
daB
der
Schlussel
greih.
Lockem
Sie
die
/nvisiBalf"-Kiemmschraube
wie
in
Abb.
4
gezeigt.
5.
Montieren
Sie
den
Lautsprecher
am
lnvisiBalf".
wie
inAbb.
5
gezeigt.
6.
Ziehen
Sie
die
Klemmschraube
so
fest
an
,
da8
der
Lautsprecher
geha~en
wird
,
wiihrend
Sie
diesen
.
wie
in
Abb
. 6
gezeigt
,
wie
gewunscht
ausrichten.
Wenn
sich
der
Lautsprecher
genau
in
der
von
Ihnen
gewOnschten
Position
belindet,
ziehen
Sie
die
Klemmschraube
fest
an
und
bringen
Sie
die
Logomarke
wieder
an.
VORSICHT:
NICHT
ZU
FEST
ANZIEHEN.
. -
..
---r----t----·r
I
t
--
eX1
I~~"
~-
'!'
f.Hi'
I!~
k~d'l.l
il'
1,,\n~;tflto
i~iliil
A:l!tW~ll!!lf<J
·L;.f'l<l'
ii~iEi'£illh<Fo
~.:;,m!:jt•
+'fell:.
M·~.:~.
tl.U:f-i -
A::rtl
p}J\?,ifj.:
1\Jc
i
Ui::
'
1
d~i!li.'ll
tfil>J
~Ik::1J•i.H;
t
k-J!:·i9frt-;g-~J1!!ill$1$ijl,,
iiHh
,
:.?.~'!<'~1£
x<E
lf.il:.AA~liU
.
H·t.
i\'litJt;f:fHJ\!l!llt'Jl.B$1iP:i9.1tli
!li<:
't
.'II'.I.W
~ili'2i
ili] ,
JBL
Proles-
sklnal
i:
lf
l
t't
H:
frir;r;
r?
.C:
ll!!
'!i:.
!\li
rtJ
'l.(
'
lUNi.frtti.J
iU ~~
Niitil&.lf<JI9!
~
.Ht1
H:
fiiun
11.
- ·
t----
+-
l
,.J_
!
i
"
-+-
+-
l
·i·-·--
!
I
--t-
1
'
.
i-
.....
i
t.
¥H~~~~'*"'!i:.1-~N!t.li~
-
I'Ji
m
lll
~!:Hi'f£~J:.
Jlt'<tl'f-
<XiWl:f
''--1---
.1!.
-
;E'J!:'O#!;i'\1.\l'!l
R'1~!tl:it
t~~M.f'HlEiJi.Jt-;g-~lf<J.
!ill
MH*'!
-
iE'lt~~:Ztc\'ti.Jil'~~.
·
--+---
2.
ili
- ~
,ik
lf!IJ3J.:!II\;
O
HliA.!f!
NI:?.WJ"5jt"
1Jt
:ll
!:*11
8'1
1ft
1J
•t'7f--
--t---
II·J
HIL
h/,iliJ.¥.f!ll\11~:t\!I.Jfli
-+
~~ft
'
J1tiiii.
lmoo
=
rrr;;<
,
i:E:t:
l*fil~fi'O.ilil4'.
oi-i'~~i!It<.
i,Wfi!'J
u
)llfE~~JitJ!'l!*H'Ii<.
3.
~M~liH:t:
t1.11::~s
triH<lJ~rtJilt
_J
__
'·'·
J'i<rtl
·f'ii/J•~~Ht*tl,
,
I
4.
ilHifii"'
M.!lt
fJ~n~
Ji.J
/;I!Jl!l
'f-
IJi
A.iltf.l'*t:lfiOI!
:Hif<JfL•!'
.
1£
r··--
JJLIH:&'IlH{
$1.
11Ji'l~11'tlf.i
'f
·
~m~~
o
l'i<OO~~
ffl
.
~*
I
~mJ!j("D'1'1E\'tt
,.
5.
t~
00
1i
f1i
,
,;
.
:t-!f
!51
il•
~~'I.:
'M1
:
•~m'*·L
6.
i!f
.1dfl
~
f.\J
/d~II.QJ-
••
f
x
IHI.J
,l;
;m,
1?.>
1;:-i
j!f
j5J,lr
2~
ill!£
J~i
'
,.\iil'J
1n:,,
0
"''
.11;
-<HI.I
I'
,.
~»
(llj
m ,:
,,
/IIi
.~H-t.
f!l.Jlf:ldilf
d
r~li!i.
'it
i!flf(f,j'~@)Jjj'(j
~.
i1.
~
!11\
rJ:
;
r;
'J!:'ti'
ill
;k
:11(
.
I
t-
-
i
;
t'
i
I
J
'
+-
---
1
--t--
1
+--