
Owner's Manual
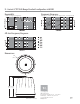


How to use Release Key to adjust height of speaker:
2.
Insert key into
small hole at
top of Gripple.
Push in 1/4” to
release the
cable.
4.
Remove key
and re-secure
the load.
1.
Make sure the
load is supported.
CAUTION: Installation must be done by qualied persons using safe rigging standards.
Use equipment only in accordance with manufacturer’s instructions. Do not alter or modify.
Do not use equipment if the equipment is not functioning correctly or if the equipment is defective
4. Snap secondary support safety cable hook hanger
onto one of the side holes in the top bracket of the
speaker, and attach the top to a dierent ceiling support
point of the building structur e, per Steps 1 & 2. After
height adjustment is nal, trim any unneeded extra cable
tail wires with trimmer suitable for 2 mm (0.077 in)
diameter stranded aircraft-type cable.
SPEAKER
INSTALLATION
INSTRUCTIONS
using
Suspension Systems:
3. With speaker supported, snap main
support hook hanger onto the center hole
in the top bracket of the speaker. Adjust
to proper height by pulling cable through
either end of Gripple.
Detail
3
3.
Adjust
height.
Detail
Fittings are suitable for use in Air Handling Spaces
in accordance with Section 300.22 (C) and (D)
of the National Electrical Code, and rules
12-010 (3), (4), and (5), and 12-020 of the
Canadian Electrical Code, Part 1.
File No. E228153
Luminaire Fittings
File No. E251132
Conduit & Cable Hardware
2. Pass tail end of cable through the
other channel of the Gripple (see
inset detail).
1. Thread Gripple onto cable (see inset
detail). Pass over ceiling anchor point
(as shown) or through other secure
anchor point of the building structure.
Installer is responsible for ensuring that
anchor point is secure to building
structure.
4