
Owner's Manual

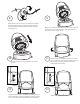


The second gland nut can be installed by drilling a 22 mm
(7/8 in, 0.875 in) hole on the side of the bottom half of the
enclosure, in one of three recesses on the underside of the
enclosure, or other locations as needed, while taking care
that the location chosen does not interfere with the
locking parts so both halfs of the enclosure will mate and
close properly.
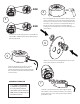
Attach one of the two included Gland Nuts into the open
hole on the seal plate as shown above.
Install the gland nut into the hole as shown
above in #6 and feed external wire from
outside through the gland nut and up through
the center hole in the lower half of the speaker
as shown above.
3
4
5
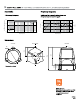
Close-up view of tap setting for the Control 85M and
Control 88M. **Adjusting tap setting required before
powering up system.
88M
85M
6
Continue to extend external wire up through the gland
nut installed on the seal plate and attach to pre-existing
wires from the top section of the speaker with included
gel-lled wire nuts.
7
** To achieve a watertight
seal with these gland nuts,
use only round jacketed
cable with outside diameter
(O.D.) between 4.0mm (0.16”)
and 9.0 mm (0.36”).
IMPORTANT: WIRE SIZE