
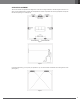
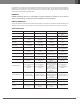
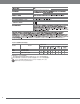
Specifications


English
5
www.jbl.com
3. Connect Speaker Wires
• Insert the speaker wires into the binding posts on the speaker noting proper polarity.
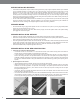
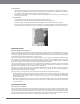
4. Speaker Mounting
• Attach the speaker panel screw anges directly to the structural framing using the provided wallboard screws (See
Figure 6). The panels have been pre-drilled with the proper number of holes. Be sure that all of the screws are
installed and that they hold securely to the framing.
• Add screws to the wallboard surrounding the speaker as well.
• Do not use nails.
TIP: Make sure the tip of the screw is on the side of the screw hole toward the outside edge. This creates an outward
pull or stretching eect on the speaker.
5. Recheck Speaker Registration
• Once the speaker is secured, recheck that the outer ange of the speaker is ush with the surrounding wallboard.
• Place a 4-foot straight edge across middle of the speaker to verify that the speaker face protrudes approximately
1/16" (2mm) beyond the wallboard in each direction.
• Check that the speaker is not warped from strain caused by uneven framing. A warped speaker frame will cause the
speaker face to bulge.
• Having the correct registration minimizes the amount of joint compound that might be built up over the face of the
speaker during the nishing process. This 1/16" (2mm) protrusion of the speaker face will become invisible after the
seams are properly nished and joint compound is feathered out from the front of the speaker appropriately.
TIP: If you tried to tighten the screws but unable to achieve a satisfactory result, try placing approximately 4" (102 mm)
of thin shim material under the mounting ange at the center point.
6. Test Speaker Sound
• Before proceeding with any wall nishing, test each speaker with an amplied sound source.
• Test with music at listening volume in addition to test tones to ensure full functionality. Make note of sound coming
from high, mid, and low frequency drivers of each speaker. Check for any rattling or vibration.
• Now is the time to correct any potential issues.
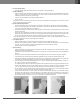
7. Seam Finishing
• After the registration and sound check, seam nishing can proceed. The speaker panel should be nished in-place,
similar to any other piece of wallboard.
• Self-adhesive nylon mesh tape is recommended due to its ease of use, however paper tape is also acceptable (See
Figure 7).
• Use only air-dry joint compounds and plasters for seam nishing. Do not use chemically curing joint compound.
• For best results, we recommend at least three light applications of joint compound, sanding between coats.
• Allow 24 hours between each application of joint compound for complete drying. Failure to allow the joint compound
to completely dry between applications may result in ne hairline cracking around the speaker.
• The joint compound should be spread beginning 2”-3” in from the speaker edge and then feathering outward 16”-
20” in order to achieve a smooth, at transition.
• It is important that enough joint compound be applied around the speaker to make a very gradual transition from the
surface of the wallboard to the face of the speaker panel. Every situation is dierent, but it will normally take at least
a 16”-20” (30cm) fan of joint compound around the perimeter of the panel to create a at-looking transition.
• Be sure to feather the joint compound away from the speaker as to not build up more than the maximum allowed
1/16" (2 mm) of joint compound over the face of the speaker panel (See Figure 8).
• Conceal series speakers do not require a skim coat to attain a smooth nish. However, some advanced nishing
techniques and materials such as Venetian plaster or heavy plaster coats may require skimming over the front of
the speaker. In these situations, it may be necessary to shim the speaker proud of the surrounding wallboard so
that we avoid build-up of more than 1/16" (2 mm) in thickness on the face of the speaker.
Figure 7 Figure 8 Figure 9