
Specifications


10
HALF-ROUND WALL-MOUNTING
(HORIZONTAL OR VERTICAL)
NOTE: Decide whether you will connect the speakers as a single channel
or two separate channels, and follow the appropriate instructions on
the following pages.
CONNECT AS A SINGLE CHANNEL
CAUTION
The customer is responsible for proper selection and use of mounting hardware
(available through hardware stores), to properly and safely wall-mount the
speakers. The JBL Control NOW speaker was designed to be easily installed.
However, if you are unable to clearly and fully understand and follow the
instructions in this manual, or if you are unsure of your ability to properly install
these loudspeakers, please contact your dealer or a qualifi ed installer. Please
do not use any power tools during installation. Power tools can exert excessive
and unnecessary torque which, in turn, can damage fasteners or other parts
and accessories, reducing their strength and causing possible failure of the
fastener or part. A failed or damaged fastener or part may not be able to
perform as designed, and may lead to an unsafe installation.
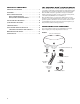
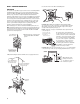
1. Secure two corner/wall-mounting
brackets together by using two
#10-32 x 1/2" (M5 13 mm) screws pro-
vided, as shown. Attach the mounting
bracket to the wall.
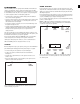
When deciding upon a location for the JBL Control NOW speaker, take care
NOT to install the mounting bracket closer than 3" (7,6 cm) (horizontal) and 8-1/2"
(21,5 cm) (vertical) to the ceiling. Any closer than the minimum measurements
will not allow the room needed to position and slide the JBL Control NOW
speaker into the mounting bracket.
8-1/2" (21,5 cm) Minimum
distance from ceiling
(vertical mount)
3" (7,6 cm) Minimum
distance from ceiling
(horizontal mount)
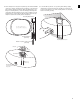
2. Attach the mounting bracket to the wall. Be sure to use appropriate anchors.
Appropriate
anchors
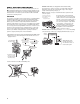
3. Remove the terminal assemblies from the rear of both speakers. The terminal
assembly is removed by giving it a slight counterclockwise rotation. Use the
transparent plastic strap to pull the assembly out, as shown.
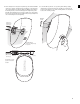
4. Connect the small end of the multiunit wiring adapter to one of the speaker
rears, as shown.
#10-32 x 1/2"
(M5 13 mm)
Screws (2)