EN JBL Club-704/ Club-4505/Club-5501 AMPLIFIERS OWNER'S MANUAL
THANK YOU FOR YOUR PURCHASE . . . Your JBL product has been designed to provide you with the performance and ease of operation you would expect from JBL. • Please take time to read your owner's manual in its entirety before operating or installing your amplifier. • Keep the owner's manual for your amplifier in your glove compartment along with the owner's manual for your car. • Put your amplifier sales receipt with other important documents in order to expedite warranty service if needed.
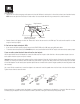
JBL CLUB TABLE OF CONTENTS CHAPTER 1: PICTORIAL INDEX OF INPUT CONNECTIONS ........................................................................................................ 01 CHAPTER 2: INSTALLATION AND WIRING ........................................................................................................ 02 What's in the box Precautions 1. Power indicator 2. Protect indicator 3. Speaker output connectors 4. Fuses 5. Power input connectors 6. Front and rear inputs and outputs (RCA) 7.
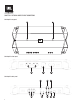
CHAPTER 1: PICTORIAL INDEX OF INPUT CONNECTIONS Club Amplifier top panel 2 1 PROTECT POWER Club Amplifier front panel 4 3 5 Club Amplifier back panel 7 9 11 - 6 1 8 10 12 13
JBL CLUB CHAPTER 2: INSTALLATION AND WIRING What's in the box: 1 amplifier 2 spare fuses (x3 with Club-4505) 4 RCA adapters (x2 with Club-5501) Quick-start guide Precautions: IMPORTANT: Disconnect the vehicle’s negative (–) battery terminal before beginning the installation. • Always wear protective eyewear when using tools. • Choose a safe mounting location, away from moisture. Check clearances on both sides of a planned mounting surface.
1. Power indicator: The light will illuminate in white when the amp is receiving power and playing. 2. Protect indicator: The indicator will illuminate in red if the amp enters Protect mode in the event of conditions such as over/under voltage, short circuit, amplifier output circuit failure, or excessive heat. 3.
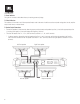
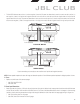
JBL CLUB ° 3-channel operation: Connect the stereo speakers to the Front terminals, as described above. Connect the single speaker’s + lead to the Rear L+ terminal, and the - lead to the Rear R- terminal. Left Front speaker Right Front speaker 4-ohm subwoofer ° 2-channel (bridged) operation: Connect one speaker’s + lead to the Front L+ terminal, and the - lead to the Front R- terminal. Connect the other speaker’s + lead to the Rear L+ terminal, and the - lead to the Rear R- terminal.
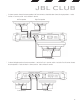
• The Club-4505 features Front L+, L-, R+, and R- terminals; Rear L+, L-, R+, and R- terminals; and Sub + and - terminals. ° 5-channel operation: Connect the front left speaker to the Front L+ and L- terminals, and the front right speaker to the Front R+ and R terminals. Connect the rear left speaker to the Rear L+ and L- terminals, and the rear right speaker to the Rear R+ and R- terminals. Connect the subwoofer’s positive (+) lead to the + terminal, and the negative (-) lead to the - terminal.
JBL CLUB • The Club-5501 features two positive (+) and two negative (-) terminals. To power two subwoofers in parallel, connect one sub’s positive (+) and negative (-) leads to the positive and negative terminals on the left, and the other sub’s positive and negative leads to the positive and negative terminals on the right.
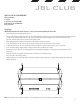
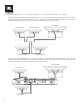
• Ground: Run a wire (the same gauge as the power wire) from the GND input to a factory bolt in the vehicle’s chassis (see illustration below). NOTE: Remove any paint from the chassis for best contact. Use a star washer below the ring connector for a secure connection. Factory Bolt Ring Connector Note: Remove any paint below ring connector Ground Wire Star Washer • Remote: Connect a 20-gauge wire from the “Remote Out” lead of the source unit to the REM input.
JBL CLUB PRE OUT REAR FRONT From high-level source 7. Input level: Use this switch along with the gain control to set the Club amplifier’s input level. If use an aftermarket radio’s RCA-level outputs, set the Input Level switch to the “LO” position. If using high-level outputs, start the control-setting process with the Input Level switch set in the “HI1” position. Note: If you have connected your Club amplifier to a factory audio system’s speaker outputs, the audio signal may fail to play.
. ADAS ASSIGN (Club-704 and Club-4505 models only): If you’ve connected the amp to an Advanced Driver Assistance System (see 13, next), this dial allows you to select the speaker over which you’ll hear ADAS messages. Turn the dial to FL for the front left speaker, FR for the front right, RL for the rear left, and RR for the rear right. 13.
JBL CLUB CHAPTER 3: OPERATIONS Setting the input levels: To match your amplifier’s input sensitivity (gain) to your source unit’s output level, we recommend the following procedure: A. Turn both input level controls counterclockwise to MIN (minimum). B. Play a dynamic music track through your source unit. Turn the source unit’s volume control to the 3/4 position. C. Turn the front input level control dial clockwise towards MAX until you hear distortion in the music (it’s no longer clear). D.
Selecting the subwoofer phase You can choose a subwoofer phase output of 0° or 180°. To check your sub's phase, play music with lots of bass and listen as another person slowly flips the 0/180 degree phase switch back and forth. The correct setting is the one that gives you more bass. If you don't detect any real difference, leave the switch in the 0 setting. PHASE 0º 180º Boosting the bass Turn the dial clockwise to increase the bass output from 0 dB to +9 dB.
JBL CLUB PROBLEM: Music lacks dynamics or "punch." CAUSE and SOLUTION: Speakers are not connected properly. Check speaker connections for proper polarity. PROBLEM: Amplifier fuse keeps blowing. CAUSE and PROBLEM: The wiring is connected incorrectly or there is a short circuit. Review installation precautions and procedures in manual. Check wiring connections. PROBLEM: Engine noise—whining or clicking—in system when the engine is on. CAUSE and PROBLEM: Amplifier is picking up alternator noise.
HARMAN International Industries, Inc. 8500 Balboa Boulevard, Northridge, CA 91329 USA www.infinityspeakers.com 13 © 2016 HARMAN International Industries, Incorporated. All rights reserved. Infinity is a trademark of HARMAN International Industries, Incorporated, registered in the United States and/or other countries. The Bluetooth® word mark and logos are registered trademarks owned by Bluetooth SIG, Inc. and any use of such marks by HARMAN International Industries, Incorporated is under license.