
Operation Manual


7
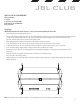
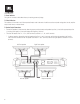
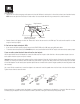
Use a small Phillips screwdriver to loosen the adapter’s set screws and insert the speaker wires into the holes on the back of the adapter.
Tighten the set screws to secure the wires.
Always connect the (+) speaker wire to the adapter’s (+) terminal and the (–) speaker wire to the adapter’s (–) terminal. When all wires are
connected, plug the adapters into the Club amplifier’s FRONT (and REAR, if using the 4-channel amplifier) preamp inputs.
• Remote: Connect a 20-gauge wire from the “Remote Out” lead of the source unit to the REM input. This lead turns the amplifier on when
using low-level input signals.
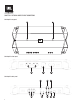
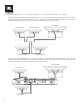
• Ground: Run a wire (the same gauge as the power wire) from the GND input to a factory bolt in the vehicle’s chassis (see illustration below).
NOTE: Remove any paint from the chassis for best contact. Use a star washer below the ring connector for a secure connection.
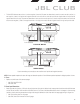
6. Front and rear inputs and outputs (RCA):
• If your source unit offers preamp outputs, connect to the FRONT, REAR, and/or SUB inputs using RCA patch cables.
• To connect a second amp directly to the Club-704 amplifier, run a patch cable from the PRE OUT outputs to the second amp’s preamp inputs.
If your car audio system’s head unit does not have line-level outputs:
Use the supplied bare wire-to-RCA adapters to connect the Club amplifier’s inputs to either the front or the rear speaker outputs of your car
audio system’s head unit (splice crimps not included).
Important: Some factory-installed audio system amplifiers include electronic filters that limit the amount of bass sent to the system’s smaller
speakers. This filtering will adversely affect the Club amp’s performance. To get the most bass possible from your Club amp, splice the bare
wire-to-RCA adapters into the factory system speaker outputs that are connected to the system’s largest speakers (the ones designed to make
the most bass).
Factory Bolt
Ring Connector
Ground Wire
Note: Remove any paint
below ring connector
Star Washer
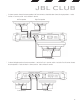
Loosen
Screws
Insert
Wires
Tighten
Screws