
User manual
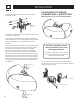


3. After carefully placing all four speakers in the mounting
bracket, lightly jostle the speakers into place so that the pole-
mount-bracket cap will slide down into place. Tighten the pole-
mount-bracket assembly with the four #10-32 x 2” (M5 51 mm)
screws provided.
4. Place the pole-mount-bracket cover over the bottom visible
mounting bracket by snapping it into place.
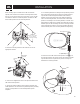
The Control CRV is designed to be driven from a 70V or 100V
distributed speaker line or as a 4 ohm speaker. It is important to
set the tap selector switch before installing the speaker.
The rotary selector switch is recessed into the terminal cup.
The legend for the tap selector switch is recessed into the top
port so as to be visually unobtrusive.
Once the speaker is installed in the wall or PMB bracket, the
tap selector switch is protected against unintended switching.
To reset the selection, the speaker must be removed from the
bracket.
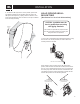
#10-32 x 2"Screws (4)
Drop Tube
Pole-Mount-BracketCap
Pole-Mount Bracket
Only two speakers shown here
for clarity.
Pole-Mount Bracket Cap
Drop Tube
INSTALLATION
13
1
2
3
4
5
70 V LINE
3.8W
7.5W
15W
30W
THRU
70 V LINE
100 V LINE
100 V LINE
7.5W
15W
30W
THRU
DO NOT USE
1
2
3
•
5
1
2
3
4
5
100V
1
2
3
4
5
70V
SETTING TAP SELECTOR
Tap Selector
Legend Label
Rotary
Tap Selector
Switch