
User manual


PAINTING CONTROL CRV
The loudspeakers can be painted to match the decor. The
speaker accepts almost any type of latex or oil based paint.
For best results, the following procedure is recommended:
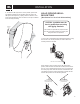
1. Remove the grille.
2. Mask the baffl e of the speakers -- it’s almost always advisable
to keep the baffl e black.
3. Clean the cabinet with a light solvent such as mineral spirits
by rubbing the item with a lightly dampened cloth. Do not use
abrasives such as sandpaper or steel wool, nor should you
use gasoline, kerosene, acetone, MEK, paint thinner, harsh
detergents or other chemicals. Use of these cleaners may result
in permanent damage to the enclosure.
4. After cleaning, apply two or more thin coats of either latex or
oil-based paints. Latex paint will adhere better if an oil-based
primer is used fi rst. Application can be made by rolling, brushing
or spraying.
5. Painting the Grille – Painting the grille requires masking of the
logo before spray painting. Multiple sprayed coats using thinned
paint is recommended to avoid clogging the grille holes. If the
grille is rolled or brush painted, the mesh may become clogged
with paint and poor sound quality may result.
CONTACTING
JBL PROFESSIONAL
These products are designed and backed by JBL Professional,
the world leader in professional sound reinforcement. For
complete warranty information, to order replacement parts or to
ask for clarifi cations to this manual, contact JBL Professional.
Within the United States:
Applications Department, JBL Professional
8500 Balboa Blvd., PO Box 2200
Northridge, CA 91329 USA
In the USA you may call Monday through Friday 8:00am to
5:00pm Pacifi c Coast Time (800) 894-8850.
Outside the USA:
Contact the JBL Professional Distributor in your country.
A list of JBL Professional Distributors and US Service Centers can
be obtained from the JBL Professional website at: www.jblpro.com
MAINTENANCE
No maintenance to the product is required when assembled in
accordance with the instructions and wiring guidelines described
in this manual. When installed in harsh environments, it is
advisable to inspect the structural integrity of the mounting and
wiring connections periodically to ensure proper safety and
performance.
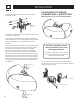
SERIAL NUMBER
The serial number is located on the rear of the speaker housing.
To view it, remove the four screws on the rear assembly as
shown.
PAINTING & MAINTENANCE
14
The serial number is
located on the back top
area of the speaker housing
between the two top rear
bracket-bolt holes.
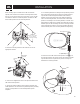
The product identic ation
label is located behind
the rear housing bracket.
The product identifi cation
label is located behind the
rear housing bracket.
The serial number is located on
the back top area of the speaker
housing between the two top rear
bracket boltholes