
User manual

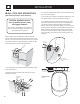


3. Connect the stripped bare wires to the input terminals of the
JBL Control CRV speaker.
4. Set the tap selector switch to the desired 70V/100V tap, or to
the THRU position for 4 ohm low-impedance operation.
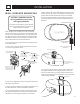
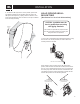
5. The mounting bracket is designed to trap the fl ange of the
JBL Control CRV speaker by securing the mounting-bracket
cap with two screws through the bottom of the mounting
bracket. Rest the JBL Control CRV speaker’s rear fl ange in the
mounting bracket, as shown. This will support the weight of the
speaker. Slide the mounting-bracket cap over the assembly.
Secure the mounting-bracket cap by inserting two #10-32 x 2”
screws (provided) in the bottom of the mounting bracket and
tightening.
INSTALLATION
Mounting-Bracket Cap
Mounting Bracket
#10-32 x 2" Screws (2)
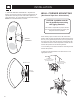
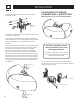
(side view)
(side view)
Mounting Bracket
shown as looking through
the speaker.
Mounting-Bracket Cap
Mounting Bracket
#10-32 x 2"Screws (2)
Mounting-Bracket
Cover
Mounting-Bracket
Cover
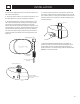
6. To orient the JBL logo into the correct position, pull the JBL
logo slightly outward from the speaker grille and rotate. The JBL
logo is held in place by a spring. Peel the adhesive cover off the
mounting-bracket cover and attach to the top and bottom of the
mounting assembly.
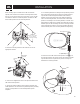
7. VERTICAL BRACKET ORIENTATION —Regardless of
whether you choose a vertical or horizontal orientation for the
speaker,when mounting the JBL Control CRV speaker to a
single wall surface, you should always install the wall-mounting
bracket in a vertical orientation.
5