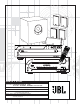
X + 0 + Y2 0 M HZ OWNER’S GUIDE MODEL NUMBER: C I N E M A P R O P A C K ™ 6 0 0 II I n c l u d e s : D C R 6 0 0 II , D V D 6 0 0 II a n d S C S 1 3 5 P D E S I G N G O A L : Re-create the excitement of the movies using high-performance separate components in one convenient package.
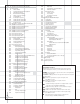
4 5 5 5 5 6 9 9 10 10 11 11 12 14 16 17 19 20 21 22 26 28 38 38 38 39 40 42 42 42 42 42 43 44 44 44 44 45 45 45 45 46 46 47 47 47 48 48 48 49 49 50 50 51 51 52 52 53 53 53 53 53 54 2 Important Safety Information and Unpacking Getting Started What’s Included Installing and Connecting the Equipment What We Recommend Quick Installation Diagrams Where to Place the Speakers Mounting Options Connecting the Speakers Making the Audio Connections Making the Video Connections Completing Setup Quick Guide to Using t
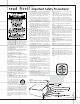
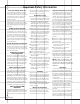
re a d f i rs t ! 1. Read Instructions. All the safety and operating instructions should be read before the product is operated. 2. Retain Instructions. The safety and operating instructions should be retained for future reference. 3. Heed Warnings. All warnings on the product and in the operating instructions should be adhered to. 4. Follow Instructions. All operating and use instructions should be followed. 5. Cleaning. Unplug this product from the wall outlet before cleaning.
Important Safety Information Verify Line Voltage Before Use Your JBL Cinema ProPack 600II home theater system has has been designed for use with 120-volt AC current. Connection to a line voltage other than that for which it is intended can create a safety and fire hazard and may damage the system. If you have any questions about the voltage requirements for your specific model, or about the line voltage in your area, contact your selling dealer before plugging the components into a wall outlet.
Getting Started Thank You for Choosing JBL For more than 50 years, JBL has been involved in every aspect of music and film recording and reproduction, from live performances to the recordings you play in your home, car or office. that you expected – and that when you think about purchasing additional audio equipment for your home, car or office, you will once again choose JBL.
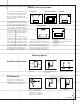
Quick Installation Diagrams BASIC INSTALLATION: Your TV must at a minimum have a composite video input (this connector usually has a yellow-colored core), and Left (usually has a white-colored core) and Right (red-colored core) Stereo audio preamp-level RCA outputs. All wires for this hookup are included.
Quick Installation Diagrams ALTERNATE INSTALLATION FOR BETTER PICTURE QUALITY: Your TV must have an S-Video input, and Left (usually has a white-colored core) and Right (red-colored core) Stereo audio preamp-level RCA outputs. Two pieces of S-Video cable are not included and should be purchased separately.
Quick Installation Diagrams ALTERNATE INSTALLATION FOR BEST PICTURE QUALITY: Your TV must have Y/Pr/Pb component video inputs (three separate RCA connectors with red-, blue- and green-colored cores), and Left (usually has a white-colored core) and Right (red-colored core) Stereo audio preamp-level RCA outputs. The component video cable is not included and should be purchased separately. This setup requires that the TV’s own video switching is utilized to access the DVD picture.
Where to Place the Speakers The front speakers should be placed the same distance from each other as they are from the listening position. They should be placed at about the same height from the floor as the listeners’ ears will be, or they may be angled toward the listeners. Front Speakers The center channel speaker should be placed slightly behind the front left and right speakers, and no more than two feet above or below the tweeters of the left and right speakers.
Connecting the Speakers Separate and strip the ends of the speaker wire as shown. Speakers and electronics terminals have corresponding (+) and (–) terminals. Most manufacturers of speakers and electronics, including JBL, use red to denote the (+) terminal and black for the (–) terminal. The wires for the three front speakers should all be of the same length even if the speakers will be placed at varying distances from the DCR600II. The same applies to the two rear speakers.
Making the Video Connections IMPORTANT NOTE: The DCR600II and DVD600II offer both S-Video and composite video inputs and outputs. However, you must choose one type of connection or the other for all connections in your system. This will depend on the type of connections on your television. If both types of connections are available, we recommend that you purchase S-Video cables and make those connections for superior picture quality. The composite video connections will also provide excellent results.
Quick Guide to Using the JBL Cinema ProPack 600 II The DVD600II can play discs in the following formats: • Both 5-inch (12cm) and 3-inch (8cm) discs • CD audio discs • DTS audio discs • CD-R audio discs • CD-RW audio discs • DVD movie discs • VCD video compact discs • Discs containing MP3 compressed-audio files However, it cannot play: • DVD discs with a Region Code other than "1" or "All" • DVD discs using PAL format video • DVD-ROM data discs • DVD-RAM discs • CD-I discs • CD-G discs • SVCD discs • Photo
You may wish to experiment with surround modes other than Dolby Digital and DTS using the DCR600II receiver’s functions. Press the Surround Mode Selector t7 to scroll through such choices as Dolby Pro Logic II (Music, Movies or Emulation), Dolby 3 Stereo, 5-Channel Stereo, Hall 1 or 2, Theater, Logic 7 (Cinema or Music) or Surround Off (Stereo). See page 52 for descriptions of these modes. Press the Stop Button once to enter Resume mode, in which play will resume from the point where it was stopped.
DCR600 II Front Panel Controls 1 Main Power Switch: Press this button to apply power to the DCR600II. When the switch is pressed in, the unit is placed in a Standby mode, as indicated by the amber Power Indicator 3 surrounding the System Power Control 2. This button MUST be pressed in to operate the unit. To turn the unit off and prevent the use of the remote control, this switch should be pressed until it pops out from the front panel so that the word “OFF” may be read at the top of the switch.
! Input Source Selector: Press this button to change the input by scrolling up or down through the list of input sources. When an audio source is selected, the last video input used remains routed to the Video 1 Output › and Video Monitor Output °. This permits you to simultaneously view and listen to different sources. @ FM Mode Selector: Press this button to select Auto or Manual tuning.
DCR600 II Front Panel Information Display 96KHz 192KHz A Bitstream Indicators: When the input is a digital source, these indicators display the specific type of data signal. The DCR600II will also indicate when it detects a digital signal with a resolution of either 96kHz or 192kHz. This can occur when the receiver is used with an external DVD-Audio player or other device that is capable of transmitting this type of signal.
DCR600 II Rear Panel Connections MODEL NO. DCR600II IMPORTANT NOTES A. The AC plug connections should always be the last connections made when installing an A/V system. When making subsequent connections to audio source equipment or speakers, it is always a good practice to unplug the unit from the AC wall outlet. This prevents the possibility of sending audio or transient signals to the speakers that may damage them. B. Connect devices as per the Quick Setup Guide or per pages 6 through 8 of this manual.
¤ Video 1 Video Inputs: Connect to PLAY/OUT composite or S-Video jacks on a VCR or other video source. ‹ Video 1 Audio Inputs: Connect jacks to the PLAY/OUT audio jacks on a VCR or other video source. NOTE: When making speaker connections always make certain to maintain correct polarity by connecting the colored (+) terminals on the DCR600 II to the red (+) terminals on the speakers and the black (–) terminals on the DCR600 II to the black (–) terminals on the speakers.
DVD600 II Front Panel Controls 96KHz 24bit Main Power Switch: Press this button to apply power to the DVD600II. When the switch is pressed in, the unit is placed in a Standby mode, as indicated by the amber Power Indicator surrounding the System Power Control . This button MUST be pressed in to operate the unit. To turn the unit off and prevent the use of the remote control, this switch should be pressed until it pops out from the front panel so that the word “OFF” may be read at the top of the switch.
DVD600 II Front Panel Information Display M 96KHz 24bit Disc Type: Lights to show the type of disc currently being played. Intro: Lights when the IntroScan function is active. Disc Number: Shows if a disc is loaded in a tray position. The indicator for the disc in play flashes. Note that if a disc is added to or removed from the tray while a disc is playing, the indicator will not show the change until all discs are cycled. Program: Lights during programming.
DVD600 II Rear Panel Connections Component Video Outputs: If your TV or video projector has component video inputs, you may connect these output jacks to the set for the highest video quality available. Note that the component video inputs may be labeled as Y/Pr/Pb or Y/Cr/Cb but, for connection purposes, they are the same. The outputs of these jacks should NOT be connected to a standard composite video input.
Remote Control Functions a Power Off Button: Turns off the power to a device selected by pressing its Input Selector. PROGRAM INDICATOR LED b Power On Button: Turns on the power to a device selected by pressing its Input Selector. c Mute Button: Press to momentarily silence the DCR600II or TV set being controlled, depending on which device has been selected.
e Status Button: This button operates only when the DVD600II has been selected. When a disc is playing, pressing this button will display the Status Banner, which contains information about the disc and enables you to change the functions. fg M1 and M2 Macro Buttons/OpenClose Button: Press these buttons to store or recall a “Macro”, which is a preprogrammed sequence of commands stored in the remote. When the DVD600II has been selected, the M1 Button f functions to open or close the disc tray drawer.
y to select the channel being adjusted, followed by the Set Button . You may then use the ⁄ / ¤ Buttons y again to change the level for that channel. Press the Set Button to lock in the setting. When using the DVD600II to play a DVD disc, this button functions as a Title button, and displays the disc’s Title Select Menu, or a symbol ( ) if the disc either does not offer this function or has only one title.
Preset Up/Down/Slow-Play Buttons: When the tuner is in use, press these buttons to scroll through the stations programmed into the receiver’s memory. When a DVD disc is playing and the DVD600II has been selected, press these buttons to move forward or backward through the disc in slow speed. Each press of these buttons changes the slow-play speed in the following order: 1/16 Normal Speed ➔ 1/8 Normal Speed ➔ 1/4 Normal Speed ➔ 1/2 Normal Speed. To resume normal play, press the Play/Pause Button .
Dev ice # Button Remote Control Function Grid MAIN DCR600II +DVD600II DVD CD/CD-R Tape VCR 1 (VID 1) VCR 2 (VID 2) CBL (VID 3) SAT (VID 3) TV 01 POWER OFF Power Off Power Off Power Off Power Off Power Off Power Off Power Off Power Off 02 POWER ON Power On Power On Power On Power On Power On Power On Power On Power On 03 MUTE Mute 04 DVD DVD Input Select DVD Select DVD Select DVD Select DVD Select DVD Select DVD Select DVD Select 05 STATUS 06 M1 M1 Cancel Cancel
Remote Control Function Grid Dev ice # Button MAIN DVD CD/CD-R Tape VCR 1 (VID 1) VCR 2 (VID 2) CBL (VID 3) SAT (VID 3) TV 37 5 5 5 5 5 5 5 5 5 38 6 6 6 6 6 6 6 6 6 39 7 7 7 7 7 7 7 7 7 40 8 8 8 8 8 8 8 8 8 41 Tun-M Tuner Mode Angle Select Random Play Bypass Next 42 9 9 9 9 9 9 9 9 9 43 0 0 0 0 0 0 0 0 0 44 Memory Memory 45 Tuning Up Tune Up Day+ Day+ 46 Direct Direct Tuner Entry 47 Clear Clear Clear Clear Clear C
Remote Control Code Tables TV 28 Maker (Brand) Name Setup Code Number A-MARK ADMIRAL AKAI AMPRO ANAM AOC BLAUPUNKT BROKSONIC CANDLE CAPEHART CENTURION CETRONIC CITIZEN CLASSIC CONCERTO CONTEC CORANDO CORONADO CRAIG CROWN CURTIS MATHES CXC DAEWOO DAYTRON CIGI LINK DYNASTY DYNATECH ELECTROHOME EMERSON FUNAI FUTURETECH GE GOLDSTAR GRUNDIG HALL MARK HARMAN KARDON HITACHI INFINITY INKEL JBL JC PENNEY JENSEN JVC KAWASHO KEC KENWOOD KMC KTV LLOYTRON LODGENET LOGIK LUXMAN LXI MAGNAVOX MARANTZ MATSUI MEMOREX MET
Remote Control Code Tables TV Maker (Brand) Name Setup Code Number MGA MINERVA MITSUBISHI MTC NATIONAL NEC NIKEI ONKING ONWA OPTONICA ORION PANASONIC PHILCO PHILIPS PIONEER PORTLAND PROSCAN PROTON QUASAR RADIO SHACK RCA REALISTIC RUNCO SAA SAMPO SAMSUNG SANYO SCOTT SEARS SHARP SIEMENS SIGNATURE SONY SOUNDESIGN SPECTRICON SSS SYLVANIA SYMPHONIC TANDY TATUNG TECHNICS TECHWOOD TEKNIKA TELERENT TERA THOMSON TMK TOSHIBA TOTEVISION VIDEO CONCEPTS VIDTECH WARDS YAMAHA YORK YUPITERU ZENITH ZONDA 115 084 077 175
Remote Control Code Tables VCR Maker (Brand) Name 30 Setup Code Number AIWA 040 AKAI 048 AMPRO 076 AMSTRAD 133 ASA 134 108 109 AUDIO DYNAMICS 018 048 BROKSONIC 110 147 166 CANDLE 134 135 140 CANON 135 140 CAPEHART 094 CITIZEN 134 CRAIG 094 140 DAEWOO 134 DAYTRON 045 116 DBX 017 094 DUAL 094 DYNATECH 018 ELECTROHOME 136 EMERSON 040 FERGUSON 131 FINLUX 013 FISHER 136 104 105 042 105 048 040 FUNAI 133 GE 017 GO VIDEO 113 117 GOLDSTAR 018
Remote Control Code Tables VCR Maker (Brand) Name Setup Code Number NORDMENDE 048 OPTIMUS 159 ORION 147 166 PANASONIC 114 125 PHILCO 040 PHILIPS 040 PILOT 134 PROTLAND 094 PULSAR 076 150 167 172 134 QUARTZ 020 QUASAR 125 161 RADIO SHACK 020 129 133 134 140 142 RCA 095 124 125 127 157 172 REALISTIC 017 020 040 045 129 RICO 062 106 RUNCO 128 SABA 136 SAISHO 143 SALORA 020 SAMSUNG 045 080 095 105 SANSUI 048 116 147 166 SANYO 017 115 SCH
Remote Control Code Tables CATV 32 Maker (Brand) Name Setup Code Number ABC 001 ALLEGRO 111 AMERICAST 212 ARCHER 112 BELCOR 113 CABLE STAR 033 CITIZEN 111 COLOUR VOICE 085 DIGI 114 EAGLE 186 EASTERN 066 ELECTRICORD 039 EMERSON 112 FOCUS 116 G.I.
Remote Control Code Tables CATV Maker (Brand) Name Setup Code Number SPRUCER 053 081 177 STARCOM 002 011 163 STARGATE 120 TANDY 024 TELECAPATION 028 TEXSCAN 036 TFC 122 TIMELESS 123 TOCOM 170 UNITED CABLE 011 UNIVERSAL 033 034 VIDEOWAY 124 211 VIEWSTAR 019 ZENITH 065 ZENTEK 116 189 205 039 042 113 025 086 089 190 125 211 33
Remote Control Code Tables Satellite Receivers Maker (Brand) Name 34 Setup Code Number ALPHASTAR 472 ALPHASTAR DBS 450 ALPHASTAR DSR 442 BIRDVIEW 425 CHANNEL MASTER 320 321 322 325 CHAPARRAL 315 316 380 451 361 CITOH 360 DRAKE 313 317 318 413 481 DX ANTENNA 331 352 362 379 483 ECHOSTAR 395 397 452 453 463 477 478 484 ELECTRO HOME 392 365 403 454 468 474 371 354 355 FUJITSU 324 329 334 GENERAL INSTRUMENT 303 311 323 HITACHI DBS 455 HOUSTON TRACK
Remote Control Code Tables CD Players Maker (Brand) Name Setup Code Number ADCOM 063 AIWA 072 111 118 AKAI 050 177 184 AUDIO TECHNICA 053 AUDIOACCESS 125 AUDIOFILE 211 BSR 044 CALIFORNIA AUDIO 015 CAPETRONIC 070 069 087 CARVER 136 140 141 CASIO 117 122 166 CLARINETTE 122 166 DENON 187 188 213 EMERSON 052 093 108 FISHER 055 068 FRABA 117 126 GE 164 GENEXXA 108 GOLDSTAR 016 087 HAITAI 099 214 HARMAN KARDON 001 002 HITACHI 093 INKEL 216 JC PENN
Remote Control Code Tables CD Players Maker (Brand) Name Setup Code Number RCX 169 REALISTIC 058 093 095 104 105 SANSUI 047 081 134 157 172 SANYO 033 068 082 095 168 SCOTT 108 108 164 166 167 180 181 SHARP 058 105 114 151 159 SHERWOOD 003 041 058 105 133 SONY 103 115 116 118 132 139 163 205 206 207 208 SOUNDSTREAM 124 058 085 086 106 107 110 121 137 146 154 074 097 151 155 173 053 061 135 169 SYMPHONIC 059 TAEKWANG 177 110 TEAC
Remote Control Code Tables DVD Players Maker (Brand) Name Setup Code Number CALIFORNIA AUDIO 040 DENON 002 019 GE 003 004 GOLDSTAR 005 HARMAN KARDON 001 JBL DVD600II 001 JVC 006 022 034 051 034 035 044 052 038 041 046 047 032 KENWOOD 007 LOTTE 008 050 MAGNAVOX 009 MARANTZ 033 MITSUBISHI 023 NAD 010 ONKYO 015 OPTIMUS 011 050 PANASONIC 024 025 PHILIPS 033 056 PIONEER 012 020 PROSCAN 037 RCA 018 RUNCO 027 SAMSUNG 031 053 SANYO 013 049 SHARP
Configuring the DCR600II Receiver Once the speakers have been placed in the room and connected, the remaining steps in the setup process are to calibrate the output levels and set the delay times used by the surround sound processor. The DCR600II features an advanced memory system that enables you to establish different configurations for the speaker configuration, surround mode, delay times and output levels for each input source.
Configuring the DCR600II Receiver 9. When you have completed your selection for the surround channel, press the Set Button ^, and then press the Selector Buttons 5 on the front panel to change the display to S-W SPEAKER. 10. Press the Set Button ^, and then press the Selector Buttons 5 on the front panel to select the option that best describes your system. The choices available for the subwoofer position will depend on the settings for the other speakers, particularly the front left/right positions.
Configuring the DCR600II Receiver at the channel being adjusted to give you time to make the adjustment. When you release the button, the circulation will resume after 15 seconds. 5. Continue to adjust the individual speakers until they all have the same volume. Note that adjustments should be made with the ⁄ / ¤ Buttons y on the remote or the Selector Buttons 5 on the front panel only, NOT the main volume controls, except when setting the reference level of the front left speaker.
Configuring the DCR600II Receiver 7. Press the Set Button ^. 8. Select the Dolby Digital mode either by pressing the front panel Surround Mode Selector 7 or by pressing the Surround Mode Selector t on the remote until DOLBY DIG appears in the Main Information Display U. 9. Press the Delay Button & on the remote or front panel. The words S DELAY TIME appear in the Main Information Display U. 10.
Remote Control Functions The JBL Cinema ProPack 600II is equipped with a powerful remote control that will control the functions of not only the DCR600II receiver and DVD600II DVD changer, but also most popular brands of audio and video equipment, including CD players, cassette decks, TV sets, cable boxes, VCRs, satellite receivers and other home theater equipment.
Remote Control Functions Programming Macros Macros enable you to easily repeat frequently used combinations of commands with the press of a single button on the remote control. Once programmed, a macro will send out up to 19 different remote codes in a predetermined sequential order, enabling you to automate the process of turning on your system, changing devices, or other common tasks.
Remote Control Functions • Press the MAIN Selector h. • Press the Mute Button c to store the DCR600II’s Power On command. • Press the TV Input Selector Button o to indicate the next command is for “TV Power On.” • Press the Mute Button c to store the TV Power On command. • Press the VID 3 Input Selector Button n to indicate the next command is for “Cable Power On.” • Press the Mute Button c to store the Cable Power On command.
Remote Control Functions Channel Control Punch-Through The remote may be programmed to operate so that the channel control function for either the TV, cable or satellite receiver used in your system may be used in conjunction with one of the other devices controlled by the remote. For example, while using and controlling the VCR, you may wish to change channels on a cable box or satellite receiver without having to change the device selected by the DCR600II or the remote.
Configuring the DVD600 II DVD Changer DVD Compatibility & Terminology The DVD600II is more than a DVD player; it will play the following disc formats: • Both 5-inch (12cm) and 3-inch (8cm) discs • CD audio discs • DTS audio discs • CD-R audio discs • CD-RW audio discs • DVD movie discs • VCD (video CD) discs • MP3 audio discs However, it will NOT play the following: • DVD discs with a Region Code other than the one for which the player is set • DVD discs with PAL format video • DVD-Audio discs • DVD-ROM dat
Configuring the DVD600II DVD Changer only one title, but some may have more than one, to give you a “Double Feature” presentation or to include special presentations that take you “behind the scenes” of the main feature. Press the Title button to see a listing of the titles on a disc. When a disc has only one title, pressing the Title button may show a list of the chapters. The DVD600II is turned on in two steps.
Configuring the DVD600II DVD Changer Note that when a default subtitle language is selected, it will be used whenever that language is present on the DVD disc being played. However, when that language is not present, the language used will be the one preprogrammed into the disc itself. (Again, typically that default will be English for discs sold in Region 1, but the selection will vary at the discretion of each disc’s producer.
Configuring the DVD600II DVD Changer the ¤ Button until the Password option is highlighted (Figure 7). As the system is locked, you will first be asked to enter the password previously set. Enter that password using the – Numeric Keys and then press the Enter Button . Figure 7 To enter a password, you may either enter the four-digit number directly, using the Numeric Keys – , or you may use the ⁄ / ¤ Buttons y to select the number for a position, and then press the › Button to move to the next position.
Configuring the DVD600II DVD Changer Once the new password has been entered, the system remains locked with the new password in effect. Press the ‹ Button ` to return to the main menu. If you have no other changes to make after setting this default, press the Menu Button z to remove the Setup Menu from the screen, or press the Play/Pause Button to begin or resume playback.
Configuring the DVD600II DVD Changer • On: Select this option to turn on the Dynamic Range compression circuitry so that the dialogue will remain clear even at low volume levels. Although the DVD600II will play all of these disc types, this setting creates a default that tells which way to present the soundtracks when there is a choice.
Operating the DCR600 II Receiver Surround Mode Chart MODE FEATURES DELAY TIME RANGE Dolby Digital Available only with digital input sources encoded with Dolby Digital data. It provides up to five separate main audio channels and a special dedicated Low-Frequency Effects channel. Center: 0 ms – 5 ms Initial Setting = 0 ms Surround: 0 ms – 15 ms Initial Setting = 0 ms DTS Available only with digital input sources encoded with DTS data.
Operating the DCR600II Receiver Selecting a Surround Mode One of the most important features of the DCR600II is its ability to reproduce a full multichannel, surround sound field from digital sources, analog matrix surround-encoded programs and standard stereo programs. In all, a total of thirteen listening modes are available on the DCR600II. Selection of a surround mode is based on personal taste, as well as the type of program source material being used.
Operating the DCR600II Receiver When the digital source is playing, the DCR600II will automatically detect whether it is a multichannel Dolby Digital or DTS source, or a conventional PCM signal, which is the standard output from CD players. A Bitstream Indicator A will light in the Main Information Display ( to confirm that the digital signal is Dolby Digital, DTS or PCM. present, all modes except Dolby Digital and DTS are available.
Operating the DCR600II Receiver 5. When a Dolby Digital or DTS source is playing, it is not possible to make an analog recording using the Tape ¶ and Video 1 Record Outputs ›fi. However, the digital signals will be passed through to the Digital Audio Output ¡. PCM Audio Playback PCM (Pulse Code Modulation) is the noncompressed digital audio system used for compact discs and laser discs.
Operating the DVD600II DVD Changer Loading Discs To load discs in the DVD600II, first make certain that the unit is turned on by pressing the Main Power Switch so that it latches, and then the System Power Control or the f or Play/Pause Open/Close Button Button . The Status Indicator turns green. Next, if needed, press the Open/Close Button f until the Disc Tray opens. Holding the discs by the edge, gently place each one into one of the compartment slots in the drawer.
Operating the DVD600II DVD Changer • Turn the unit on by pressing the System Power Control , if it has not already been engaged. If there are already discs loaded in the unit, the last disc to be played will automatically begin playing. • If the disc was stopped using the Resume function, (by pressing the Stop Button once) playback will begin from the point where it was stopped. If the disc was stopped by pressing the Stop Button twice, the disc will begin playing from its beginning.
Operating the DVD600II DVD Changer • On some discs, when you select the DVD menu during the playback of a movie, the disc will return to the point in the program where the menu was selected by offering a “Play Movie” option. Press the Enter Button or Play/Pause Button to resume play. However, not all discs offer this feature, and selecting the menu while playing a movie may mean that you will either have to go back to the beginning of the program or the start of a chapter.
Operating the DVD600II DVD Changer will be replaced with two dashes (– –). 5. Using the Numeric Keys – , enter the number of the chapter to be accessed. 6. The desired chapter will automatically be started. You may also simply enter the chapter number while the disc is playing to skip to that chapter. Changing Languages (Audio) DVD discs may contain a variety of audio tracks, including foreign languages, special commentaries, descriptive video for the sight-impaired, and various digital formats.
Operating the DVD600II DVD Changer 2. Press the ‹ / › Buttons ` until the camera icon with the letters “Ang” below it (fifth from the left) is highlighted in white between yellow brackets. Disc Type: Shows the type of disc being played. 3. Press the Enter Button Time Indicator: The time indication selected is shown. . 4. Note that the main Menu Bar will be replaced with a single display of the angle number (Figure 21). Figure 21 5. Press the Enter Button until the desired angle is shown.
Operating the DVD600II DVD Changer MP3 Disc Playback When the DVD600II reads a disc and recognizes it as an MP3 disc, no Disc Type Indicator will light; however, a listing of all the directories and tracks on the disc will appear on the video screen. (Figure 23). Note that the right side of the screen will initially be blank, as that is used for programming playlists for MP3 playback.
Operating the DVD600II DVD Changer There are two versions of the VCD format: an early version which is simply called “VCD” and a later version with Playback Control which is called “Version 2.0” or “PBC”. The DVD600II is compatible with both forms of VCD, although playback will vary according to which version is used and the specific way in which the disc was created.
Operating the DVD600 II DVD Changer Programmed Play The DVD600II is equipped with a wide range of programmed play functions that enable you to have the unit select or repeat tracks for you, or you may program a specific order for discs and tracks to play. Random Play The Random Play function will play all of the tracks on a CD or chapters on a DVD in a random order, as selected by the DVD600II. Once the disc has played all of the tracks, it will stop.
Operating the DVD600II DVD Changer 5. The third box will now be highlighted to indicate that a selection for chapter should be made. This choice is available only for DVD discs, as CD discs do not have chapter capability. The number in parentheses under the box shows the maximum number of chapters on the disc. If “999” appears, it indicates that the disc selected has not yet been played and the unit does not yet know the type of disc and how many titles or tracks are available.
Operating the DVD600 II DVD Changer DVD Language Codes The availability of specific languages for the main audio track or subtitles is dependent on the choices made by a disc’s producer. You should always consult the disc’s jacket for information on languages for any disc. In the case of some languages, you may be required to enter a code from the list below to access that language. See pages 47 and 48 for more information on entering language codes.
Troubleshooting Processor Reset In the rare case where the receiver’s operation or the displays seem abnormal, the cause may involve the erratic operation of the system’s memory or microprocessor. To correct this problem, first unplug the unit from the AC wall outlet and wait at least three minutes. After the pause, reconnect the AC power cord and check the unit’s operation. If the system still malfunctions, a system reset may clear the problem.
Troubleshooting No sound from one speaker • No audio signal is being transmitted to the speakers • Check all wires and connections between the DCR600II and speakers. Make sure all wires are connected. Make sure none of the speaker wires are frayed, cut or punctured. • In Dolby Digital or DTS modes, make sure that the DCR600II is configured so that the speaker in question is enabled. No sound from surround or center speakers • Incorrect surround mode • Select a mode other than Stereo.
Troubleshooting Disc does not play • Disc loaded improperly • Incorrect disc type • Invalid Region Code • Rating is above parental preset • Wrong source for CD was selected • Load disc label-side up. • Check to see that disc is CD, CD-R, CD-RW, DVD-Movie, MP3 or Video CD; other types will not play. • Use Region 1 disc only. • Enter password to override or change rating settings. • If you are playing a CD in the DVD600II, you must select the DVD source on the DCR600II, not the CD source.
Technical Specifications DCR600II Audio Section Two-Channel Stereo Mode 100W per channel continuous RMS power into 8 ohms at 0.08% THD, 80Hz to 20kHz Five-Channel Cinema Mode 100W per channel dynamic RMS power into 8 ohms at 0.08% THD, 80Hz to 20kHz (Plus 100W into 8 ohms at 0.
Technical Specifications DVD600II Playback Media: 5-inch (12cm) or 3-inch (8cm) DVD-Video: Region 1, single or dual sides/layers, linear PCM, Dolby Digital or DTS CD, CD-R, CD-RW: Linear PCM Audio MP3 Video CD (VCD): MPEG-1 Video, Linear PCM Audio Video Section: Signal format: NTSC Composite Output: 1V p-p/75 ohms, sync, negative polarity S Output: Y/Luminance: 1V p-p/75 ohms, sync, negative polarity C/Chrominance: 0.286V p-p Component Outputs: Y: 1V p-p/75 ohms, sync, negative polarity Pr: 0.
Technical Specifications SCS135P Overall Frequency Response: 35Hz – 20kHz (–6dB) Satellites Configuration: 2-Way, video-shielded Recommended Amplification: Use with DCR600II only Impedance: 8 Ohms nominal Sensitivity: 86dB @ 1 watt/1 meter Tweeter: One 1/2" titanium-laminate dome Midrange: One 3" cone Unit Dimensions: Width: 3.19 inches (81mm) Height: 4.38 inches (111mm) Depth: 3.75 inches (95mm) Unit Weight: 1.1 lb (0.
Technical Specifications Cinema ProPack 600 II System General Power Requirement: AC 120V 60Hz Contents: DCR600II, DVD600II, Programmable Master Remote Control, SCS135P speaker system, basic hookup wiring Carton Dimensions: Width: 36-5/8 inches (930mm) Height: 17-5/8 inches (448mm) Depth: 22-1/8 inches (562mm) Shipping Weight: 82.7 lb (37.6kg) All features and specifications are subject to change without notice.