® ENGLISH TM ESC 360 Simple setup guide Thank you for choosing JBL. For over 55 years, JBL has been involved in every aspect of music and film recording and reproduction, from live performances to monitoring the recordings you play in your home, car or office. We’re confident that the JBL system you have chosen will provide every note of enjoyment that you expected – and that when you think about purchasing additional audio equipment for your home, car or office, you will once again choose JBL.
ENGLISH CAUTI ON RISK OF ELECTRIC SHOCK DO NOT OPEN CAUTION: TO REDUCE THE RISK OF ELECTRIC SHOCK, DO NOT REMOVE COVER (OR BACK). NO USER-SERVICEABLE PARTS INSIDE. REFER SERVICING TO QUALIFIED SERVICE PERSONNEL. The lightning flash with arrowhead symbol, within an equalateral triangle, is intended to alert the user to the presence of uninsulated “dangerous voltage” within the product’s enclosure that may be of sufficient magnitude to constitute a risk of electric shock to persons.
Automatic On/Off and Automatic Digital-Input Selection The ESC 360 offers two unique user-convenience features: Automatic Turn-On/Shut-Down and Automatic Digital-Input Selection. The Automatic Turn-On feature will turn the ESC 360 on as soon as a source connected to its digital inputs (such as DVD, CD player with digital output, or any other device featuring a coaxial or optical digital output) is switched on, or as soon as the unit connected to its last-used analog input starts outputting sound.
ENGLISH Included “Smart” powered subwoofer/controller. 4 satellites and a center channel loudspeaker. Wall-mount brackets. Power Foot for horizontal placement of center speaker. Versatile remote sensor and doublesided tape provided. Volume Mute Late Night Input 0 dB Test Delay Level Adjustment + – Bass + – Treble – + Surround Mode JBL ”error-free“ speaker cables. Remote control. Digital coax input cable and analog RCA input cable. • Automatic Turn-On and TurnOff.
• JBL “error-free” speaker cables simplify connection and eliminate possibility of out-of-phase wiring. • Center foot for horizontal placement of the center channel. such as a DVD player. The result is clear and accurate digital sound to each speaker, along with availability of stereo-surround effects (Dolby Pro Logic features mono surrounds). features a “5.1-Ch” indicator that illuminates when a Dolby Digital 5.1-channel encoded signal is present.
ENGLISH one. Speaker Placement Satellites Subwoofer 0-2 ft. Mounting Remote Sensor to Center Speaker. Center speaker. Place remote sensor at bottom of center speaker. Insert support leg through remote sensor and into speaker. The remote sensor may be placed anywhere using the supplied double-sided tape. Surround Speakers 5 – 6 ft. Mounting Options Front and Surrounds Speakers On shelves. On the wall. On optional stand, FS 300 S.
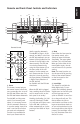
(rear panel of subwoofer) Center Digital Source A DVD or CD Digital Output COAXIAL Right Front Left Front Digital Source B DVD or CD Digital Output OPTICAL TV Audio Output Right Remote Sensor Left AUX (Additional Audio Source) Audio Output Right Left Left Surround Right Surround Speaker and Amplifier Connection Dashed lines indicate that wire is not included -7- ENGLISH two.
Remote-Control-Battery Installation. + + + ENGLISH three. Operation Push small tab towards battery slot and pull battery drawer out. Remove old battery. Rear-Panel Control Master On/Off Switch To operate unit, place this switch in the On/Standby position. The system will go into standby when no signal has been received and when no unit connected to any of its two digital inputs has been on for approximately five minutes.
ENGLISH Remote and Front-Panel Controls and Indicators 20 23 24 22 19 21 Digital 18 16 15 14 25 26 ProLogic Surround Phantom DIG. OPT DIG. COAX 4 Late Night TV AUX Volume Mute 2 6 Late Night 3 7 9 0 dB Test Delay Level 8 10 Input Adjustment + – 4 11 Bass + – 12 Treble – + 13 Surround Mode 5 1. Power This button, located only on the remote control, allows the user to manually turn on or off the ESC 360.
ENGLISH 4. Input This control is available on both the front panel and the remote control. It allows manual selection when the user repeatedly presses and releases the button for any of the ESC 360’s four inputs. The ESC 360 features an Automatic Digital Input Selection feature that automatically switches the ESC 360 to the source connected to one of its two digital inputs as soon as that device is powered on.
. Adjustment These buttons are used in conjunction with Test (8), Delay (9), and Level (10) to increase or decrease a setting. 12. Bass Press (+) to increase the level of low-frequency information. Press (–) to decrease the level of low-frequency information. 13. Treble Press (+) to increase the level of high-frequency information. Press (–) to decrease the level of high-frequency information. 27.
ENGLISH Status-Bar Indicators LED Bar Indicators illuminate in response to adjustments in volume, delay, level, bass and treble controls.
Surround Use this mode for films recorded using DTS, Dolby Digital or Dolby Pro Logic Surround. Phantom This mode creates surround sound from stereo recordings. The center channel is not used and the surround channels have a 20-ms delay. ENGLISH Surround Modes 3-Stereo Mode Use this mode to play back Pro Logic-encoded films when you do not want the surround channels to play. Stereo This mode plays a recording in traditional two-channel stereo.
ENGLISH Troubleshooting If there is no sound from any of the speakers: • Make sure the subwoofer is plugged into an active AC wall outlet. • Make sure the Master Power Switch, located on the rear of the subwoofer, is in the On/Standby position. • Make sure there is a source – for example, a DVD Player, CD Player, VCR or television – hooked up to one of the four input jacks. • Make sure that the program material is playing. • Recheck the hookup connections, referring to the Speaker Connections section.