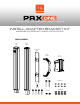
JBL A.I.M.
PRX ONE-Install Adapter Bracket Kit Assembly & Bracket Installation Guide – Page 2 WALL SURFACE MOUNTING Note that the BRACKET ASSEMBLY consists of an ARRAY BRACKET and a WALL BRACKET. 1) RUN WIRING -- Run the wiring from the power amplifier to the location desired for mounting the JBL PRX ONE Array speaker system. 2) ATTACH WALL BRACKET TO WALL - Using a level to ensure that the WALL BRACKET is straight, secure the WALL BRACKET to the wall.
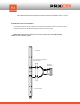
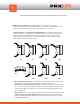
PRX ONE-Install Adapter Bracket Kit Assembly & Bracket Installation Guide – Page 3 3) ORIENTING TOP & BOTTOM ARRAY This drawing shows the proper orientation of the two speaker modules, where the connection plate attaches and where the wall bracket attaches (onto the connection plate). IMPORTANT: Note that the speaker will not work correctly if the TOP AND BOTTOM ARRAY are not oriented as shown.
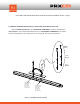
PRX ONE-Install Adapter Bracket Kit Assembly & Bracket Installation Guide – Page 4 4) CONNECT SPEAKER MODULES (Array) TOGETHER VIA CONNECTION PLATE Attach CONNECTION PLATE to the TOP AND BOTTOM ARRAY, as shown together Attach Array Bracket to the 4 indicated threaded points on the TOP AND BOTTOM ARRAY 's rear cabinet, using the included M6-27L (6 mm diameter, 27 mm long) bolts, with lock and flat washers.
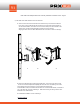
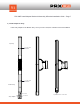
PRX ONE-Install Adapter Bracket Kit Assembly & Bracket Installation Guide – Page 5 6) SLIDE ARRAY WITH ARRAY BRACKET ONTO WALL BRACKET 1 Once the wall mount has been attached to the wall and Array mount has been attached to the Array, loosely install the M6-L36 PIVOT BOLT (bolt, lock washer and flat washer on one side and flat washer, lock washer & nut on the other side) of the WALL BRACKET.
PRX ONE-Install Adapter Bracket Kit Assembly & Bracket Installation Guide – Page 6 7) MORE ABOUT TILT ANGLES -- The bracket allows for +/-15 degrees of up or down tilt. Because of the height of the speaker(2Arrays+1Adapter), make sure there are no bulges on the wall as the end of the speaker may hit them at any angle within the -15° to +15° area. PRE- SET ANGLES and CONTINUOUSLY VARIABLE ANGLE -- The bracket has through holes for mounting angles of +/- 15 degrees in 5 degree increments.
PRX ONE-Install Adapter Bracket kit Assembly & Bracket Installation Guide – Page 7 8) Install Adapter to Array Insert Array adapter to the Bottom array.
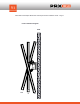
PRX ONE-Install Adapter Bracket Kit Assembly & Bracket Installation Guide – Page 8 Final installation diagram Wall +15° 0° -15°