
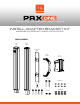
Install Guide

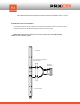
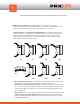

7) MORE ABOUT TILT ANGLES --
The bracket allows for +/-15 degrees of up or down tilt.
Because of the height of the speaker(2Arrays+1Adapter), make sure there are no bulges on the wall
as the end of the speaker may hit them at any angle within the -15° to +15° area.
PRE- SET ANGLES
and
CONTINUOUSLY VARIABLE ANGLE
-- The bracket has through holes
for mounting angles of +/- 15 degrees in 5 degree increments. There is also a slot above the set of
holes for continuously variable adjustment. The pre-set angles are recommended for accurate
aiming in 5 degree increments and the slot for any angle between 5 degree increments. Either
can be utilized for setting the speaker’s tilt angle.
PRX ONE-Install Adapter Bracket Kit Assembly & Bracket Installation Guide – Page 6
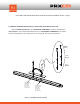
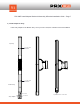
8) SET THE SWIVEL (PAN) ANGLE
– Loosen the top and bottom bolts on the pivot. Adjust the
side-
to-side swivel (ie, pan) aiming angle of the speaker. Tighten the bolts securely.
Maximum Swivel Angles before Wall Interference
– The bracket swivels a full 90 degrees from
side-to-side. However, when mounting the PRX ONE onto a wall, the side-to-side swivel is
limited
by the end of the speaker encountering the wall. The maximum swivel angle depends on
the up/
down tilt angle setting.
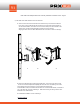
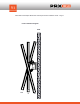
9)
SAFETY CABLE
- Attach a safety cable (not included) to any of the 6 mm inserts on the back of
the
PRX ONE - INSTALL ADAPTER BRACKET KIT
cabinet using one of the extra included M6*L9
bolts or via an M6 forged shoulder steel eyebolt. Attach the other end of the cable to a secondary
attachment point on the wall.
0°
-5°
-10°
-15°
+5°
+10°
+15°