
Owner's Manual
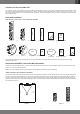
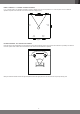
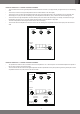
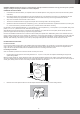
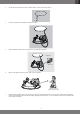

Table Of Contents
- THANK YOU FOR CHOOSING JBL®
- PACKAGE CONTENTS
- SPEAKER PLACEMENT FOR IN-CEILING AND IN-WALL
- IN-WALL SPEAKER - LEFT AND RIGHT PLACEMENT
- IN-WALL SPEAKER - CENTER CHANNEL PLACEMENT
- IN-WALL SPEAKER - SURROUND PLACEMENT
- IN-WALL SPEAKEAR - 5.1-CHANNEL SYSTEMS PLACEMENT
- IN-WALL SPEAKEAR - 7.1-CHANNEL SYSTEMS PLACEMENT
- IN-CEILING SPEAKER - LEFT AND RIGHT PLACEMENT
- IN-CEILING SPEAKEAR - 5.1-CHANNEL SYSTEMS PLACEMENT
- IN-CEILING SPEAKEAR - 7.1-CHANNEL SYSTEMS PLACEMENT
- IN-CEILING INSTALLATION GUIDE
- PAINTING THE GRILLE
- BOUNDARY COMPENSATION CONTROL
- SPECIFICATIONS
- MERCI D'AVOIR CHOISI JBL®
- CONTENU DE L’EMBALLAGE
- POSITIONNEMENT DES ENCEINTES DANS UN PLAFOND ET DANS UN MUR
- ENCEINTE ENCASTRÉE - POSITIONNEMENTS GAUCHE ET DROIT
- ENCEINTE ENCASTRÉE - POSITIONNEMENT DU CANAL CENTRAL
- ENCEINTE ENCASTRÉE - POSITIONNEMENT DU SURROUND
- ENCEINTE ENCASTRÉE - POSITIONNEMENT DU SYSTÈME POUR 5.1 CANAUX
- ENCEINTE ENCASTRÉE - POSITIONNEMENT DU SYSTÈME POUR 7.1 CANAUX
- ENCEINTE EN PLAFOND - POSITIONNEMENTS GAUCHE ET DROIT
- ENCEINTE EN PLAFOND - POSITIONNEMENT DU SYSTÈME POUR 5.1 CANAUX
- ENCEINTE EN PLAFOND - POSITIONNEMENT DU SYSTÈME POUR 7.1 CANAUX
- GUIDE D’INSTALLATION EN PLAFOND
- PEINTURE DE LA GRILLE
- COMMANDE DE COMPENSATION DE BORD
- CARACTÉRISTIQUES TECHNIQUES
- VIELEN DANK FÜR DEN KAUF EINES JBL®-PRODUKTS!
- LIEFERUMFANG
- LAUTSPRECHERPOSITIONIERUNG FÜR DECKEN- UND WANDEINBAU
- WANDEINBAU-LAUTSPRECHER -–LINKE UND RECHTE POSITIONIERUNG
- WANDEINBAU-LAUTSPRECHER – POSITIONIERUNG DES CENTER-KANALS
- WANDEINBAU-LAUTSPRECHER – SURROUND-POSITIONIERUNG
- UNTERPUTZ-LAUTSPRECHER – POSITIONIERUNG VON 5.1-KANAL-SYSTEMEN
- UNTERPUTZ-LAUTSPRECHER – POSITIONIERUNG VON 7.1-KANAL-SYSTEMEN
- DECKENEINBAULAUTSPRECHER – POSITIONIERUNG LINKS UND RECHTS
- DECKENEINBAU-LAUTSPRECHER – POSITIONIERUNG VON 5.1-KANAL-SYSTEMEN
- DECKENEINBAU-LAUTSPRECHER – POSITIONIERUNG VON 7.1-KANAL-SYSTEMEN
- DECKENEINBAUANLEITUNG
- ANSTRICH DES GITTERS
- BOUNDARY-COMPENSATION-STEUERUNG
- TECHNISCHE DATEN
- MUITO OBRIGADO POR ESCOLHER A JBL®
- CONTEÚDO DA EMBALAGEM
- POSICIONAMENTO DA CAIXA DE SOM NO TETO E NA PAREDE
- CAIXA DE SOM DE PAREDE - POSICIONAMENTO COM DUAS CAIXAS (ESQUERDA E DIRETA)
- CAIXAS DE SOM DE PAREDE - POSICIONAMENTO DO CANAL CENTRAL
- CAIXAS DE SOM DE PAREDE - POSICIONAMENTO SURROUND
- CAIXA DE SOM DE PAREDE - POSICIONAMENTO DE SISTEMA DE 5.1 CANAIS
- CAIXA DE SOM DE PAREDE - POSICIONAMENTO DE SISTEMA DE 7.1 CANAIS
- CAIXA DE SOM DE TETO - POSICIONAMENTO COM DUAS CAIXAS (ESQUERDA E DIRETA)
- CAIXA DE SOM DE TETO - POSICIONAMENTO DE SISTEMA DE 5.1 CANAIS
- CAIXA DE SOM DE TETO - POSICIONAMENTO DE SISTEMA DE 7.1 CANAIS
- INSTRUÇÕES PARA INSTALAÇÃO NO TETO
- PINTURA DA GRADE
- CHAVE DE COMPENSAÇÃO DE PROXIMIDADE
- INFORMAÇÕES TÉCNICAS
- БЛАГОДАРИМ ВАС ЗА ВЫБОР ПРОДУКЦИИ JBL®
- КОМПЛЕКТАЦИЯ
- УСТАНОВКА АКУСТИЧЕСКИХ СИСТЕМ В ПОТОЛКЕ И В СТЕНЕ
- НАСТЕННАЯ АКУСТИЧЕСКАЯ СИСТЕМА: РАЗМЕЩЕНИЕ ЛЕВОЙ И ПРАВОЙ КОЛОНКИ
- РАЗМЕЩЕНИЕ АКУСТИЧЕСКИЙ СИСТЕМЫ ЦЕНТРАЛЬНОГО КАНАЛА
- АКУСТИЧЕСКАЯ СИСТЕМА ДЛЯ МОНТАЖА В СТЕНУ: РАЗМЕЩЕНИЕ КОЛОНОК ОБЪЕМНОГО ЗВУЧАНИЯ
- РАЗМЕЩЕНИЕ 5.1-КАНАЛЬНЫХ СИСТЕМ
- РАЗМЕЩЕНИЕ 7.1-КАНАЛЬНЫХ СИСТЕМ
- АКУСТИЧЕСКАЯ СИСТЕМА ДЛЯ МОНТАЖА В ПОТОЛОК: РАЗМЕЩЕНИЕ АКУСТИЧЕСКИХ СИСТЕМ ЛЕВОГО И ПРАВОГО КАНАЛОВ
- ПОТОЛОЧНАЯ АКУСТИЧЕСКАЯ СИСТЕМА: РАЗМЕЩЕНИЕ 5.1-КАНАЛЬНЫХ СИСТЕМ
- ПОТОЛОЧНАЯ АКУСТИЧЕСКАЯ СИСТЕМА: РАЗМЕЩЕНИЕ 7.1-КАНАЛЬНЫХ СИСТЕМ
- РУКОВОДСТВО ПО МОНТАЖУ В ПОТОЛКЕ
- ПОКРАСКА ЗАЩИТНОЙ РЕШЕТКИ
- НАСТРОЙКА ГРАНИЧНОЙ КОМПЕНСАЦИИ
- Технические характеристики
- 感谢您选择 JBL®
- 包装内容
- 扬声器吸顶式及入墙式摆放
- 规格
- JBL®을 선택해 주셔서 감사합니다
- 패키지 구성품
- 천장 설치형 및 벽 설치형 스피커 배치
- 사양

English
10
IMPORTANT: Always use low-torque settings. NEVER over-tighten the clamp screws.
Speaker Clamps Inside
Mounting Cut-Out
Insert Speaker Straight Into
Mounting Cut-Out
Tighten Clamping Screws
8. Attach the supplied round or square grille. Powerful magnets in the speaker frame will securely hold the grille in place.
Attach Supplied Grille
PAINTING THE GRILLE
JBL Synthesis architectural loudspeaker grilles can be painted to match any decor. If you wish to change the grille's color, its satin nish will function
as a primer coat. For the best results follow this procedure:
1. Gently remove the scrim cloth from the back side of the grille before painting.
2. Use a high-quality spray paint and apply a thin coat of color. Ensure that the grille perforations remain free of paint. Filling them with paint will
diminish the speaker's sound quality. If any perforations are plugged, use compressed air to blow the paint out of the perforations.
Note: If you nd any grille perforations that are plugged with paint after the paint has dried, carefully use a straight pin or sewing
needle to remove the paint.
3. We have included round and/or rectangular replacement scrim cloths. After the paint has dried, apply a light coat of spray adhesive to the
inside of the perforated grille and attach a new scrim cloth. IMPORTANT: Never spray adhesive on the cloth. The scrim cloth on model SCL-5
or SCL-8 has pre-attached foam pads that help prevent the square grille from vibrating against the ceiling.
BOUNDARY COMPENSATION CONTROL
The Boundary Compensation control reduces the speaker's bass output level to compensate for the greater reection of bass energy when the
speaker is placed near a wall.
When possible, avoid mounting the speaker within 2 ft (0.6m) of a wall. If such placement is unavoidable, set the Boundary Compensation control to
the "NEAR" position.